Sunday, 22 May 2022

New Look 6233, Dressing Gown


I'm a firm believer that every problem has a fun solution if you think about it hard enough. I think we can all agree one of the problems uniting us right now is the price it costs to heat our homes (did I mention I'd bought a house idk). If you've been keeping up with me on insta or have had the pleasure of spending time with me in the real world, you will also know that I suffer from terrible circulation, and at the first sign of a temperature drop my hands start to throb and turn a red/white/grey colour. 

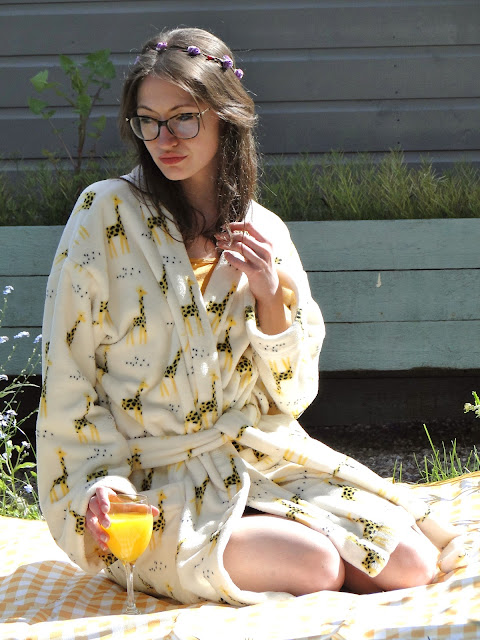
My solution was to make a snuggly dressing gown that would hopefully stop me reaching to turn the thermostat up when I'm pottering around the my house. After seeing @CrafternoonTeas' super lovely New Look 6233 gown I knew this was exactly what I needed. It is made up from 2 fronts, a back, a straight neck band, two pockets and a tie for the waist, so there's no crazy shaping or fiddling about with collars with this one.


I do like things a little bit unusual, and initially was worried about how I was going to make my dressing gown fit this criteria. When I found this super soft giraffe fleece on the Minerva website though, I knew I'd hit the nail on the head. What is more unusual than a giraffe?! I can't get my head round it that they are not completely mythical. How do they even stay upright?! 

Even when using a relatively easy pattern, sewing with fleece poses it's own unique challenges. Be prepared for FLUFF. Lots and lots of fluff. Just cutting out your pieces will create so much shedding, so be prepared and have the vacuum cleaner close at hand. This excess fluff in the seam allowances also poses as a potential issue if you don't manage it properly. Particularly where the seams meet, you run the risk of really bulky seam allowances, so my top tip would be to always grade the seam allowances and carefully trim the pile away from the fabric here. 

The pile of the fabric also makes it tricky to get a neat edge stitch - I found this when top stitching the pockets. It's hard to see exactly where the fabric is, so if you're not careful it's easy to miss the edge completely and just catch the fluff! Or, I also found - you think you've done a really straight line but when the fluff settles you find it comes out a bit wobbly! 

Luckily one of the benefits of having such a pile to the fabric means that with some gentle brushing around your topstitching you can hide, or at least partially camoflague your stitches underneath it all. 

Irritatingly, attaching the pockets is the first step to making the dressing gown. I think if I'd done a few more practice runs I would have had a neater edge stitch to attach them. I would recommend doing a practice pocket on some scraps! Another thing to consider is that due to all the fluff, this fleece didn't seem to respond to pressing! So it was hard to get a clean, pressed edge to follow in the first place. 

The only way I found to overcome the bulky and sometimes downright bouncey turn under when stitching the sleeve and bottom hem was to overlock the edge before turning it under. this sort of surpresses all the fibres and also creates a neat line to follow as you turn it under. I really love the chunky 2 inch hems on this garment. I used about 10000 pins and stitched it down from the top using a twin needle, both for the aesthetics of a double line of stitching and to ensure the edge on the underside was caught. 

I took care cutting the front/neck band as I was eager not to have any upsideown giraffes and also didn't want to cut anyone in half. I think I did pretty well in lining up the sitchline down the giraffe noses for the left side and lining it up with their back legs for the right side. This kind of manoeuvre is always tricky when your fabric is directional or has a one way nap. Success though! No upsidedown safari animals and not one ended up sniffing another's bum ! 

I took 4 inches off the bottom of the gown in attempt to make it a little sexier (what man doesn't need a sexy giraffe in their life?) and I cut the tie on the crossgrain instead of the straight grain so the print was horizontal. 

I'm really pleased with my make! Its so snuggly which was my main aim, and the yellow in the fabric goes well with my interior decor! 

What fun animals have you been adorning your garments with this season? 


x

Location: Hands Rd
Currently listening to: Must Be a Dream, Tempesst

Friday, 13 May 2022

So Zo... Strappy Vest Top


I'd got one last day of annual leave, the weather outside was BEAUTIFUL, my new neighbour leant me a deck chair. My mum took me shoe shopping, I'd got a LOT of blogging to catch up on. But DAMN I just wanted to sew. If you've been following me a while you'll know I've use So Zo' s FREEE knicker pattern multiple times, but what I have naively overlooked is the FREE VEST PATTERN also included on Zoe's blog .

This pattern is the very definition of quick win. It's 2 pattern pieces, it's like 5 seams, it uses less than a meter of fabric. It's super easy to fit (I cut a size 8 and didn't have to make any alterations yay). The only special skill you'll need in your arsenal is the ability to attach elastic. If you've never tried though, in the instructions for the pattern Zoe explains two differnt methods for attaching the elastic. I had never tried fold over elastic (FOE) before, but did have some in my stash. I decided not to use a lace trim as I thought it would run the risk of looking a bit too underwear-y.


My tip for attaching FOE would be to do a basting seam from the right side of the garment, following the centre line of the elastic and stretching it gentley around the curves. Then flip the top of the trim over the basting seam and zig zag close to the edge. Pull out your basting stitches and you're good to go!


I toyed with the idea of attching sliders to the straps but something about the faff of that definitely didn't suggest quick win. Besides, if I made sure I made the straps the right length in the first place I wouldn't have to use sliders would I? The straps ended up being 28cm in length (this of course might be different next time depending on the stretch % of my elastic), and were placed on the back piece,11cm in from the side seams. If you leave yourself just over 30cm to make the strap from before you stitch down the trim to the front piece then you should be golden! You can tweak the length from here but shouldn't end up with too much wastage.

The hem on the pattern piece is 2cm wide. I didn't overlock the raw edge for fear of streching it out- instead I loaded up the twin needle and hemmed close to the edge. You have to do this from the right side for the stiching to be the right way round, so good pin placement is key here. 


I'm so super pleased with the fit! Once I've stocked up on different fold over elastics this pattern will be a total stash buster.


Who else has made one? What cute fabrics did you use? I used some more of this lovely lovely sausage dog print from Minerva. Oh my word, it's so cute. I can't get enough. I want a sausage dog everything!! Shorts or knickers next? 


x

Location: The Pinnacles, Sheffield
Currently Listening to: Bandits, Reverend and The Makers

Sunday, 17 April 2022

Simplicity 8513, Bodysuit


Some patterns just keep on giving. Sometimes the simplest designs can lend themselves to being adapted in a million ways to create something fun and diffrent every time.


Simplicity 8513 is one of those patterns. Once I'd perfected the fit of the body (not too tricky as its a pettern for knits and therefore quite forgivingm - I just had to lengthen the body a little but shorten the chest above the front armhole notch #smallbustproblems), I could make easy design alterations to the neckline and sleeve length to keep from making the same garment over and over again.

This time I was using this very cute sausage dog print kindly gifted to me from Minerva. I pounced the moment I saw it and was SO stoked that no one else had claimed the fabric before me. It has the perfect amount of stretch and recovery - making it great for vests and t-shirts (maybe a matching knicker set....), so naturally I gravitated to this bodysuit pattern that I know and love. The quirkiness of the fabric makes it appealing for children and adults alike  - I can imagine some reallllly sweet baby clothes in this fabric (yep yep, I know, I've essentially made myself a babygrow here). The fabric is available in a few different colour ways. Aside from the monochrome being my go-to, I think this helps stop the print from being tooo Ceebeebies meaning I could get away with making something for me! I've not stuck my romper through the wash yet, but the fabric feels good quality and unlikely to bobble or fade in the wash (we've all been there, spend days or weeks on a project, complete a sassy make, within two wears it's already bobbling where your handbag rubs = heartbreak). 


So how did I change the pattern this time? There are two amendments I made:
Sleeves: I had a vision and I wanted to try something new, I thought tshirt sleeves would look cutest with the fabric - to make them more exciting I did my first ever bit of 'ruching'! This is an easy and effective way of changing up a sleeve, and can also be used to make sleeves look shorter, without actually cutting anything off the hem. 
To Ruche, I first drew a line 1.5 cm away from the raw hem edge (pre-hemmed) towards shoulder point (marked by a dot on the pattern piece). I drew the line about 4 inches long, but this could be loads longer if you want more ruching or have a longer sleeve to play with. I played around with different lengths of 4mm elastic against the line, stretching it out anf letting it ruche between my fingers to get an idea of how the gathers would look. I decided the elastic should be about 6cm long for my desired ruche, but cut 8cm so I had some to hold onto. I stretched the elastic out and stiched along the line I drew. Let go of then end and Ping! You've ruched! 


Second modification was the Neckline. I couldn't decide if I wanted a turtleneck, mock turtleneck or cowl neck, so I cut one of each and pinned them on to test. Having never done one before, I loved the idea of a cowl neck, however the floppiness of it seemed to distract from the neat silhouette I had created. There was somehting a bit more official about a tall neck, an almost formality that challenged the playfulness of the dog print. I think that's one of the things I really enjoyed about this make. The sexy meets cute, feminine but bold, applicable to either situation depending what you style it with. I used the pattern piece included in the pattern but messed around with the height of the neck, making sure I'd got them pooches lined up nicely in the centre.

My fave part of making this is always putting the leg elastic on. I had a quick peek at the sewing marketstall in Sheffield and they finally had some picot elastic in stock! I bought 2 meters and have about 50cm left after going round the legs. My top tip for applying this would always be not to stretch the elastic too much as you sew, as you want the edge to hold on to your body but not squeeze it.


Now, who's for hotdogs?


x
Location: Home Sweet Home
Currently listening to: Club Cougar, Nadine Shah

Sunday, 3 April 2022

Panelled Knickers, 2021


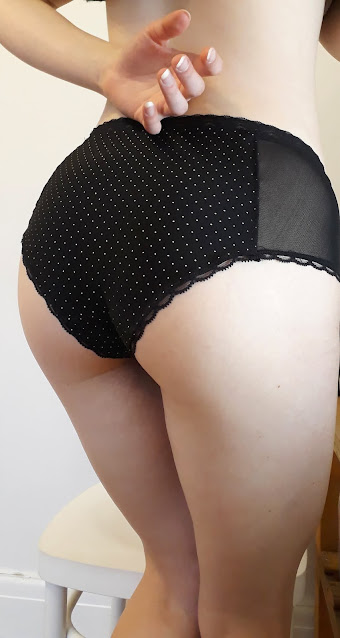
Sewing is an important form of expression for me, much like writing this blog and getting dressed in the morning. Recently I’ve been feeling really good – there’s a lot of really exciting stuff going on right now and knowing that this feeling is unlikely to last forever I have been trying really hard to acknowledge,  embrace and appreciate it. So, naturally, I made some fancy knickers. And then I showed everyone on Instagram. And now I’m showing everyone on Blogger and Minerva too.
Body positivity, but make it accessible, not angry. There’s still a stigma I think, around women who band around the body positivity tag like it’s a protest against something. And I feel the response of the viewer is still commonly one of slight unease and an uncertainty of how to respond. Don’t be a pervert! But also you have to appreciate my body or else you’re closed minded. You’re not allowed to be jealous, but you must be envious. It’s a minefield. My heart felt so big to find that most of the reactions I got on Instagram were from other seamstresses who were both excited about my knicker success and excited about creating their own knicker success. 


I was really inspired by a single shot from @justkatemakes who’s memade bikini post captured the fun and freedom that I feel when making and wearing memade lingerie. Although it’s not my first time using panels to create shape and fabric juxtaposition, I thought there was such a lovely elegance to @justkatemakes ‘s bikini set and I wanted to emulate that. With that in mind I wanted to omit my lumpy sideseams and instead draft a side panel that would join, hidden between the front panel and its lining and then to a back seam in a bum panel shaped to accentuate the small of my back and errrm, the round of my ass.

Its funny isn’t it – there are so many pictures of pants that pop up on my insta feed. On models, off models, handmade, store bought, pattern pieces, how-to’s, how not-tos, lace and elastic and sewing supplies, whole accounts dedicated to making underwear. Yet I post a photoset and part of me still thinks ugh, was that a good idea? Will it some how come back on me? My ex would have slaughtered me, my mom now used to these antics would probably roll a jovial eye and tell me not to get cyber bullied. I note some of my closest female friends avoided hitting the like button, but those that sew and understand the joy of creating were instantly celebratory…. Not that I’m scrutinising, just observing. Even if you’re happy with your body and people seeing it there is still a fear of being perceived as arrogant for not being shy, or arrogant for then writing a blog post about how you’re not shy.

But the way I see it is this. We will not be this young and free and celebratory of our bodies forever, other things will take importance and rightly so. I want to embrace body positivity and sewing and how healthy I feel right now as some kind of bookmark. I don’t want to forget this feeling. 

x

Location: Mama's House
Currently Listening to: Locomotiove, Crystal Pistol

Sunday, 27 March 2022

McCalls M7472, Short Sleeve Shirt


There’s a new lad in our department. When my colleague asked who he was someone said ‘you know, the one with the silk shirts’. I thought it was interesting that someone’s identity could be summed up by their signature shirt and I found myself a little envious – what piece of clothing would colleagues and acquaintances recognise as defining my personality?

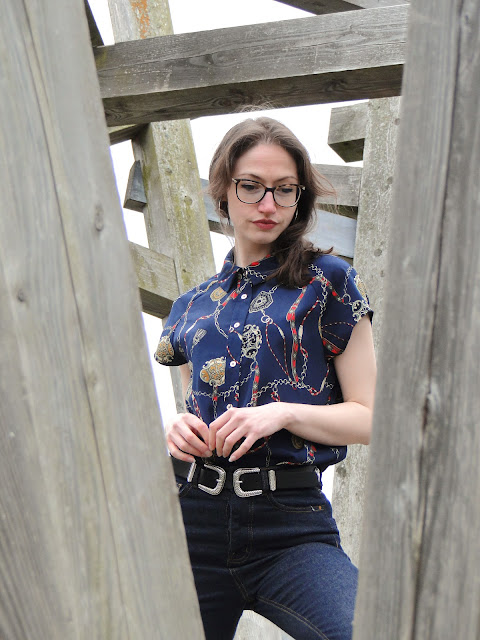
I don’t mean to sound like I ripped him off, but when I saw this silky rodeo print fabric in Abakhan I thought about Nathan and I was sold on the idea of making my own office-friendly silk shirt. Something that would shout class and style without people having to even know my name.

This fabric was an off cut from the stash bins downstairs in Manchester Abakhan. I think there was just over a meter of the fabric left, about 120cm if I remember right which instantly removed the potential for long sleeves. Having only tired Version D of the McCalls M7472 shirt but there being an overwhelming 6 options in the pattern, and after the success of my dotty shirt and doggy shirt I thought it would be a good choice to make the short sleeved version.

I downsized the pattern by tracing off the next size down (10 instead of 12) and obviously substituted the long sleeve pattern piece for the short. I was really excited about the shape of the raglan sleeves and even more excited that they meant no need to faff with pleats of cuffs or buttons! The hem is turned up and eased before the side seams are sewn so they fit really neatly inside the armhole.

Although version B just uses the collar stand and not the collar piece on the pattern packet I decided adding the full collar would help it look a little bit more work friendly, plus I still absolutely adore the squared off collar points on this! I ended up interfacing the lower collar instead of the upper collar when I realised I liked the print on the uninterfaced piece better as it just looked more flowing and consistent with the way the design fell on the rest of the shirt. There was such little fabric to play with when cutting out that I couldn’t really afford for pattern placement to be my number 1 priority.

The fabric behaved so well that for once doing buttonholes didn’t make me burst a blood vessel. I chose quite subtle buttons that sat flat on the button band so were easy to position. I chose gold to compliment the metallic style imagery in the print and to of course add that extra level of regality to my new identity.

The length of the shirt means I can tuck it into my lower slung work trousers, adding a whole new world of getting-dressed options.

But don't be fooled, this shirt has a diversity to it that means I can get away with it when I'm at my desk, when I'm working from home, when I'm out on a date OR when I'm out playing band, and that's exactly why I think this shirt was so successful in describing who I am at just a glance. The chain and buckle print is STRONG, the silky fabric so feminine. What a modern day woman I am.


x

Location: Heeley People's Park
Currently listening to: Marigold, Flamingods