Showing posts with label playsuits. Show all posts

Sunday, 3 August 2025

McCalls M8009, Dress hack


My last few projects have slowly been using up the fabric stash I got for my Birthday this year. The final fabric in the bag was this lovely mini-polka dot crepe. Being a May-child, I was inspired by the sunshine when I found this fabric and recall telling the lady at the counter that I was going to make a summer dress when she asked. 


Fast forward to the middle of September, and I'm wearing said summer dress at my friend's wedding on what was definitely the last day of summer 2024. 


I'm so glad I got chance to wear this this year before the climate becamen unkind to that deep v-neck! I even got to pair this dress with my sunnies for the day which ensured the DJ knew for sure (and woudn't stop telling me) that I was the coolest there. 


The dress pattern relied heavily on the M8009 McCalls play suit pattern, which I have made twice now. My skeleton version if one of my favourite makes ever and I was excited that I wouldn't have to make summer dress toile to know this bodice would fit me well. I made all the same alterations as before, though did find myself needing to take the side seams in more than I did last time which I assume is down to the drape of the fabric. 


I didn't interface the bodice or even the neckline, as rigitity isn't a word that goes hand in hand with languorious summer's day. Don't go thinking I skipped detail though. I understitched, I hand stitched the arm binding, I even added my first lil Made With ❤ woven tag into the back neck. 


The skirt pattern was as simple as using the pattern piece I used for my recent Serena Dress hack. As the skirt is gathered at the waist, I just kept gathering until it fit the waistline of the dress. I left just over 1.5cm un-gathered at the centre back so I could fit the zip without any dramas. 


After assembling, I decided to make the dress a bit shorter so it looked a bit less 50s housewife. I think I took a couple of cm off max, as I know what I'm like once i get snap-happy with the scissors! 


A quick single turned hem allowed the dress to remain floaty and not too heavy in keeping with the summer vibes! 


Currently trying to figure out if I can team this with something long sleeve or some thick tights to get some more wear out of it before next summer! 


Another fab pattern from McCalls! 


x

Location: Tideswell
Currently listening to: Again Again, Lady Gaga

Sunday, 6 April 2025

McCalls 7626, Denim Playsuit


At the end of every blog post I always seem to throw in a "next time I make this, I'm going to do x, y, z..." anyone else notice I hardly ever get round to doing X, Y or Z? Well this time I actually did! The McCalls 7626 playsuit was literally calling out for a denim version to be made. And denim not having to be pattern matched, quick to cut out and easy to buy, making a second M7626 seemed like an easy win. 


I wanted to change the buckles to a pair with a little more interest than the back-packy ones that were in my local haberdashery. I found these lovely tortoiseshell ones (eventually!) in Abakhan Manchester (big thanks to Mark for his eternal fabric shop patience and for getting stuck into the search for notions). They were smaller than the pattern requirements so this meant before I even got started I needed to reshape the straps. The front bits were easy but the actual strap took a bit of maths and logical thinking as they are cut on the fold, and I still wanted the point to be central of course. I thought I'd got it bang on, but those of you with a keen eye will see I managed to be a few mm off somewhere along the line. Oh well, at least they are a symmetrical pair! Again, I interfaced the straps despite the pattern not mentioning the need to do it. I initially thought this was going to make too bulky-a seam inside, but thankfully I talked myself into interfacing at the last moment and that was definitely the right thing to do. 

I also chose to topstich this playsuit for maximum denim-ness. This posed a few issues along the way, the first being that once the lining was inserted and I was ready to top stitch the neckline, I had to stitch through both layers, and not just open out the seam and stitch the denim. I would have been unable to get around the corners where the straps attach without catching the lining. Secondly, I did initially do a double row of top stitching around the top, but as successful as I felt it was going as I stitched, the end result just looked a little wonky and inconsistent. So out it came! 


I tried to be mindful of where I did do double rows of topstitching - I like the way it runs all the way down the side seams. Mistake-free, I could have got away with 2 reels of the golden thread, but a few fuck-ups meant I had to order a third reel for the sake of hemming at the final hour. 


I paid super attention to getting a lovely pair of back pockets assembled. I'm really pleased with how neat they turned out. 


Shape-wise, I kept the same alterations to the pattern as I did for my first one. The denim is a lot more rigid than the linen I used last time, so maybe could have done with a few tweaks here and there to accomodate for this. Its not as comfy as #1, but just like a new pair of jeans I think it just needs wearing in a bit. It was hard to test the fit as I went along, as some seams needed topstitching before sewing the next bit, meaning I'd pretty much already committed by that point right? 


I lined the playsuit with a deep red, slightly iridescent lining fabric... that seemingly did not like high heat iron temperatures! Who knew eh! Yes, that's right, there is a scorch mark in my lining which is very evident if you look inside. Luckily I've no need to show you that and you can just act like I never told you, OK? 


So yep, what was meant to be a breezey, "I've done this before", pattern produced many-a stumbling block along the way. I'm intrigued to know, has anyone ever ever ever made something that has literally gone 100% perfect? Fabric choice, sewing, fit, durability? Cause I swear some days I just see massive glaring errors in every single thing I've ever made. It's all a learning curve tho right? 


What I do like about this one, is how its hip for summer, but can also be teamed with turtlenecks, of which I have many, to suit right through Autmn and Winter.

x
Location: Neepsend
Currently listening to: Blue, The Verve

Sunday, 3 September 2023

McCalls 7626, Playsuit

2023 is proving itself to be the year of the playsuit. After falling hopelessly in love and making two McCalls 8009 playsuits in quick succession, I started eagerly browsing for my next potential playsuit pattern. 
I landed on the McCalls 7626 pattern, with dress, jumpsuit or playsuit variation. I was a little concerned the top could look a bit boxy with its straight neckline and rectangular straps, so knew fitting in the bust area was key to avoid looking oddly angular. 
I made a toile from an old duvet case and made a few subtle tweaks to the pattern. I increased the seam allowance by 1cm (so therefore taking in 2x 2cm) at the underarm and graded back out before the seam hit the waistband. I was concerned that taking in some of the side seam in this area could have made the arm hole too small, so I extended the armhole by a cm at the back and then moved the strap markings over by 1cm too. This seems to do the trick! 
I increased the side seam allowance of the shorts by 1cm at the hips down to the hem. I added this alteration on to the front, back and side panel (/pocket) pieces. 
I added 1.5cm to the top of the inside leg seams (front and back) making the crotch length longer, then graded this down to the hem. This makes the pattern piece more angled instead of being a straight line from crotch to hem. 
Following this, with a bit of trial and error I deepened the crotch curve in the front and back. This can be tricky as the more the curve is deepened, the more you need to clip to allow the curve to actually curve. Of course you don't want to clip too deep during the trial and error stage incase you've over-deepened the curve - then you can't go back! I need a little more guidance on how to not just wing this process and actually apply some alteration wisdom to how deep the curve should be. 
I cut 2.3cm from the bottom hem of the shorts, then hemmed as detailed in the pattern instructions - by turning under a 2.5cm hem and then turning in 6mm from the raw edge. 
In terms of construction, I decided to interface the straps of my playsuit to a) prevent them from stretching out b) help them keep their pointy form and c) add a little more thickness to help them keep their place in the sliders. I was surprised the pattern didn't recommend this. I would 100% do that again. 
I also interfaced the entire back pockets before stitching them. I knew I wanted to have a go at adding some interesting topstitching. I wanted nice crisp lines around the edge of the pockets and I wanted my top stitching to land neatly. I think interfacing really helped with this, particularly when pressing the edges of the pockets into position. 
My top-stitch design was pretty basic, but I'm really pleased with how neat and symmetrical the pockets are as a pair. I want to pluck up the courage to make a more personalised design, turning my initials into a more abstract form or something. A little something to think about before my (inevitable) next playsuit. 
While we're on the subject of the back pockets, I don't know if I have a weirdly proportioned booty, but the suggested pocket placement of the pockets on the pattern was waaaaay off. Thankfully I didn't jump right in and put my pockets on while all my pieces were still flat and unassembled. This would have been easier, however I was waiting for my topstitch thread to arrive in the post and I was too impatient to put the project in hold. This was a blessing in disguise, as when I came to attach my pockets onto my fully assembled playsuit, I found the pattern markings were way too high and the pockets would have sat awkwardly on my lower back. Has anyone else found this? I moved them down by about 2.5 inches after pinning and assessing. I will make this change on the pattern pieces. 
I decided to use a contrast fabric in the side panels, as I thought this would break up the dotty print of the fabric and help show off the design, and also knew that a contrast panel in the side would look flattering for my figure. 
For the pocket bags I used the satin lining that I lined the bodice with. This fabric was well behaved, and I quite enjoy its silky sheen on the inside. 
The straight lines of the neckline lend themselves to some top quality understitching to hold that lining in place. 
I pinned, tacked then stitched the invisible zip into the back. Here my one error became obvious - I should have overlocked the back raw edges. The lining only covers the bodice and waistband edges, meaning that below the band to where I overlocked the crotch seam too was still raw after inserting the zipper. My fabric was fraying hard at this point after so many try-ons, but I couldn't get the overlocker over the zipper to catch the raw edge of the fabric. To save it, I used a modest zig zag stitch from below the waistband to the end of the zip placment which stopped the fabric from shedding any further. 
I love my little rompersuit! I'm so pleased with the fit and I like the chunky straps way more than I thought I would. I quite enjoyed not committing to a strap length by using the sliders too haha! 
Next 7626 has gotta be a denim one with some goldy top stitching right? 

x
Location: Nether Edge, Sheffield
Currently listening to: I'm Gonna Catch Me a Rat, Fabienne DelSol

Sunday, 28 May 2023

McCalls M8009, Playsuit

2022 was a bit of everything. The best year, the worst year, the most productive, the least productive, somehow growth and stagnation both at the same time. I look back on my 2022 sewing and I could stamp it with a big rubber stamp that says DISTRACTED - stay behind after class Ms. Holland.


And I'd be right. I was distrated, distracted growing into my house, distracted falling in love, distracted getting my heart broken, distracted playing badminton, distracted learning golf, distracted trying to learn how to swim, distracted writing songs, distracted letting men buy me dinner, distracted trying to get enough vitamin D, distracted recording songs, distracted getting a new job, distracted getting another new job. It's amazing I managed to get anything made really isn't it? 

I want to cut the crap in 2023. I know what makes me happy. It's making, it's learning, it's putting skills into practice. It's sewing, damn it! I wanted to launch the year with a new pattern I'd never made before that would likely need a few fitting alterations. I'm a big big fan of a playsuit (despite their obvious awkward draw backs), a chairty shop TopShop playsuit find was on heavy rotation in 2022 for various occasions. So I wanted to make my own! Having gained a bit of confidence in fitting crotch and legs after my Simplicity Amazing Fit trousers I felt ready to take the plunge. 


I used what I think was the last of the fabric from the backdrop in the Coco Don't video to make the toile. I cut to the bust size as this is where I always have fitting issues. I suspected, and was soon proved right, that this would cause the playsuit to be a bit short in the body. Visually, you could tell the crotch sat too high and it looked (and felt) pretty uncomfortable. The solution was easy - I added 1.5cm to the length of the bodice band. This meant it sat on my natural waistline and dropped the crotch lower. I also tapered the top of the inside leg seams out a bit where they met, so that the shorts were a little looser around my hips/bum. 


On the top half, I had to take a little out of the neckline to save it from gaping. It was only a teeny tiny bit - I just pinched about 1cm on the neckline of the paper pattern and flattened this towards the bust. When I cut the fabric I trued the new neckline so it was straight. 


The gathering on the shoulders and bust is a lovely touch to this pattern. I was worried it would look a bit bulky when the lining was gathered too but there were no problems. I moved the bust gathers towards the centre by about 1-2cm, as I felt the positioning was a little bit off on my initial toile that followed the pattern. I don't think this was any kind of poor design on behalf of the pattern design, more a case of me doing what I can to try and make my boobs appear bigger! 


Tacking together the side seams and pinning up the back it became quite clear I needed to taper in the side seams at the underarm so that the bodice wasn't loose and lumpy. I increased the seam allowance by about 1.5cm, grading out towards the bodice band. 

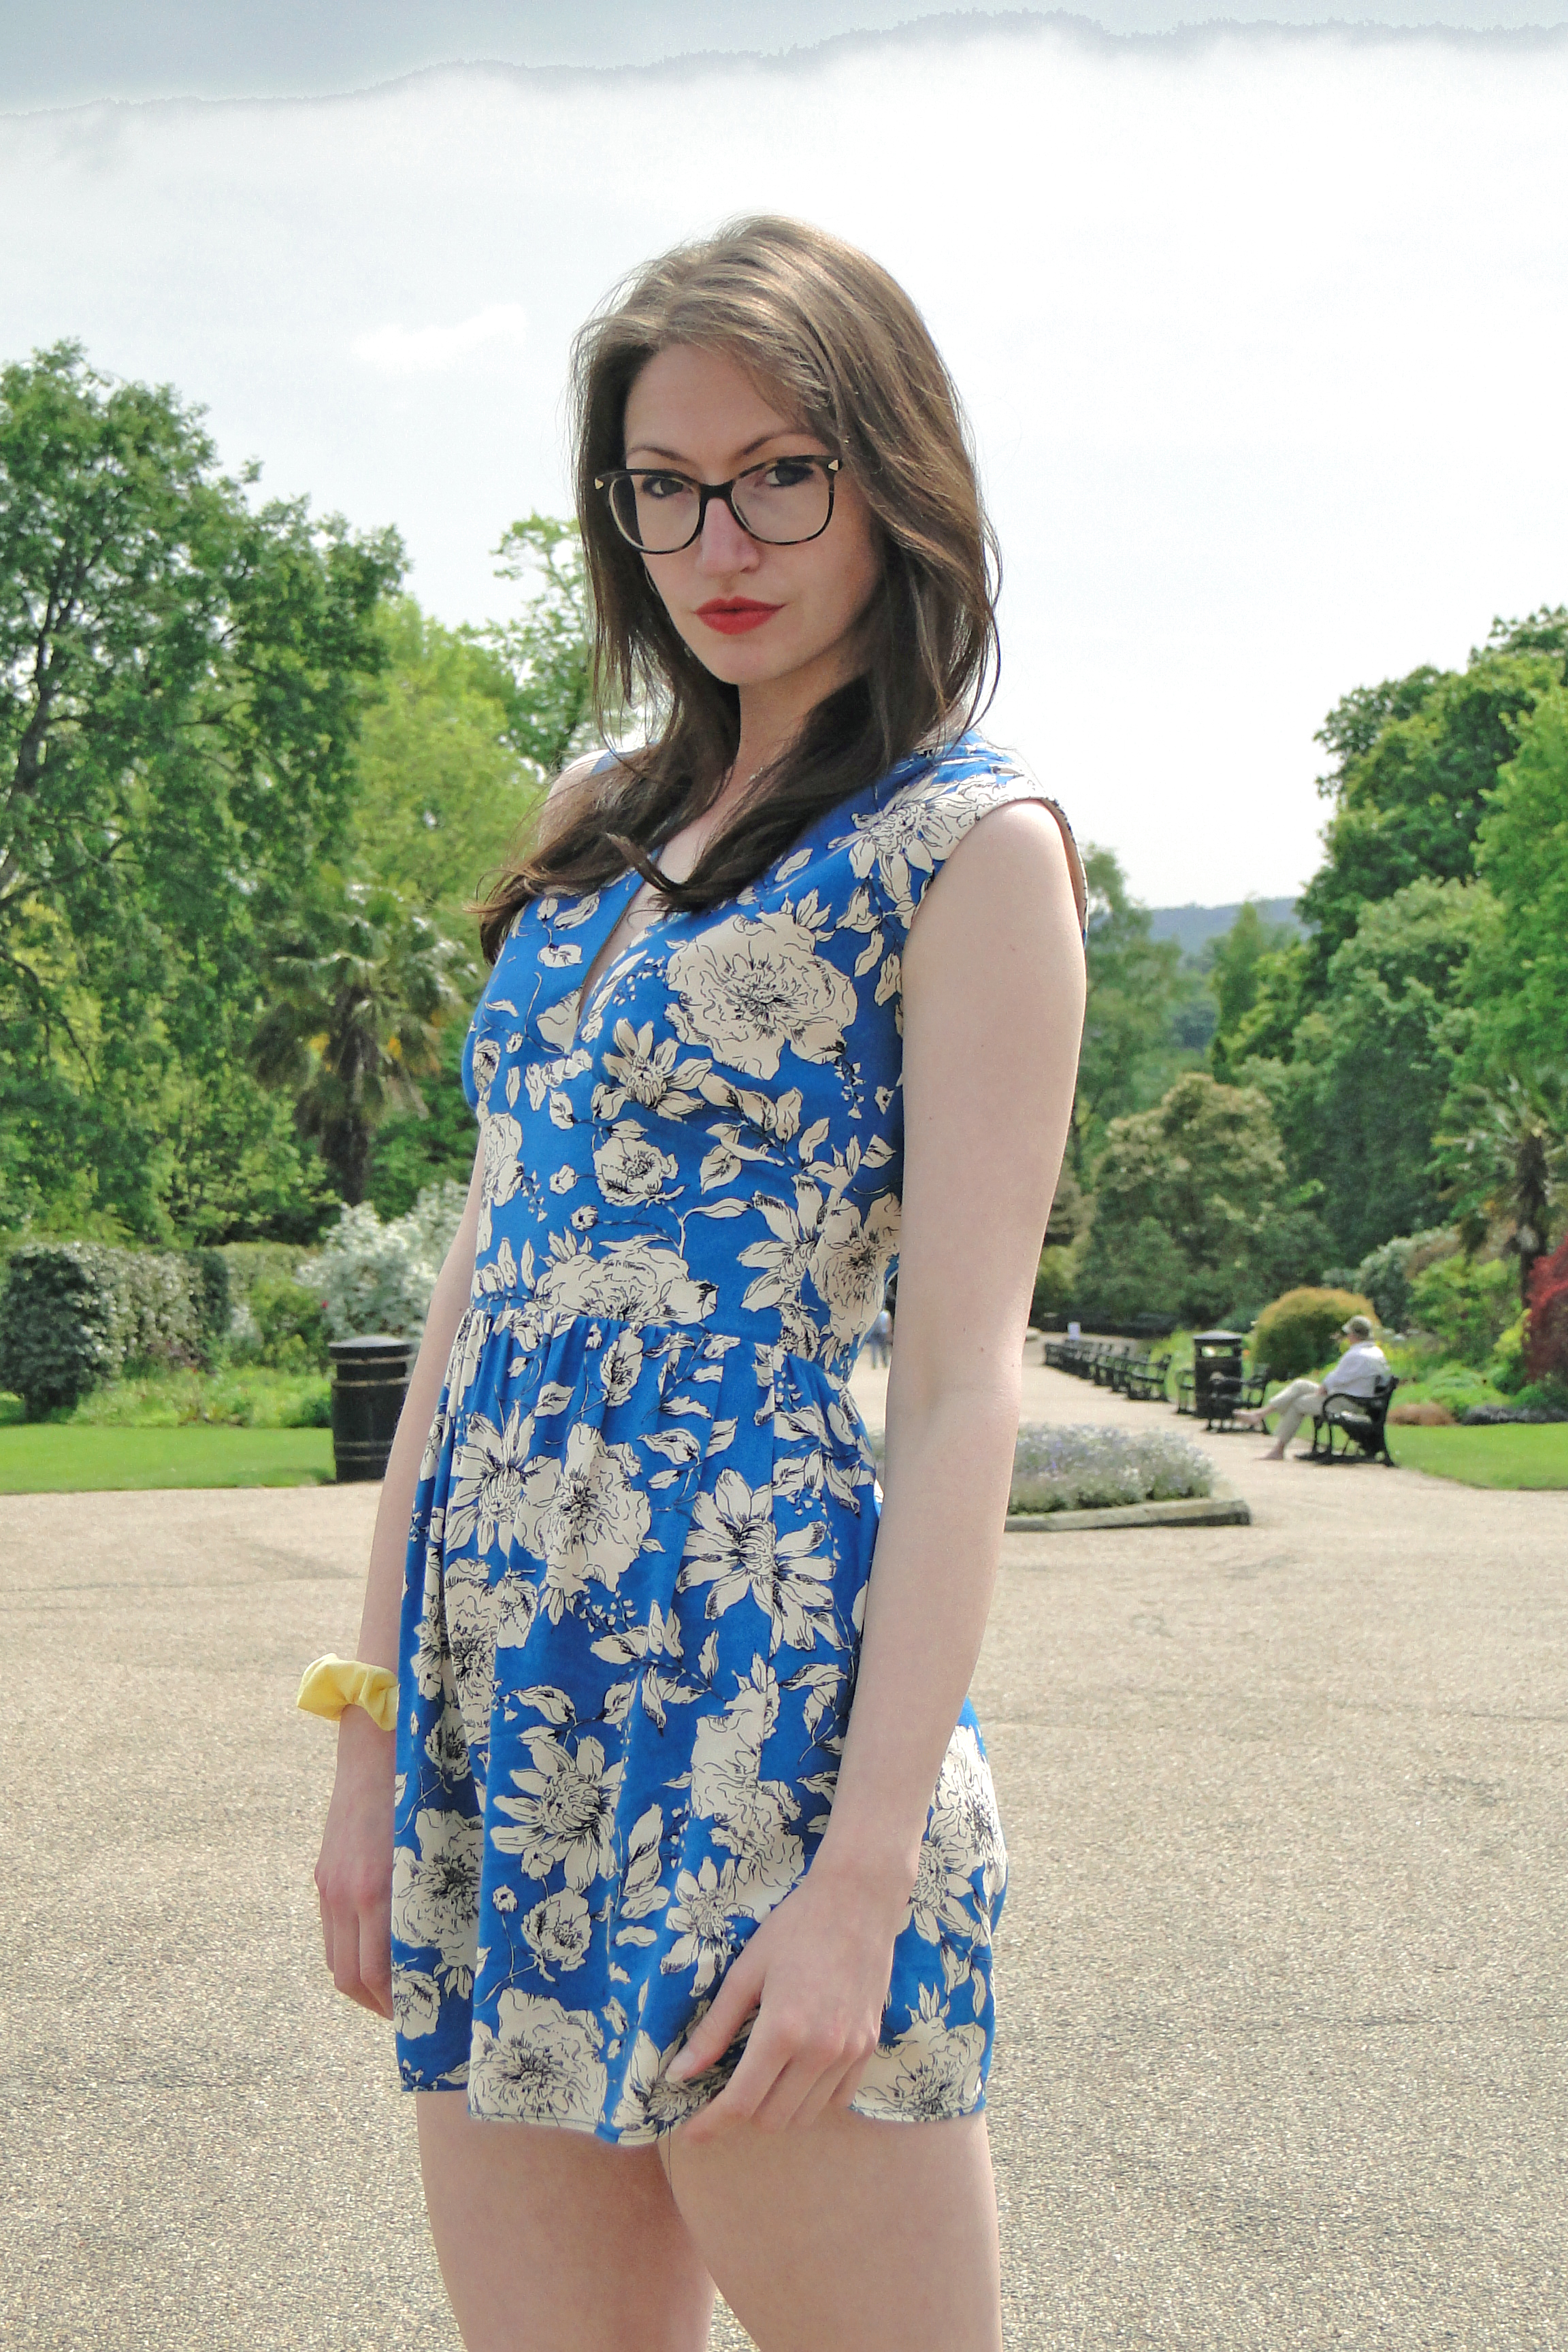
This floral fabric has been in my stash for 2 summers now I think?! I never quite knew what to make with it. It became obvious quite quickly that I wouldnt have enough fabric for the sleeves and I would have to use something different for the lining (delves into stash and comes up with some tan statin). I think this pattern was a really good match for the fabric. I added some lightweight interfacing to the outer bodice piece which I couldnt see any mention of in the pattern but I think it was a good shout. The pattern also calls for a 24" invisible zip... The shop onmy had 22", but when I put it in it reallly did feel like it was designed with 22" in mind so there were no problems there. 


The shorts ran a chance of being too short, but before I comitted to the length I compared them to the Topshop playsuit I'd been wearing and they were about the same length. I overlocked the raw edge and turned up a tiny hem. 


Lastly, as the sleeves were a no-go I opted for bias bound armholes. I dont actually ever recall doing bias binding before where the whole band is turned inside! It went well, the armholes definitely had the desired neat finish, but I 100% did not enjoy handstitching down on the inside. Next time I will make the armholes a little wider as I don't think I compensated quite enough for how much I lost by increasing the underarm side seam width. 


The pattern is really cute! I'm glad I was couragous enough to try the plunge neckline, the alterations I made definitely allowed me to get away with it. Looking forward to getting my pins out this summer! 


x
Location: Sheffield Botanical Gardens
Currently listening to: Universal Cinema, Gaz Coombes