Sunday 28 June 2020

Self Drafted Sports Top


I'm dedicated to the things I enjoy. When lockdown was announced I felt sheer panic at the thought of not being able to get into the gym for who knows how long. That panic lasted about 10 minutes as I soon realised change didn't have to be a bad thing. The day my gym shut its doors I set off on my first run of lockdown and I haven't skipped a session yet.


My workouts have become more varied and thankfully the weather has been kind. I have surprised myself at how much I have enjoyed adapting, how much less self conscious I am doing leg raises in public than I thought I would be, perhaps because we are all in this weirdo boat together doing what we can to not get fat.


I panicked at first wondering what effect lockdown would have on my sewing. I have stash of odd bits of fabric, rapidly depleting. I miss going to browse for buttons at the market. And for the first few weeks my creativity was definitely 'off', feeling like we shouldn't really be allowed to do things we enjoy when everything is so upside down. Dedication though. I can't turn it off, my heart still says sew sew sew...... But I felt so miserable putting on my LBD and thinking no one will ever see it. If the only thing we're allowed to do is stay in in our PJs and go for one run a day then it was clear I was going to have to make some sports gear to keep my creative heart happy.


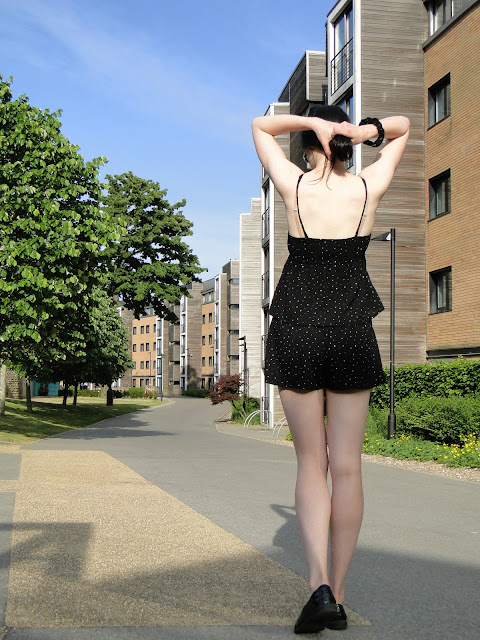
"Sports Top" was on my make-9 grid for 2020, and although I may not have been able to play around with all the Airtex fabrics I'd envisaged, I did have some of this pretty natty lightweight, stretch houndstooth leftover from a sports vest I made a few years ago.


I can't really pass the pattern off as self-drafted. I was inspired by the simple design of a sports shirt I own from primark, made up of just three pieces and a neckband. The design features an open back, tied at the bottom, which is pretty neat bearing in mind pulling the ties nice and tight creates a fitted look at the front, but the open back keeps the shirt loose enough to be comfortable for sports. The sleeves are part of the front/back, attached with an overarm seam, meaning again there is a good amount of room available for arm movement.


Making the pattern was really really easy. There are no darts included in the shirt at all, so all I had to do was lay it flat on top of my pattern paper and draw round it. I added 1.5cm seam allowance to all the edges. The front and back pieces are really similar, just with the ties added to the back and a slightly lower neckline at the front. The Primark design includes this cute little mesh panel in the front. I thought I owed it to myself to attempt one in mine too, as the rest of the top was so simple! I'm not sure I've ever inserted a triangle panel into something that needs to sit flat before, so it was a bit trial and error.


I cut the panel piece to be an extra 1cm than the cut-away around the long sides and then snipped directly downwards from the point of the cut-away for about 1.5cm. I then matched right side of the panel to right side of the cut away and stitched with a 1cm seam allowance. I did the same on the other side and then just tried to flatten the smushy bit at the panel point without any of the edges peeking through. It took me a couple of attempts, as as you can read from the last sentence, it maybe wasn't the most professional of panel insertions.


The most satisfying part it topstitching that panel though. A row of sweet lil stitches down the sides of the triangle really scores the professional points.


The back opening, tie edges and bottom of the front and back are all overlocked and turned over 1.5cm, and the sleeve openings overlocked and narrowly turned up by about 6mm. I should probably have stitched down with twin needle but instead I used a single row of stitching and it looks fine! The ends of the ties are then folded over twice by 1cm and stitched down so no edges are peeking out.


Side seams are super easy, just whizz up the sides and the overarm seams, with the slight curve at the armpit to make the sleeve shape. There's a kind of relaxed bagginess that is created at the chest which I think accentuates that sporty look.


Creating the right neckband length was also trial and error, and lots of pins around my neck haha! to start with I measured the circumference of the head hole and cut a strip of fabric that length by 5cm. I knew the neckband would have to be shorter than this, but would figure out how much by pinning ans stretching and trying on as I went along.


The two back panels are attached together by the neckband. On my Primark version they just meet at the top, but for mine I crossed them over ever so slightly. I placed the neckband seam at the shoulder seam so that there was less rogue fabric and loose ends and (hopefully) less margin for error, and then overlocked the neckband right side to right side.


My tips would be.... Make sure you have your overlocker on the correct settings!!!! I failed to change the settings from overlocking single layer fabric to attaching folded over neckband to the head hole. I almost almost knackered the whole thing, machine and all, right when I thought I was on the home straight too!! I stopped pretty promptly and unpicked the neck. I changed the settings on my looper stitches, held my breath and went in for a second attempt.


Phew! This time we scorched around the neckband with no issues, and I don't think you can even tell the area where the accident happened! Pretend you didn't read the above and no one will ever need to find out.


Lastly, just to make extra sure that no one was going to be inspecting that neckband, I narrowly topstitched around, flattening out the overlocked edges to the underside of the head hole.


I'm pretty stoked! The Primark version is a little more stretchy in all directions, but lengthway stretch isn't really a necessity so my fabric suits the design fine.


It didn't take long to wizz this little top up and I didn't require too much fabric. Deffo a leftovers project if you find yourself with the right fabric.... Now, does anyone want to mail me some Airtex?


x

Location: Crookes Sports and Football Centre, Sheffield
Currently listening to: Street Fighting Man, Rolling Stones

Sunday 21 June 2020

McCalls M5989, Pyjama Camisole


I mentioned in my previous blog post that I had a lot of this lovely viscose in my stash from Abakahn after my friend Charlotte talked me into adding it to my basket. I was glad that I had when my Lapwing trousers turned out so well and was eager to make a pyjama top to match.


I wanted to find a sweet little camisole pattern that wasn't going to be too time consuming and would match nicely with the bottoms. I thought there must surely be a free pattern that caught my eye somewhere on Pinterest but after a few hours of browsing I still wasn't coming up trumps.

Charlotte came to my rescue again when she said she would post me the McCalls 5989 pyjama set pattern. This set features a cute camisole you can make in various lengths as well as a PJ bottoms/shorts and robe. 


I was excited about the camisole as it's low neckline added a bit more interest to the garment than the free vest top patterns I'd seen online. The bottom half of the top is quite wide and flowy for super comfort but is pulled in at the underbust with an elasticated drawstring. There is also some sneaky elastic encased in the top back hem which helps stop the top from shifting around and the straps to stay on my shoulders.


Charlotte warned me that she only had the larger size pattern and I may need to scale down... Okay so this wasn't going to be the super quick make I had hoped for but at this point I was pretty excited that the camisole had a little backstory to it and I knew it would be well worth the effort.


So I made a toile out of really lightweight fabric to see what alterations I was going to be faced with. As predicted the main problem area was the bust. It was just tooo big and the slightest bit of movement was going to result in some serious nipslip. To combat this I pinned out the areas of excess fabric in my bust. This was both at the curved edge of the cup and also at the under arm. The cups are not shaped with darts so you rely mainly on the gathers created by the drawstring for shaping. This makes the fitting process a bit more forgiving as you can manipulate how the fabric sits on you once the garment is finished and the drawstring is inserted.


Once I'd drawn these little triangle chunks onto my toile I coped them onto my paper pattern and then pinched out the excess paper and smushed it all down flat. Although I did love the deep neckline on the pattern, due to its loose fit nature I decided to increase the length of the centre front seam for a little more modesty. 


I had also found that there was a little bit too much fabric along the sideseam below the underarm. I pinched out about 1.5cm on both the top back panel and the top front side seams to avoid this puffing out so much.


Although I quite liked the length of my toile, I was really keen to make sure this camisole was part of a set alongside my Lapwing trousers. I made the length of the bottom pieces 12.5cm shorter, simply by cutting this off of the bottom, as the extra length with the baggy trousers would have made me look a bit swamped!!

Lastly I made an educated guess when my straps kept sliding off my shoulders that this meant I needed to stitch them a little closer together on the back panel. I moved them in by 1.5cm and hoped for the best.


I'll admit I was in two minds as to whether my alterations would achieve the fit I wanted, but I had sooo much of this fabric I leapt in with my second attempt.

There are some things to be mindful of when constructing, mainly I would advise to be super super careful when pressing and sewing the hem on the top of the cups that you don't stretch it out. The nature of the cut means that the neckline falls on the bias and is very easily stretched out of shape if you apply too much heat/pressure... and then even after all the fitting alterations you could still end up with a gaping issue!


I cut the elastic for the back a little shorter than the elastic guide too and it didn't really have an awful lot of grip on my toile. I don't think there's a right and wrong, I just held the elastic flat to my back without stretching it to get a rough idea of how long it needed to be... you don't want it cutting off your blood circulation but you may as well make the best use of it. The elastic is fed into the hole and then secured with stitches at the ends.


The side seams are pressed forward, which seems a little odd, but this helps when sewing the hem on the underarm area of the front pieces. the edge is slightly curved so you have to pay a bit of attention when easing in and folding under.


Making the casing for the drawstring is probably one of the most satisfying parts of the process. You sew the bottom to the top using a 2cm seam allowance and then fold under the seam allowance, stitching another line along the fold. There's a little gap at the centre front seam that you leave open so that you can feed your drawstring through. 


The drawstring is a piece of elastic the same length as your back piece, but with two strips of the fabric attached to either end. This is the best of both worlds! As means you can still tie a super cute bow in the centre, but have the elastic to allow for movement and comfort.


So there you go! One matching PJ set ready for however long this lockdown lasts! I had fun making pattern alterations and making something designed to my ideal. I love the backstory of mine and Charlotte's friendship that is stitched into the very making of this! She sent me this cute little tag to sew in which I absolutely love! Social distancing cannot beat the sewcialists! 


Until next time,

x

Location: Endcliffe Village
Currently listening to: Lie To You, Franc Cinelli

Simple Sew, Lapwing Trousers / Pyjama Bottoms


Lockdown. If someone had said a year ago, when Easter rolls around in 2020 you will be forbidden from leaving the house no one would have believed them. I'd been looking forward to getting some of my warmer weather makes out of the wardrobe as the sun came out, but turns out lying around the house in your LBD is a little underwhelming.

The thing to do then? Make some indoor clothes, obviously!


I bought this fabric from Abakhan Manchester on my last trip there with my lovely sewing friend Charlotte. We are both terrible for encouraging each other to SPEND every time we hit the shops together, and I would have chucked this pretty viscose back into the shop stash bin if she hadn't talked me into keeping hold of it. My first thought was 'it would make great pyjamas, but when am I going to make pyjamas?' - Yes I was still oblivious to the imposing 'lockdown', and therefore my future need for house clothes.
Fast forward a few months and the fabric shops are now SHUT and I'm unsure how reliable online ordering is going to be, and I'm faced with what can I make using my stash and my stash alone? Lucky for me someone talked me into buying pyjama fabric and there is LOTS of it. I have enough odds and ends of elastic on my sewing box for PJ bottoms to be a viable option. 


I have two pairs of wide leg Primark PJ bottoms that I wear to bed quite religiously (no, not at the same time), I love the shirred waistline so thought I would have a go at making my own. The Primark bottoms are made without a side seam, a piece of fabric for each leg. I faffed about for a bit wondering if I could draw around them and make my own pattern, when I remembered that the Simple Sew Lapwing trousers pattern would be very adaptable to make PJ bottoms from. I would still add the shirring to the waist but I would also have POCKETS inserted into those side seams... Go on then, you've talked me into it.


With the intention of adding a piece of elastic to the waist and then a few rows of shirring I added 1.5cm to the top of the waist so that I could fold this over the elastic.


The pattern is quite easy to follow, although the illustration on sewing the outside leg seams at the pocket area still baffles me a little. I just did what felt right and ended up skipping the 'snip into pocket seam allowance' stage as I just didn't seem to need to do this?!


I then also decided to understich the pocket opening to keep the pockets from flipping outwards. I was able to overlock the side leg seams once the pockets were inserted, only leaving the bit of pocket seam allowance hidden under the front pocket un-overlocked. Maybe worth finishing this edge before putting the trousers together next time?


The crotch and inside leg seams are straight forward. I overlocked these raw edges together not separately- the front rise to back rise first and then the inside legs.


Next step I was kind of winging it a bit now - I cut a piece of elastic that sat comfortably around my middle where I wanted the trousers to sit and stitched it into a ring. I then marked half way and quarter way points and matched these up to the back, front and side seams on the inside of the trousers. I then pulled out the elastic matching the mid points and stitched along the bottom edge of the elastic. I then turned the elastic inwards twice so that the raw edge and stitching was hidden, pulled the waistline back out so the elastic was taught and stitched a second line at 1cm, folding under the edge as I sewed along.


To add my shirring, I wound the bobbin with elastic by hand and lined the machine foot up so it was a foot's width away from the stitch line. When shirring I always make sure I leave reaalllly long tails to make sure my elastic doesn't TWANG when it's pulled out. I added 6 rows of shirring each at foot width apart.


They are almost done now! Next step is a try on, and as I suspected they were wayyyy too long. The legs are straight and wide so it was fine to just cut the extra length from the bottom. I cut a massive 7.5cm from the length, an alteration I will be doing to the paper pattern too as I remember my last pair were also super long. I left enough fabric for a 1cm hem - twice turned over and then hemmed. 


Finished! Lovely comfy lockdown trousers! What have you been making in iSEWlation? Have you been using up your stash or have you been avidly internet shopping? Are you using this time to learn new techniques or are you busy making your summer wardrobe and praying we get let out? Maybe you've made scrubs? Let me know!


Lots of love and #staysafe


x

Location: Endcliffe Village
Currently listening to: Nobody Move, Hanni El Khatib