Saturday, 22 October 2016

New Look K6230, Raglan Sleeved Long Sleeve Top


So it's the same pattern, but this time I stuck a little more closely to the pattern pieces and decided not to add waist and sleeve bands.


I love the colour yellow. I made two new year's resolutions at the start of the year; to be more savvy and to wear more yellow. Having failed colossally on being more savvy, I thought it was about time to give the yellow thing a go. I was tempted by a yellow and white baseball top in H&M but then thought it would be much more fun to make one.


I was unsuccessful in finding the perfect white jersey, but successful in finding the perfect grey jersey! The yellow wasn't quite the shade I'd dreamt about either (not literally this time- too busy dreaming about my ex boyfriend's friend apparently), but wanted to give it a go. I got the pair for not much money downstairs in Abakhan so what could go wrong.


Having learnt from my raglan jumper, but being too lazy to retrace the pattern, I again made seam allowances larger where the sleeves join. Although I took some from the neckband length I think I should have taken a little more as it gapes a bit if I dont pull it down my shoulders.


I used twin stretch needle to hem the sleeves and bottom. I used white thread here as a bit of a feature! Talking of white thread, I also thought I'd give a bit of topstitching a go, just to hold down my seam allowances. I'm not 100% on this, but think it adds a bit of interest. It's quite tricky to get a perfectly straight line when your jersey is stretching around all over the place!!

x

Currently listening to: Never Fade, Trentemøller
Location: Devonshire Green Skate Park, Sheffield

Saturday, 15 October 2016

New Look K6230, Raglan Sleeved Jumper II


I took a sewing holiday back in February and made my first Raglan sleeved jumper and it's come in pretty handy since. This week I took another sewing holiday and I made another Raglan Jumper.


I made the same changes to the pattern as last time- omitting the centre back seam (what's it there for?), and creating a waistband and cuffs. I cut these a little shorter than the circumference they needed to fit. The bands are then stretched as they are sewn, matching up mid points like when you sew on elastic. It can be a bit of a gamble just how much shorter they need to be, as you don't want gaping, but you also don't want puckering... It can be a bit of a minefield but I just opted for the jump in and have a go method and it seemed to work!


After sewing on the waistband I tried on and thought the extra length this added made it a tad too long, so took it off, cut down the bottom and put it back on again. Much better!


Pattern matching was an interesting one with this fabric! Most importantly I made sure everything was as symmetrical as poss by cutting everything out single, but lining up top piece to bottom piece to make sure all the Xs matched. Where the sleeves are inserted I have tried to focus on the horizontal lines remaining parallel right the way round. This seems to have worked out ok-I'm not too sure how else I could have done it, as I really wanted a row of Xs straight down the centre front and back.


When it came to trying on, the neck line was too wide. It didn't help that I'd forgotten to take the seam allowance out of the back of the pattern where there is a centre back seam. I decided to make seam allowances bigger where the sleeves join the body (I think I took in an extra 2 cm at each one!) and this made things much better.


I cut the neckband on the bias simply because visually I thought the crosses going diagonally around the neck would look better (less room for dodgy match up!). A bit of guess work made the band the right length after taking so much out of the neckline circumference.


Pretty simple- I love putting in raglan sleeves! I would suggest to myself that I maybe cut the pattern a bit smaller next time...
...But better too big than too small (Or so they tell me, I really wouldn't know.............)


x

Currently listening to: Psychedelic Lover, Goat
Location: Arundel Street, Sheffield

Saturday, 8 October 2016

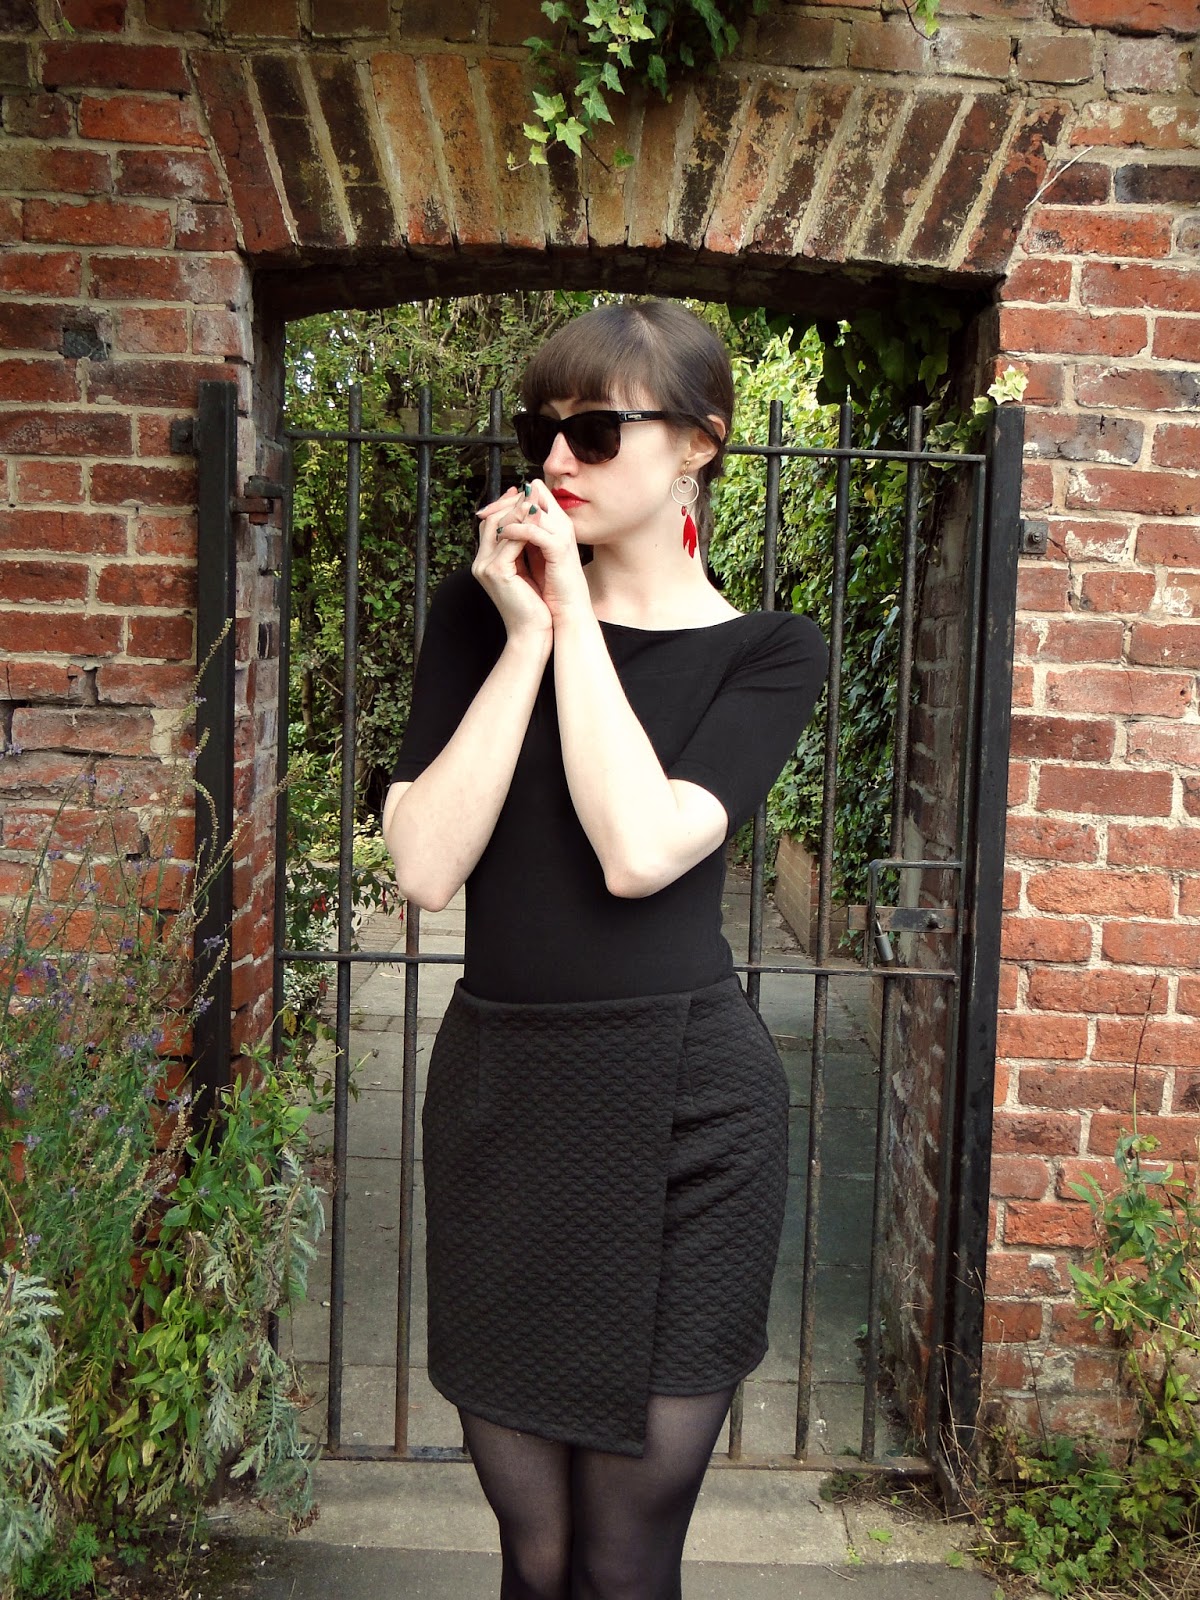
Prima Wrap Skirt


Sometimes something lovely happens to break through the grey cloud. Word on the street is I'm into sewing- and now my neighbours all know about it. So it was super lovely when the people across the way posted me this pattern. I was even more excited to find it was a pattern I actually wanted to make!


Fabricwise- Its another gem from my Autumn 2016 Abakhan stash. I'll admit it wasn't what I was looking for. After the success of my (faux) suede panels on my jacket (which it's finally just about cold enough to wear!), I thought this skirt would suit something suedey. So I'm shuffling round Abakhan with this overflowing basket finding a few dodgy pleathers but not quite suede, when the area marked Scuba caught my eye. Having just read up on all the pros of using Scuba in the recent issue of Love Sewing magazine I thought I would investigate.
Scuba is a knit fabric made from 100% polyester. It can come in varying weights and can be printed or plain. It's strong, stretchy and also drapey. So basically my dream fabric!


What caught my eye was subtle- a black fabric but with a quilted quality. Abakhan had a few different pieces, each with different patterns on the quilting. I hastily picked some up, excited about its wrap skirt potential, only to find the piece underneath was quilted with houndstooth shaped stitching!! It's really really subtle but went straight in the basket. Forget suede. Houndstooth scuba is probably about as good as it gets!


The pattern is made up of 7 pieces, but it's only 3 paper pieces to cut out. The front and back are exactly the same apart from extra for centre back seam allowance on the back piece. The front is cut on the fold, but instead of cutting on the actual fold, I did my usual trick of cutting the piece on single layer fabric then flipping it over to get the other half. I wanted to make sure the bottom of the skirt lined up with a straight line on the houndstooths and was struggling to know what the bottom half was doing when I tried to lay out on the fold. I find it's often pretty tricky to find the exact grainline when working with stretchy fabrics so I think it was well WELL worth lining up the pattern with the quilting lines. The facing is also just one paper piece following the same idea- one on the fold for the front and two with additional seam allowance for the back. The third piece is the wrap piece that sits on the front. The different skirts you can make with the pattern all have slightly different wraps and different lengths. After the success of this mini skirt I am actually tempted to make a full length floaty one to maybe team with a brown belt and denim jacket. Okay, getting carried away as I have neither floaty fabric or brown belt... Or a denim jacket that fits! Oh and the sun's gone in for this year so maybe we'll get on it for next June?


The front and back have darts- I tailor tacked these instead of tracing wheel... Which makes me feel like an adult! Then making up was really simple! The pattern suggests you start with the centre back seam as far as the zip but I found I took a little extra in when I put the zip in and stitched a new centre back from the bottom of the zip. The wrap piece also has a dart to match the front dart so I made sure I pressed one towards the centre and one towards the side so try and avoid as much bulk as possible at the waist. The wrap piece is then hemmed on the outer edges. It says 2.5com but I think mine was more like 2cm, maybe 1.8cm, just because I was unsure about having such a large hem. The wrap is tacked to the front piece and the front is sewn to the back.

I try on and find it is much to big... Because scuba is bloody stretchy!


But it's fine! Everything is fine. This pattern was gifted to me by some lovely people who I don't really know! You can't get mad when you're working on a project that has grown from kindness. I'd already guessed this sizing issue was on the cards, so as I mentioned I took a little extra in at the zip, only about a cm or so. Then I set to work on the side seams. I stitched a further inch in from the original seam line, therefore taking the skirt in by 4 inches (an inch off of each edge). I tried on and it was much better, but still needed a little more 'grab' at the waist (yeah okay, so I'll take it where I can). Just at the top I tapered in the side seam 1 cm- again making it a total of 4cm all the way round. Happy with fit, I made these alterations to the facing. I simply added the 1.5cm seam allowance to the extra inch then the extra centimeter (gotta love sewing, we all use metric and imperial side by side all the time right?), used this as the new seam allowance, checked it fitted inside the skirt then trimmed the additional fabric down.


The facing is stitched to the skirt, then understitched. I have so much love for understitching! Especially as my sewing has been getting more and more accurate. So satisfying! Then theres a bit of faffing about to stitch the facing to the zip tape at the opening which is always so much faff but I have learnt to use the zip foot to get a really nice stitching line on either side of the zip opening and hold everything in place.


Then it's hemming. I made quite a swift job of this- overlocked the bottom and turned up a really narrow hem as the skirt was looking pretty short already! If I'd had the extra fabric to play with, I would probably have liked to do a 2cm hem to match the hem of the wrap opening, but it really doesn't look any worse for being half the width.


To my surprise, the skirt was finished! I put a few sneaky stitches in the waist facing to hold it as the side seams. I've never made a skirt without a waistband before so quite enjoyed the different approach.


I was finished in a day, including cutting out paper and fabric, and all ready to wear for the evening.................. Too bad I got stood up this weekend, eh!!! But you can't be mad when you're making a gifted pattern out of dream fabric. Thanks to my lovely neighbours for saving me from what could have been a dodgy weekend!


x

Currently listening to: La Malvada Creación Del Dr Ilusión, Los Peyotes
Location: Hillsborough Walled Garden, Sheffield

Sunday, 2 October 2016

Love Sewing Magazine/Simple Sew, Shannon Shorts


The Shannon shorts are part of a nautical themed collection by Simple Sew which came free with Issue 31 of Love Sewing Magazine. I'd been eyeing up the patterns on the website then when I found out my piccy was in the magazine as part of the Stitcher Of The Year competition feature I knew these shorts had to be my next make, particularly before Autumn got any colder.


I took a trip to the fabulous Abakhan in Manchester and chucked in to my basket a LOAD of stuff for my stash. There was barely a meter of this stretchy denim, but it was perfect colour and perfect weight, and besides- just how much fabric do you need for shorts? I took a chance... And it was a bit of a squeeze to get all the bits cut out, but we got there!


The front is made up of two front pieces stitched down the centre front, and the pockets which make up the rest of the waist width. Putting all the bits together was quite an exciting puzzle. The denim is sturdy so no worries about slipping and sliding around. It is quite stretchy though, so was really really important to get all the grainlines running the right way. If it had come to it, I could have easily substituted the 'pocket bag' for a plain black cotton as this is not seen from the outside. Using a finer fabric here could have also been a great way to reduce bulk.


Putting together wasn't too tricky, the bits do just seem to fall into place. The seams on the front waistband take a bit of manipulating to fit the curve, but you can get away with quite a straight seam here as long as you make sure when you attach the waistband you match these seams up with the pockets. Obviously it's also important to match the sideseams of the waistband to those on the trouser leg.


The shorts are fastened with a concealed zip on the left hand side which went in quite nicely. Again it really adds to the overall professional finish if you match up the left and right hand side of the waistband seam when the zip is done up. Its worth as many attempts as it takes (remind me of this next time I've unpicked a zip a million times and want to give up... on life). I managed to get this one in pretty quickly for once, maybe because sturdier fabric is less of a bitch.


So once you've got the zip in you can really test the fit. I'd made a toile from some leftover calico from Zohra and ended up adding a little exrta into the waist. Well... That was before I knew the denim I was going to land upon was going to have so much stretch! So I'm trying on the shorts and it's become really quite obvious they don't even need the zip as I can wiggle them on and off without even touching it. The lazy part of me is saying maybe I should just eat more to make them fit. I mean, I'd just had two weeks off snacking so I could wear Zohra to The Washington with my midriff out so it wasn't an unreasonable idea. But that annoying driven part of me said nah Holland, maybe you should just take some out. So I cut down my sideseams, taking out the 1.2cm I'd added to each seam on the the pattern plus maybe a little more (stupidly can't remember how much)... I knew it was too much to hope for that that zip had gone in so nicely! They were still a bit big. I didn't want to take more out of the side seams in case I lost the definition of the pocket shapes so there was only one thing for it, and that was to take some out of the back... New territory!


I pinched the back of the waist until they sat really comfortably where I wanted them to sit. I pinned and found I had 1.5 inches either side of the pinch! So that was 3 inches coming out of the waist! I then kept pinching as far as I could down the centre back seam until there was nothing left to pinch. This is where the tip of my centre back dart would taper to. I took off the shorts and chalked a line between all my pins to make a triangle shape. I then had to unpick the seam attaching the waistband at the back, and the seam attaching the inner waistband (facing) AND the understitching before Sewing in my new line of stitching to the shorts bum area. I curved the tapered end of the dart a little to make the shape a little more gentle... There was no mathematical workings out here, just did what felt right and it seemed to do the trick. The hard bit somehow was creating a centreback seam where there wasn't one before on the waistband, lining this up with the new bum seam, replicating this on the facing band, not making it too bulky and keeping the seam straight. I won on all counts apart from the last- it goes off at a bit of an angle... BUT it's fine! What's that thing Aimee always says- no one will be getting that close and if they do, they won't be looking at your seams! Ha, well she's right..... Indeed no one will be getting that close.


It was well worth the faff (as always), so happy with the fit on the waist and bum area. The stretch of the denim makes for a really great fit all round! The only thing left to do was turn up the bottoms- I made them a little shorter than the pattern (because legs), and put a few sneaky stitches in to stop them unfolding. Then I picked 6 of my best buttons- I surprised myself by not picking anchors, but instead a more regal, golden affair which really zings up the front whilst still rocking the nautical.


Summer may have faded, but teamed with a pair of tights and a breton jumper, there's still chance to get some wear out of these guys before the snow sets in.


So come on sailor, what d'ya say?


x

Currently listening to: Stray, Son Of Sam
Location: Derwent Valley

Sunday, 18 September 2016

Looks Like I Made it, Self-drafted Zohra Kimono


I was lured into River Island on a trek through town by something subtly unusual. Straight through the door hung a cropped, tie-waist, narrow sleeved, fasten-up kimono that seemed to solve all the problems I find with a standard T shaped kimono. The tucked in waist makes for a flattering shape. I automatically knew narrow but long sleeves would suit me much more than the usual billowy affair that always seems to look fab on others but never quite right on me. The shaped neckline added a hint of elegance, as did the splits in the sleeves. I stopped in my tracks then went to investigate.

I took a load of photos, excited by my own understanding of the construction. A french seam down the centre back, interfaced neck and front band, the body gathered into the waistband. The more I looked the more I recognised this item as something I could totally make. At this point the security guard is looking at me funny and asking if I need any help. I just smiled like a child besotted and said no, I was just fine.


That night I didn't dream about usual themes of lost love and nuclear war, but instead the cropped kimono was whirring around in my sleepy head, and when I woke up I knew I couldn't be without it.

So I went back and bought it from River Island with the intention of drafting my own pattern from it. I figured if it was special enough to enter into my dreams, it was special enough to fork out for. I picked up a few meters of Calico and it was that night I had another vivid dream about making the kimono. With that I dedicated my Bank Holiday weekend to drafting my first ever pattern.


I don't know if there is a right and wrong way to go about making your own pattern. This was absolutely my first attempt at anything like this. I laid out RI kimono on the kitchen table and drew around the main shape of the body. I squared off the bottom to make allowance for the gathers and added a 1.5cm seam allowance around all sides. Using this front shape I had drawn, I traced the centre front line and drafted a front band that would follow the curves perfectly. I was really happy with my dedication to shaping here, as it wouldn't have been awful to have just made a long straight band to go around the front and back. As the band was shaped I had to cut a front and back as separate pieces and sew them together. I think the seam here really helps add to the structure of the garment, making it look dead professional!


The back of the kimono was the same as the front only obviously without the neckline. I added extra width to the back to make up for the diameter of the front band, plus some for the seam allowance (not usually a fan of centre back seams, but think this looks like a really great design feature on the RI version).
The waistband on my shop version is cut all in one piece so I decided to do the same. I didnt bother to make a paper piece for it, just made note that the measurements were 53cm + 73cm + 53cm for the tie, the band then the other end of the tie. The width of the band is 5cm, so I doubled and added 1.5cm on each side. So the total measurement of the band is 1.79m x 13cm. When it came to cutting out, I halved the width and cut this on the fold.


The hardest part to draft was actually the smallest piece- the back neck band. I found it really hard to get the angles and width right where it joins the front band. It is really really important that they do though! When making my calico toile I found I'd cut the angles wrong and there was ONLY JUST enough fabric to reach the front band at the right angle. I amended the pattern but found when making my proper version it was still a bit tricky. I think in future I should cut both the front and back neck band a little longer so I have more to play with.


I noted down my construction plan as I went along with my toile so I could refer back to it when I made my proper one. I found it is really important to consider what order to do everything in so as to hide all raw edges without getting in a mess! At this point I was getting really into this pattern making thing and decided it would be super cool to make my own little pattern envelope for all my bits. I typed up the instructions and did a few nifty illustrations. Named my patterm after the gorgeous Zohra Atash of Religious To Damn/Azar Swan fame for being so mystical... Loads more drafting to do if I want a pattern for all of my girl crushes.


I'd spotted some lovely silky fabric on the market at Crystal Peaks less than two weeks prior, at only £2.99 p/m there was no doubt. I nipped out to buy some now that I knew what I was doing- finding it came in two colourways, black and pink and black and blue. Hearing my dad's voice in my head- a firm believer of 'oh, just buy them both', I did just that. If patternmaking went well, I could well just make two.

Pattern- check. Toile- check. Fabric- check. Good mood- surprisingly yes! Nothing to stop me.


It was pretty early on that I realised even with my increased self-confidence that weekend (we had a gig and it went well, I'd made my own pattern and my hair was looking good), this fabric was going to be a bit of a mare! It was stretching and slipping around all over the show! Finding the grainline was a pain! I used a shedload of pins and my rotary cutter (can only imagine the disaster if I'd used scissors!), but it was tough going. After cutting out I detached the pattern pieces then re cut any ends that seemed to have gone slightly wonky. Despite things looking a bit dodge at this point, I knew that it was possible to stretch and manipulate the fabric to some degree to get it sitting where I needed it to.


Though that said........ I started out with a french seam in that centre back, but it WOULD NOT sit flat! Typical, the one straight seam in the whole garment and it was being a total arse. Throughout construction I kept thinking it would sort itself out. I'm not sure what planet I was on. It ended up being one of the last things I did- unpicking at the neck and waist then unpicking the french seam! I put it back in as a standard, overlocked seam and even this took a few attempts to get looking flat! I can only assume the fabric had been cut a little off grain and it was not liking being told when to do. I like to get what I want though and I was not going to let this be an exception.


As expected, the join on the shoulders was a bit of a pain, what with my paper pattern being less than accurate, but after much fiddling I seemed to ace it! The front/back neck band were the only bits that I interfaced, and I boy I'm glad I did! For once I am totally in love with what interfacing did for my fabric- giving me structure right where I needed it, and also making the fabric about 1000000x easier to work with. Such I shame I couldn't interface the lot!


I was dreading sewing on the hook and eye tape as I'd never had a go before and hadn't practiced on my toile, and even the RI version was a bit lumpy... It turned out great though! Once I realised to line up the centre front on each side with the centre of the tape it was really easy. I used my zip foot so I could whizz around the edges then also in between the hooks and eyes so it wouldn't pull out of shape when it was done up. So happy! The only thing I should have done is started the tape a little lower down- I have a little gap before the hooks start just above the waistband knot. Agh! So close! I think I'll definitely be using hook and eye tape again now I have got to grips with it. Much less risky than buttonholes and much easier than sewing on individual hooks and eyes!


My other fear throughout sewing up was that the waistband would go dodgy and not match up when I came to sew it on. I was really careful with this. I folded the band and put in LOTS of pins. I stitched outward from the 53cm point in the centre towards the end so that if the presser foot pushed any fabric out of place at least it would push it away from the centre (does that make sense?). Then I made sure I used exactly 1.5cm s/a when stitching the band to the bottom of the kimono so that when I turned out the ends and folded over 1.5cm of the remaining edge- it all matched up perfectly. Phew! Relief! Last job was hemming the sleeves which was a breeze after all that! Nice one.


Having started from scratch with just a shop bought item for reference, I really do think this is my proudest make to date. I've learnt so much, before I'd even picked out my fabric! I've tried new things and proved to myself I can do it! So cheesey but so true. I'm so proud that I could make dream kimono a reality...

Now, to release her into the wild and see what damage we can do................
Let's break some hearts Zohra.


x

Currently listening to: Interpol, Pioneer To The Falls
Location: Mam Tor, Castleton