Showing posts with label Burda Patterns. Show all posts
Sunday, 28 September 2025
Burda 6456, Ruffle Blouse
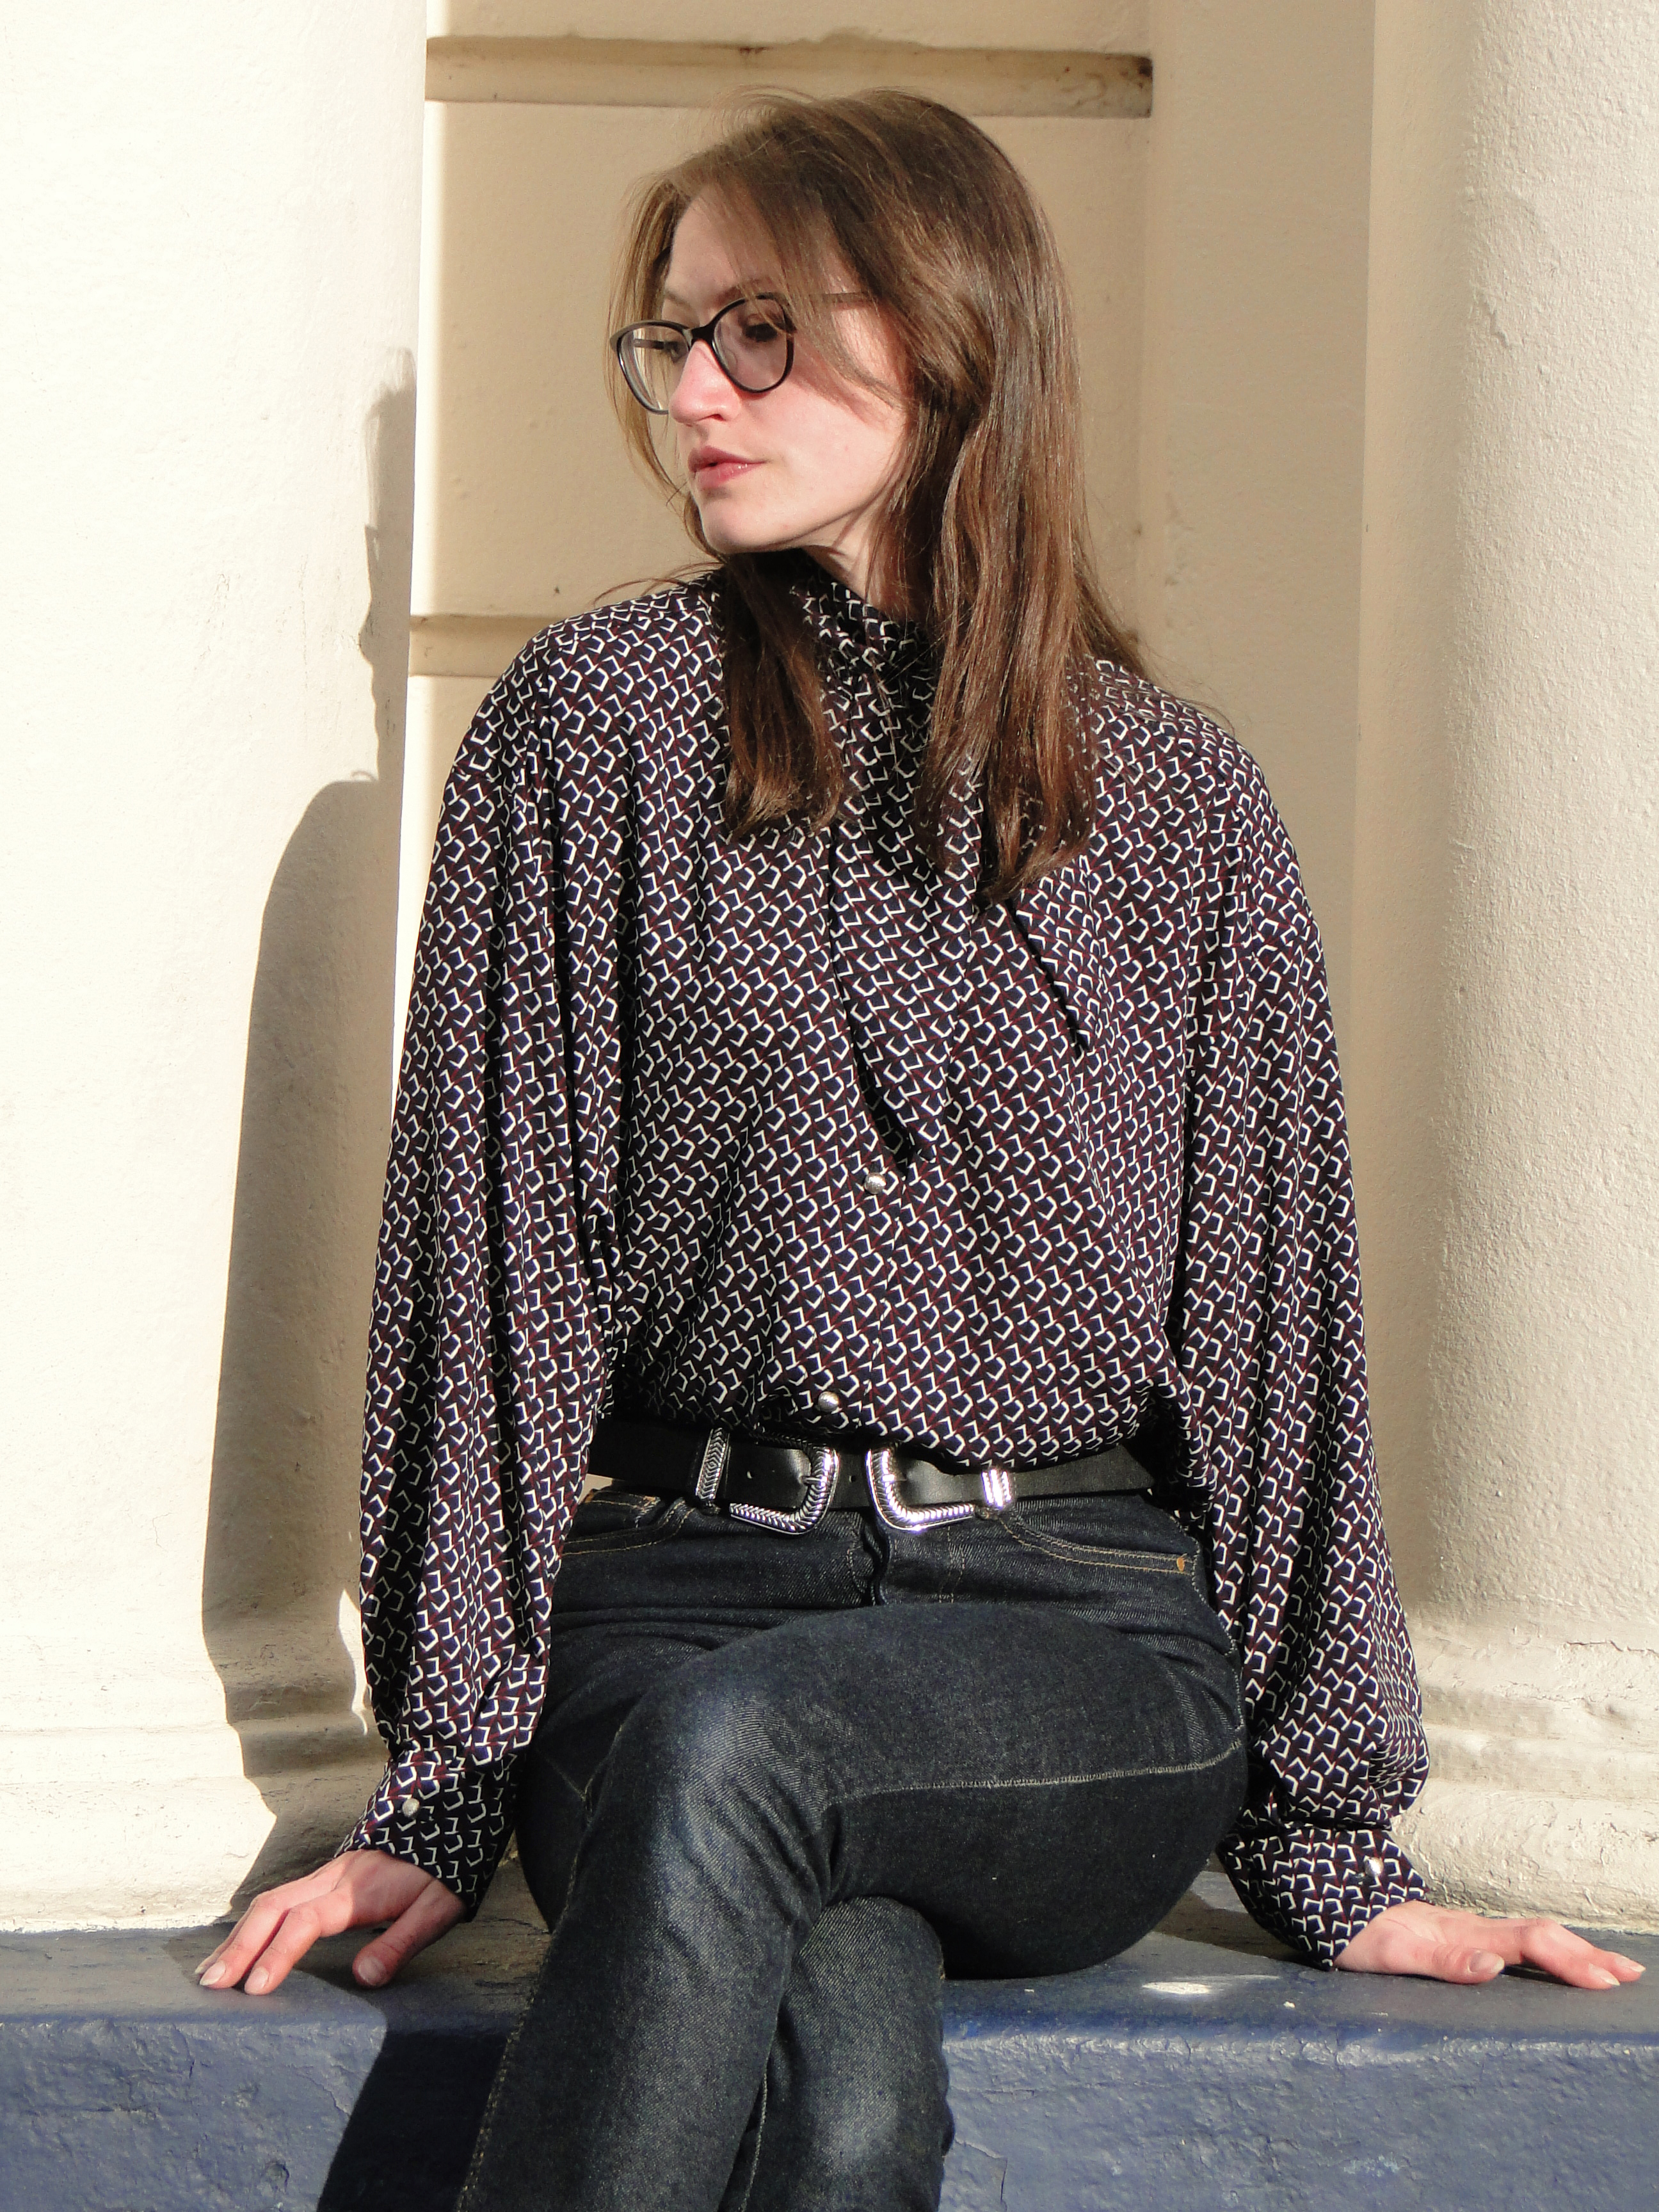
The Burda 6456 is a blouse pattern that's been sat in my stash for a while. The pattern has been prepped and ready to go, but I've never quite found THE fabric to let it loose on until I snapped this up from Abakhan. The unusual geometric print of this fabric caught my eye in. I bought a big piece so I have some left over I can make something else out of.
I cut a straight size 10 for the Burda blouse. The fit is intended to be quite loose so I didn’t make any alterations to the patterns pieces.
As the fabric is very drapey, I wanted to ensure I was cutting the patten pieces as accurately as possible. I usually pay a lot of attention to the straight grain but very little consideration to the crossgrain. As the fabric was an offcut I decided to take extra care to ensure my fabric was laid out flat before cutting. I Googled the best method, and am embarrassed to admit that 10 years into my sewing journey, I had never pulled a thread to determine the cross grain before! Once the pulled thread identified a straight line, I could line this and the selvedge up against my cutting mat and lay my pattern pieces out flat. This helps to avoid wobbly pieces that sag into a completely different shape once cut out! (we’ve all been there right…).
The main attraction to this blouse is the central flounce down the front. This is made up of 2 bendy pieces of fabric with a slightly daunting curved edge to hem. The pattern suggests folding over a 1.5cm s/a and zig zagging closed to the fold before trimming away the excess. I tried this tentatively, not keen on zigzagging or trimming something that was going to be so visible on the blouse. A few zigzags showed that the fabric was going to tunnel in between the stitches and not look great. Instead I folded over and pressed 1.5cm, stitched a straight stitch close to the edge, trimmed and then folded over again- another row of stitching to secure. As a result, 2 rows of stitching are visible on the back of the flounce, but they are neat and petite, and definitely an improvement on the zag zag and raw edge method. The hem is so narrow that it finishes the edge without distorting or wibbling the curve.
Reluctant to put a delicate fabric through the overlocker (because I am a wuss and the settings still puzzle me…), I decided to French seam the side seams and centre front of this blouse. I haven’t French seamed in ages and every time someone mentions French seams I think ahh I have got to get them back into my life! I was pleased with the result – my tip would be to be brave when trimming the seam allowance down before the second row of stitching. The moveable needle placement on my machine made it much easier to sew small (and straight) seam allowances than it was on my old machine.
The CF French seam did lead to a bit of confusion when it came to cutting the notch at the neck and attaching the flounce to the neck edge, as there was fabric folded this way and that, however I also think the instructions here weren’t quite right. From the images, and logically, the seam allowance of the neck should sit underneath the flounce, so effectively on the outside of the garment, but hidden. Following the instructions, however I placed the fabric the seam allowance seemed to show on the outside of the garment. I would be interested to know if anyone else experience this by following what was said?
I was able to figure out flipping the fabric round so the seam allowance lay flat and hidden, though admittedly the French seam did add a bit of bulk/confusion at the V-point of the neck, and I had to put a couple of sneaky stitches in to finish the top of the seam allowance.
The rest of the neckline is tacked then hidden inside the collar band. The curve at the front is really tight, and when pinning the neckband to the raw edge I was convinced I’d cut the neck band a size too big! I persevered though, and found the neck curves easier to pin while the blouse was on the mannequin rather than on my lap. The neckband DOES fit, but I would recommend super accurate cutting and sewing around the neck to make this as trouble-free as possible.
The armholes are bound. The binding is cut from the same fabric, folded in half, seam allowance from the armholes is reduced but 0.5cm, raw edges of the folded piece are then matched with the armhole and stitched before trimming the seam allowance, turning the folded edge over the seam and securing by hand. The pattern does suggest top-stitching here but I did a slipstitch by hand - we will see if it survives! If not I can always secure this with a machine stitch.
Quick double turned hem (quite easy as the bottom of the blouse isn’t particularly shaped), though once I’d done this I saw the pattern did suggest side slits, woops! The blouse fits well though and there is no struggle getting it on or off so why add the hassle!
x
Location: Milton Street, Sheffield
Currently listening to: Doom Bikini, James K
Sunday, 29 May 2022
Burda 6263, Necktie Shirt
Note: I wrote this blog in Jan 2022 but have been waiting until MAY to get some decent weather to get these pics! The chronology of my blog has gone waaaaay off track, so read this blog as if it were still winter and we don't yet know what beautiful things this year has in store for us...
Hi there! Hey! Hello, it's me! I'm back! I guess you might not recognise me with that HOMEOWNER glow I have going on? Or maybe it's because I officially grew my fringe out this time?
I've been pretty damn busy, but I can tell you I've also been pretty damn happy. Moving was actually quite a streamlined process, the big hold up being getting the studio floor laminated before I moved all my sewing stuff in.
So this is my first make of 2022 - The first make from my new house! The pattern is Burda 6263 - what drew me to it was this nifty neck tie - come - collar which I don't think I've seen on a pattern before. This pattern is definitely under represented on the socials. I hope this post inspires some of you to give it a go - I think with different fabrics could make this shirt really versatile.
My fabric was from Abakhan stash bins last summer, and bought with my leaving-money from my old job (thanks guys!). I love the geometric print (obv) and the subtle colours - navy, maroon and cream combine to create quite a retro feel. This teamed with the necktie is giving me majoy Peggy Mad Men vibes, but the over-sized sleeves and loose waist offer a more relaxed teen-grunge feel. Together I think these elements create the mixed-up, voyage of self discovery, like-a-little-bit-of-everything, Art School shirt that I keep dreaming of.
Once I'd cut the paper, I thought the pattern looked really short in the body so I thought I was being really smart when I added an exta 5cm to the pattern length of view A. Not neccessary. The armholes are really low for those big sleeves, adding length to the body. I cut a size 10 according to my measurements, but of course as usual I could have cut an 8 and I don't think I'd have needed to cut down on the PopTarts (anyone else get obsessed with these the moment they moved out?!). Luckily my fabric has THE most gorgeous drape to it, the oversizedness of it falls really nicely against my body and it also feels so lush! The fabric really was a lucky find! All the joys of soft drapey fabric but with very little fraying or snagging.
The pattern advised cutting the necktie on the bias - I'm not doubting Burda - I'm sure with some fabrics this is deffo neccessary, however due to fabric limitations I cut it on the grainline and hoped for the best. I think it worked fine, but again that may just be further credit to the qualities of this fabric.
The drop shoulders add length to the sleeves too (kind of obvious when you think about it). They appear really oversized until you add the pleats and cuffs, then WOW we're back in Mad Men and we're storming the boardroom.
I know I've said it before, but it's always such a pleasure when I can find some buttons from my gran's old stash bag. There were exactly 8 of these cute silvery buttons gleaming at me in her bag. Perfect retro vibes to compliment the fabric! While I've been away I may not have been sewing but I promise I have been keeping up to date on Insta sewing tips. I remembered seeing one using masking tape to mark button holes- I have now tried and tested this and can confirm it's a winner! SO much easier to follow than bobbly wobbly chalk lines or fabric pen that disappears into your print. I also improvised and used UHU glue as an attempted seal on my button holes??? Anyone done this? Buttonholes really are my nemesis, so willing to try any tips and tricks to make them more reliable.
I'm so glad the Burda 6263 went without any hitches and that I love the finished thing as much as I do. I was so worried I would have forgotten how to do it!! Words can't explain how much I have missed sewing while I have been moving. I've been trying to channel creativity into doing up the house and a bit of scrapbooking, but nothing quite compares to taking 100+ selfies in the mirror in your homestudio, wearing a shirt you just stitched together.
It's great to be back. Say hello to new and improved, 2022 Angela Holland.
x
Location: Loxleys, Kiln Street
Currently listening to: I Just Want To Make Love To You, Etta James
Sunday, 29 August 2021
Burda 7136, Blouse
All the members of my girlband agreed, Italy absoluely SLAYED this year at Eurovision. A quick looky through Instagram soon showed that Maneskin, their entry, had already acquired quite a following in Europe, with the kind of giddy fanbase I haven't really seen since the 1990s. Amongst the reposts and the hashtags I found this pic of Victoria De Angelis and fell for her outfit!
Sunday morning, post- Eurovij Italy victory, I'm asking my Instagram followers if they've ever seen a shirt pattern like this anywhere? There were a few good answers but the patterns that came my way were mainly out of print and difficult to track down. The suggestions did help me narrow my search down to 'shirt with bib' patterns and I finally came up trumps with the Burda 7136.
The pattern is very formal, with a pin-tuck panel in the breast and sharp collar and cuffs. After the bib area, the second most important feature for my Maneskin blouse was the floaty, flouncy sleeves. I knew I was going to have to do a bit of a hack to transform the dress shirt into something more 70s inspired. I recalled the lovely floaty bell-sleeves of the Mia blouse, which came free with an issue of Simply Sewing magazine a couple of years ago and thought these would be perect to combine with the tux-bodice. I took the top half of the Burda sleeve and then tapered the width to the same width as the Mia sleeve at the elbow point where the first flounce sits. The Mia blouse has the option for a double flounce. Although this wasn't necissarily in the initial plan I thought it could make that shirt just that little bit extra.An instagram poll voted a big fat YES to the double flounce when I put my toile out to the critics. I'll admit I was little bit worried about the shirt looking a bit too 'costume', but an extra sleeve flounce wasn't a difficult addition to incorporate should I decide I agreed with the poll at the final hour.......... Ha, turns out you guys were right.
I was on the hunt for a drapey but not strechy lace for the main body of the blouse. I found some nice laces but they were all quite open weave and crochetty and didn't quite embody the sexy vibes I was looking for. This soft white satin was an instant WIN- It had the perfect drape to it and not too much sheen for a satin fabric. I settled for a plain black polycotton as at this point I had been round alll the local shops and casually browsed online and couldn't find a lace that was on point. I bougt both of these fabrics from Direct Sewing and Knitting Supplies in Attercliffe. I don't get out that way very often but they do always have a great selection- particularly good range of knits too if you're on the search for some fun tshirt fabrics.My buttons were in my stash already, just cute plain black stem buttons from Hillsborough Fine Fabrics.If you've made a shirt before, the basic construction of this guy is nothing too taxing, though must admit the sleeves and cuffs of the actual origial pattern look look to have a few more steps than cuffs I've made before! I thought the hardest part of the shirt was making the bib. A piece of fabric is pin-tucked and then the bib shape is cut out of this once the tucks are all sewn. You have to be really reaaally mindful that you are making each tuck the same width! So I definitely recommend using a ruler and a tape measure and notches for each line of stitching. The stitch lines are all really visible on the front of the blouse and the fabric would definitely show up any unpicking so had to get these right first time! You'd be surprised how long it takes just to stich a series of straight lines!! I pressed the fabric after each one to ensure my measurements for the next line were as accurate as possible.
Confession time?! I'm hoping I'm writing this far enough down the blog post that most of you will have stopped reading now, so I'll reveal my big secret(...) I pressed all of my pintucks in the wrong direction. If you look at ANY pintuck fronted tuxedo online you'll see they are pressed out, towards the sideseams. Mine are pressed in. Why. Why!? I don't know why I did it, but I do know once I'd pressed and cut them both into their bib shapes there was no way I could just press them back the other way. I feared the worst, but I don't think the end result was a major disaster. The main trouble was trying not to catch the inner-most pintuck in the button band seam. But would you have known though? If you'd not read this would you have picked up on my error? Just say no, lets move on.
This was my first hidden-button button band! I think I was really lucky again with my fabric choice - I think some fabrics would have sprung open and not hidden the buttons at all! It also pressed really well on the collar. Construction of the collar is very similar to just adding a collar band, the actual turned out collar being part if this same piece then pressed- so actually simpler than adding another pattern piece. I love the simplicity of the shape but also how crisp and elegant the little triangles look.
The trickiest part of the sleeve is probably hemming them. The edges are very curved!! So you have to realllllllllly ease in the hem allowance. I pressed up 1.5cm and then turned in the hem allowance to meet the crease. I used about 10000 pins and stitched it from the wrong side so I could make sure I was catching the hem. I should probably have checked my machine tension as the stitching on the outside of the sleeve is a tiny bit loose - but it's doing its job and I think only the perfectionist in me can see that.
I'm really really proud of the outcome of this shirt. It has definitely inspired me to plan a project and work toward a particular design vision again- I think makes like this are really rewarding. I've not really experimented too much with combining features of multiple patterns to make something totally new before, I was surprised how easy it was in this instance.I am intrigued to try the Burda pattern again with a less formal fabric and colour choice. I think the bib could be cut without the pintucks with no detriment to the fit or shape of the blouse, so would be a good opportunity to incorporate multiple fabrics with less faff haha! I've seen some cute bib-blouses online with a ruffle around the edge too, which I think would be easy enough to have a go at by tweaking this pattern again.
After a recent trip to Abakhan and buying ALLL the cute viscose shirt fabrics I have a few more blouses lined up to make! Has anyone else combined shirt patterns to get a frankenshirt? Or maybe you've tried the cuffs on the original Burda pattern and you could tell me if they were tricky!
x
Location: Crucible Theatre, Sheffield / Fitzalen Square, Sheffield
Currently listening to: 911, Lady Gaga
This was my first hidden-button button band! I think I was really lucky again with my fabric choice - I think some fabrics would have sprung open and not hidden the buttons at all! It also pressed really well on the collar. Construction of the collar is very similar to just adding a collar band, the actual turned out collar being part if this same piece then pressed- so actually simpler than adding another pattern piece. I love the simplicity of the shape but also how crisp and elegant the little triangles look.
After a recent trip to Abakhan and buying ALLL the cute viscose shirt fabrics I have a few more blouses lined up to make! Has anyone else combined shirt patterns to get a frankenshirt? Or maybe you've tried the cuffs on the original Burda pattern and you could tell me if they were tricky!
x
Location: Crucible Theatre, Sheffield / Fitzalen Square, Sheffield
Currently listening to: 911, Lady Gaga
Subscribe to:
Comments (Atom)


