Sunday 29 January 2017

Suede dreams, Part 2: Realising Rosalie, Self Drafted Rosalie Dress


Rosalie has been my most adventurous undertaking in the sewing world to date. In my last post I discussed the designing of the dress. Let me tell you about making her, with a few handy tips for sewing with suede.


Step one- Cutting out my suede pieces. Suede and leather is bought in hides, so the bits you get will never be rectangular. From the off this is quite different to using fabric with selvedges. Lay planning is difficult because you can't really plan ahead until you know what shape your animal skins are going to be! Due to the qualities of the fabric, I was unable to cut on the fold, so I had to be really careful trying to calculate where everything should go. Due to the cost implications it's important to be as economic as possible! You're looking at about £45 per hide, with each one being very roughly 1m square, so you really want to consider your lay planning before you start hacking into it. The next thing to remember while laying out, is that suede has a nap. There is quite an obvious "up and down" when you stroke it, and you want to make sure all your bits stroke the right way. I found, as the fabric isn't woven, you can get away with angling your pieces ever so slightly, especially if it means the difference between having a sleeve too short or a sleeve bang on.


I learnt that different areas within the same hide can be different in texture. By chance, but also quite luckily, the front pieces of my dress which have a curved seam, were cut from a thinner, softer area of the hide which seemed to have a little more stretch. This made those curves a little easier to sew.
I laid out on the right side of my fabric so that I could keep my eye on the nap, but also check my suede for any scars or dimples.


Pinning suede is a bit of a no go area, certainly at the cutting out stage. Instead I weighted down my pieces and drew around them, adding on my seam allowance as I went. I cut out with the rotary cutter and that was no hassle at all.


I was a bit nervous to use the wheeling through method to transfer my darts and markings, so instead I patented my own idea! I drew all the markings on the wrong side with biro! Yes Biro!! The pen shows up really well and doesn't rub off like chalk instantly would. As all these markings would be inside the dress it didn't matter that they were there. Obviously wouldn't recommend using biro if you were using a lighter coloured hide, but worked really really well for me!!


When it came to sewing the darts, despite what the internet says I saw no other way to do it than to pin them first. Pinning suede is a bit weird. As I was using pig skin, it wasn't too thick to use pins. I'm guessing cow hide would be much less possible. The internet suggests using clips or pegs, but I didn't see how that would work on a narrow dart point. Also, pins leave holes, so you have to be super careful where you're putting them. I figured if they were exactly through the stitch line then a few holes wouldn't cause any drama. I found the major downside of pinning suede was just how bumpy it made things. Its a good idea to remove the pin well before you reach it with your needle otherwise you're going to get stretches and bumps.


So on to sewing the darts- step one, you gotta have a leather needle otherwise you're just going to break everything- your needle, your machine, your desire to ever sew again, your will to live, all of it. Once you have a leather needle, you're ready to take it on. As all stitching together is most often done on the wrong side of a garment, you really have to keep your eye on suede. A normal metal machine foot will drag on the rubbery texture of the wrong side, and could potentially stretch your pieces out of shape. And trust me, you really really don't want that when you've spent 9 weeks drafting the perfect shaped pieces to fit your body!! On thinner areas of suede the dragging and stretching isn't quite so bad, but where it's a little thicker it can be a massive struggle. Set your stitch length to 4, this will help but at times even with my stitch length on 4 my stitches looked tiny as the feed on the machine wasn't feeding through the way it would a normal woven fabric.
So I guess you could go out and get yourself a walking foot and that would most likely solve it, but if like me, you've spent all your cash on suede (!) then you're going to need a cheaper solution.
You might remember, for my Simple Sew Kaftan I stitched with a layer of tissue underneath my fabric to make stitching easier. Tissue came in handy again while sewing with leather, as a way of reducing the friction between foot and fabric. This time I used the tissue on top of my fabric and stitched though it before tearing it away. The downside is you can't see your marked on stitch lines, but the upside is your fabric won't stretch or drag or buckle and your stitching will be lovely and even. I was so happy it worked otherwise sewing those side seams could have resulted in big fail!


For all it's tricky qualities, suede has it's upsides. The stuff doesn't fray so time saved not overlocking and not hemming was a godsend!


I also decided to line Rosalie, choosing a habotai from Abakhan. Make sure you swap your needles if you're swapping between the two fabrics! Use something sharp and petite for sewing your lining fabric otherwise you get big holes and puckers and you're possibly going to pull your threads, which is not cool.


Real quick- to make the lining I just used the exact same pattern pieces as I used for the outer fabric. I overlocked the back opening before pressing under my 1.5sm, simply because the risk of getting frayed lining threads caught in my zip was making me feel a bit nauseous. Make sure you set your overlocker to the right settings for light fabrics before jumping in with it (learnt the hard way). I set all my top dials real low to make sure my stitches weren't going to pull the fabric. I'm guessing it's a good idea to use a thinner overlocker needle too, but I don't have one and it wasn't the end of the world.
I attached the lining to the suede dress at the neckline, understitched, then turned it inside. I had a sudden brainwave, that I wouldn't be over locking my sleeve heads to my dress armholes as I usually would, as I didn't reckon putting suede through the overlocker would be a good experiment. I didn't want to loose any of the lining fabric at the arm holes, and didn't want to risk puckery overlocking, so instead did a narrow zigzag stitch around the armholes of the lining before attaching to stop fraying.


Inserting my sleeves wasn't the nightmare I'd been anticipating. I had to pin everything, despite what the internet says about suede and pins. You try inserting a sleeve head without them!!


My last little sneaky suede tip came into play when attaching the zip. Usually I would pin and tack a zip, check it, try it on, then stitch it in officially. I knew pinning would be much too bumpy to get away with on the zip area, and tacking would have been a slow and painful process that wouldn't necessarily be helpful. Instead, I cheated big time... and used double sided tape to hold the zip in position while I stitched it on!! I felt like a massive cheater but it was so so so worth it. Putting in a zip had never been so easy! I tried to remove the tape after but it wasn't really having it, but it's well hidden inside the makings of the dress... So you'd never know!


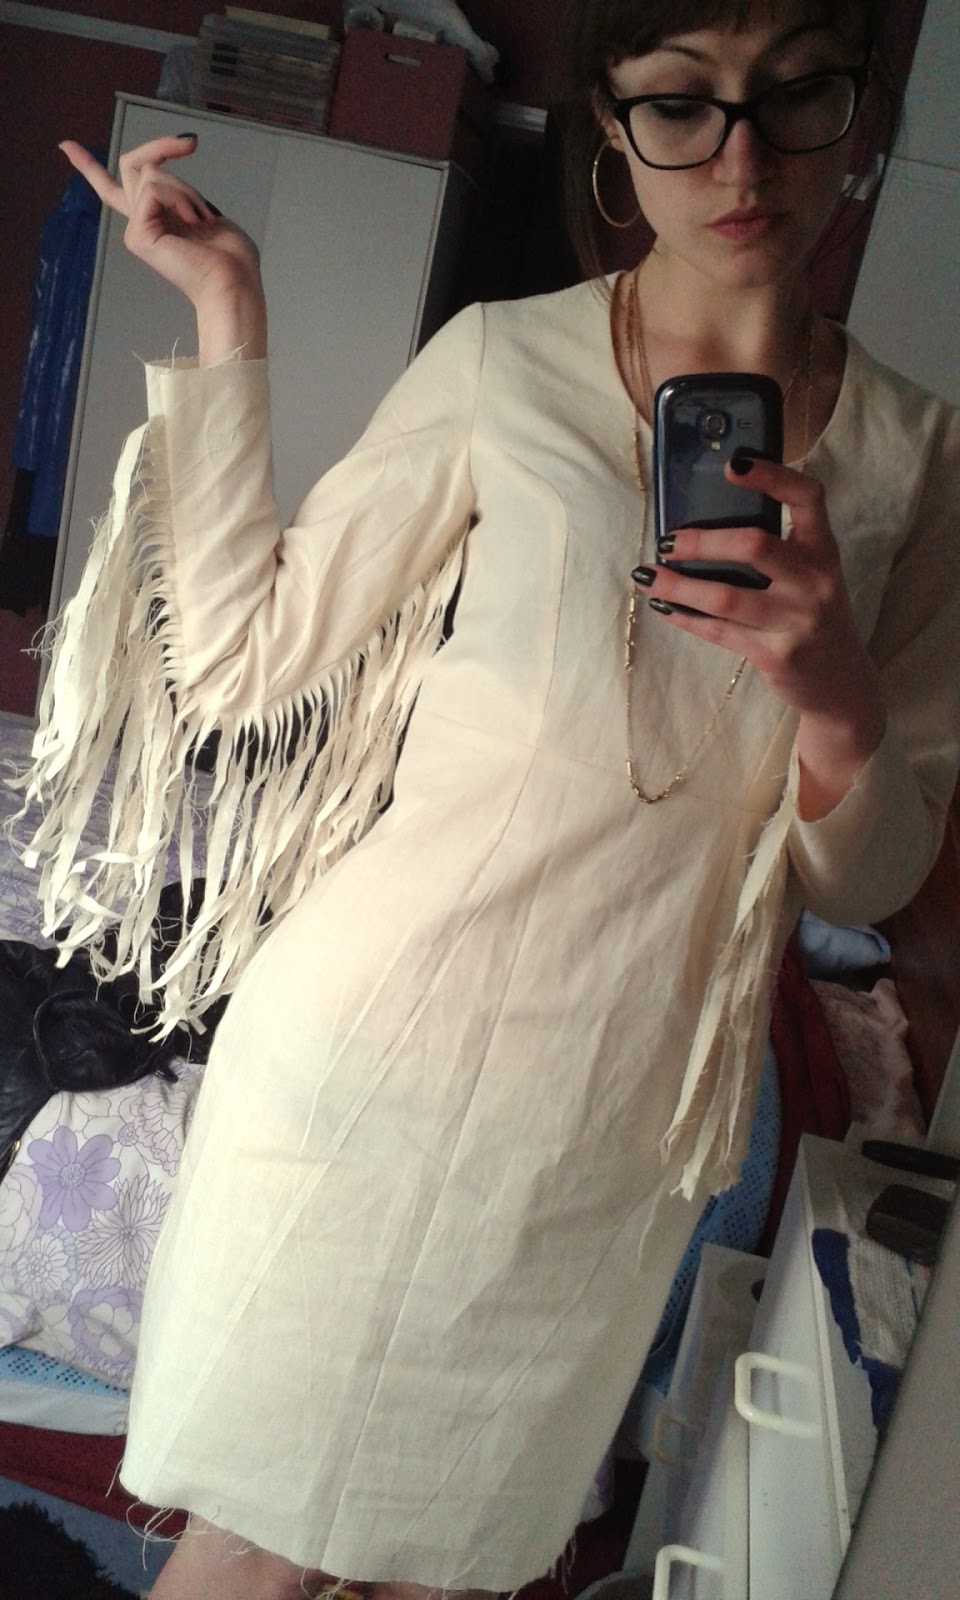
Then the fun bit- cutting my tassels! I just freestyled it and cut the suede panels I'd inserted to the underarm seam.


I tried on and was happy....... But! I wasn't loving my neckline. It just wasn't quite... right? The angle just seemed a little bit off, so I unpicked the understitching (bleh), and reshaped the neck a little. This was definitely not the best time to start doing this, as once the sleeves are in it's 100x harder to get to the neckline. I rounded it out a little, then re-understitched as far as I could.
Worth it though!


I checked length, which I was happy with, and hemmed the lining. Handstitched the lining to the zip (Zzzz) and we were about done.


I'm going to make a few changed to my pattern pieces for next time. I'm going to take some out of the back neck as it comes up a little too high, take a little out of the sleeve underarm seams and redraw that neckline. Lowering the back neckline will also result in the end of my 22inch zip sitting a little lower than it currently does, which would not be a bad thing. If my ass should magically get bigger for any reason it's going to be a bit of a struggle getting in unless I lift her over my head. I also extended by bum darts about 7cm longer than on my toile. I'm not sure if it was just due to suede's tendency to be a bit bulky, but the dart points were really sticking out at my backside. I found extending them a little lower made for a much better fit.


So there we have her! My Rosalie all ready for action. I love the flattering shape of the bust panels and side seams. I'm already planning my next dress from this block.


x

Location: Stanage Edge
Currently listening to: Mary Mountain, Quilt

Suede dreams, Part 1: The road to Rosalie

I've mumbled something about a pattern drafting class I took this Autumn/Winter, but as it stands I've still not made anything to really show-off my achievements. That's not to say though that plans have not been underway to make something super cool.
I'm going to break this post into two parts, as it's been quite a journey and I want to document the work that's gone into it. As I type this, I have not finished my garment- merely bought supplies, so I'm a bit nervous to declare what it is I'm making incase I cock up big style and the result is a majorly disappointing disaster.

So lets start at the start.

The 9 week course I took focussed on drafting your own pattern block from measurements, then using this to design garments. We were all encouraged to work with the basis of a fitted dress with a waistline seam and sleeves. Beyond this we could style it how we wanted.

Once our block was drafted from measurements and crazy maths, we pencilled in our style lines- mainly focussing on a neckline, skirt shape and overall length, before we took to the calico and toiled up our first draft.

The pattern pieces were cut from tracing off the block, therefore seam allowance is NOT included on these pattern pieces. The pattern piece is pinned to the calico on the fold, then drawn around with tailors chalk. A 1cm seam allowance is drawn around the pieces, with 1.5cm at centre back, and any additional needed for hems added onto the bottom of sleeve and skirt bottom. The stitching line is then wheeled through, and with the aid of carbon paper face up on the back, traced onto the back half of fabric. Once cut out all stitching lines are really clear. Seems like cheating, but it's dead helpful and makes for super accurate stitching later down the line.

For the first toile it was handy to mark on bust and hip lines with a running stitch, just to check how it was sitting on the body.

Fitting is probably everyone's least favourite thing about home sewing. The good thing about self-drafting is it keeps fitting troubles down to a minimum. With calico dress on, I took a little out of the side seams between the waist and hips, a little in at the back darts ('We have booty!' my teacher exclaimed) and some off the length. So er, yeah, tighter and shorter was the way forward!

With Aimee's help, we pinned these alterations onto the dress whilst I was wearing it by just pinching out excess and then marking the placement of the pins onto the calico with chalk. This is a lot easier to do when there's two of you, harder when you're alone in your kitchen with your dog.

By unpicking your toile you can then transfer your new makings onto your block by measuring the lengths/shape of your new makings.


Are you keeping up?


So I've got this nifty fitting dress in calico. Our next learning curve was moving the dart placement as I discussed in a previous post. I started by moving the shoulder dart to the underarm, but got even more excited when we discussed making the space between the bodice darts into a new little panel.
So I drafted an armscye dart and joined this with the vertical bodice dart. Don't forget these pattern pieces now need seam allowance adding on when cutting out.


I absolutely adore this brown suede dress at PrettyLittleThing.com. The fit looks very similar to that of my toile, so couldn't resist having a go at those bodice panels!


When it came to making up my new bodice with panels and checking fit, I was already sketching out ideas for what I wanted my finished dress to look like. I decided to go whole hog and make the full toile again, with my side seam, dart and length alterations.... And also a little trick up my sleeve!!! Literally! See what I did there?!


I've been thinking about tassels for a long time, in fact, I could pinpoint it to the day I saw Laura Oakes play at the Plug in Sheffield in early 2015 and she had these awesome western-looking tassels down her sleeves. You can't spot em that well in my pic, but they looked super cool. If you know me, then you'll know I get a kick out of Americana, but also dig things a bit witchy and cosmic. I fell HEAD OVER HEELS with this dress from Violet House:


Honestly, check out their website, they have SO MUCH cool stuff, not to mention Ms. Violet House is a total babe! I spent hours trawling the internet getting excited about babes in tassels, this one from Killstar is another fave:


... I knew it was time to have a go at making the dream reality. I cut two rectangles of calico about 44cmx26cm and stitched these into the underarm seams of my new toile. After turning the sleeves to the right side I cut the calico into strips..... And Mwah! We have tassels!


It didn't take long for these guys to start fraying, so knew I was going to have to pick a fabric that wasn't going to fray. Velvet was out of the window after it had recently pissed me off a bit, also it has the tendency to curl and wasn't convinced it would make a perfect tassel. Mainly though, as much as I love velvet, it's stretchiness meant that my block would need redrafting, as it was designed for stable woven fabrics. I was all for using a fake suede like the panels in my Simplicity 1070 Jacket, and maybe underlining to give it a bit more body, until I told my teacher and she said it wasn't out of the question to make it out of real suede.


I thought about it, and it seemed a shame to do anything but the best after having already put so much into getting this far. I knew it wasn't going to be cheap, but when I found there was a real leather shop just over the hills in Matlock there was no talking me out of it.


The Identity Store is a cute little shop round a back street in Matlock. You probably wouldn't know it was there unless you lived in Matlock or have a real love of leather. After browsing their awesome selection online and giving them a ring to check out the feasibility of making my dream dress, I planned my trip for when the new year had kicked in.


The shop is great, with a back room full of all kinds of leathers and suedes and fur. I came away with two pig suede hides in blackest of black and some leather sewing needles. I'm not going to tell you how much it cost! If you can't spend money on things you love then what's the point in even going to work? The staff in store were so so so helpful and gave me some handy tips for getting going.


***

I've got my pattern, I've got my fabric. My dress is on the way and her name will be Rosalie after this babe!


Stay tuned for Part 2 to see how we get on.

Wish me luck!

x

Currently listening to: Psych ward, The Urges


Monday 23 January 2017

Self-Drafted Knickers


I've got a favourite shape for knickers and by now you all know about it.

For all my previous pants projects I've utilised So Zo's FREE knicker pattern which is awesome. While going through my knicker draw the other day though, I felt inspired to draft my own from a cute little Primark pair I've been saving for occasions(!!).


The result turned out to be pretty similar, just a little more petite. My So Zo knickers have been quite highwaisted so far, and these turned out much more hipster. I opted for my usual front and side panels as I love the opportunity it provides for using different fabrics... And for using yet MORE lace.


I utilised some waist elastic from an old pair I was binning, which worked so much better than any elastic I've found in the shops so far. My centre panel was a scrap of velvet left over from my recent skirt and the little gem was part of an earring that I'd used to make something else. I used a very narrow zigzag stitch to attach the lace to the leg holes, and a slightly longer one to attach the waistband and waist lace. I think this ticks off the 'something sexy' and maybe even the 'something spooky' on my 2017 sewing list... And it's only the 1st of January!!


If I'm gonna make them again, I'm adding maybe a centimeter to each side seam, just to save stretching them out to the max to get over my ass. Also, I think a centimeter or two to the height, just because I think that creates a more flattering shape.
Not bad for my first pair of self-drafted though! There's all kinds of things to play with like leg rise and different panels and fabrics and embellishments. Oh and lace, loads of lace.


The top is just something I grabbed from H&M when I was in need of new gig wear and had no time for serious stitching. Disappointed with the fit though, I added some bust darts to cut out the gaping arm holes! Wish I'd taken a before and after for you, doh!
It was a bit guess work really- I found my bust point by putting the top on pinning where my nipples were, then pinched out the excess fabric towards this point and pinned. On taking the top off, I measured with my tape measure to check both sides were even then stitched. After checking fit, I cut away the dart fabric and top-stitched. Very pleased!

Enjoy.


x

location: Home Sweet Home
Currently listening to: The Black Stone, Holy Serpent

Sunday 8 January 2017

Butterick 5895, Tie Waist Shirt


The time between Christmas and New Year is for two things; watching World's Strongest Man and having a play with sewing-y Christmas gifts before you have to go back to work.


For Christmas this year I asked for Butterick 5895 Tie Waist Shirt pattern designed by Gertie. The pattern also features a jeans pattern not too dissimilar to the Shannon Shorts/Trousers from Simple Sew that I made a few months back. The shirt caught my eye a while back when I was a nervous beginner and I thought it was about time I found the courage- especially as it's labelled as easy!


With the large shoulders of Gertie's shirtwaist dress in mind, I was super paranoid before I got started that I was going to end up with a shirt too big. I double/triple checked my measurements and also referred to the actual garment sizes that are notes on the pattern pieces to try and work out how much ease I was going to want in the shirt. Always finding my boob to waist ratio is never the average against commercial patterns (tits always a little too small apparently! I'll get over it...) I cut a 10 but graded down to an 8 at the bust/underarm area. If I'd been going strictly on my measurements I think I'd have cut a 12. I'm quite glad I didn't- although I could have gone bigger at the waist at the tie bit gathers it all together to look super retro, I don't think my shoulder/arm/bust area needed to be any bigger. The shirt isn't meant to be fitted, but I don't want to be drowning in it! If I was bigger busted I think I could have got away with it (and probably many other things.......). Maybe for future shirts I might think about taking a little out of the overarm seam, but worry that could play hell with that whole collar construction....


Transferring the dots from the pattern sheets is super important for this pattern. I tailor tacked the lot, and a few had fallen out by the time I got to sewing up, ha! Oh well I tried. The most important ones are the markings on the shoulders by the shoulder darts. One of the first things you need to do is reinforce the corners by the collar/shoulder dart before you clip. This all becomes very integral later down the line when sewing the neck facings and making the collar more collar-y, so just don't cack it up otherwise you'll set yourself a right task trying to get it all to fit together around those corners!


When that collar comes together though, it's a dream!! The way it crosses over at the back is a cute little design feature. I might maybe make the lapels a little smaller next time though. Don't get me wrong I think they looks ace, but they are maybe just a little too flappy!? Next time I also think I might use a stiffer interfacing on that collar just to give it a little more form.


The way the facing turns into the collar is very reminiscent of the collar and facing on Gertie's Shirtwaist Dress to the point where I felt sickiningly nostaligic for last March when I made mine. The fabric I chose to make my shirt was the last of my stash from my trip to Leeds for Sew Up North, which was sort of a cross between the crape-y, swirly stuff I made my first Shirtwaist dress from and the random paislies of my second.


With this in mind, I think I would quite like to incorporate the sleeve band finishing of the dress on to the shirt, as I think the narrow hem can look a bit amaeatur? The sleeves are also maybe a bit too roomy?


Overall though, love the vintage look of the shirt. Would love to find some proper cowboy fabric any make myself a proper country and western shirt!


x

Ps, promoting posing not pistols... Mwah!


Location: Bradfield
Currently listening to: Time Collapse II / The 7th Terror, Fuzz