Tuesday 27 December 2022

Fibremood Patterns, Edith Blouse

It's not difficult to see why the Edith Blouse hashtag is trending on my Instagram right now. The pattern is super chic, super cutomisable and super easy to fit. There's an abundance of varied fabrics paired with this pattern on the socials - basically anything goes. 


My fabric was a birthday present from a shopping to trip to Hillsborough Fine Fabrics - I was immediately drawn to its William Morris-style romantic utopianism and neutral tones. The fabric is light and drapey but didn't proove too much of a nightmare to sew with. I used fresh microtex needles to reduce the rick of snagging, and used only one needle in my overlocker so the seams were more delicate. 

Although the Fibre Mood magazine has fully illustrated instructions I would recommend going to the website and following the sew along step by step as some of the images can be left open to interpretation. Also - don't do what I did and skip straight to the fun part - if you've never made a Fibre Mood Pattern before it might be useful for me to let you know now that the seam allowances aren't included on the pattern sheet, so you'll wanna add those on when you trace it off. Of course I'd already cut my toile before thinking to check what the seam allowance should be and that's when I saw it. I still made up my muslin but reduced the seam allowances as much as possible so I could try and invisage the fit. 

The side seams and sleeve seams are straight and there are no darts in the bodice, so this makes fitting quite simple. 

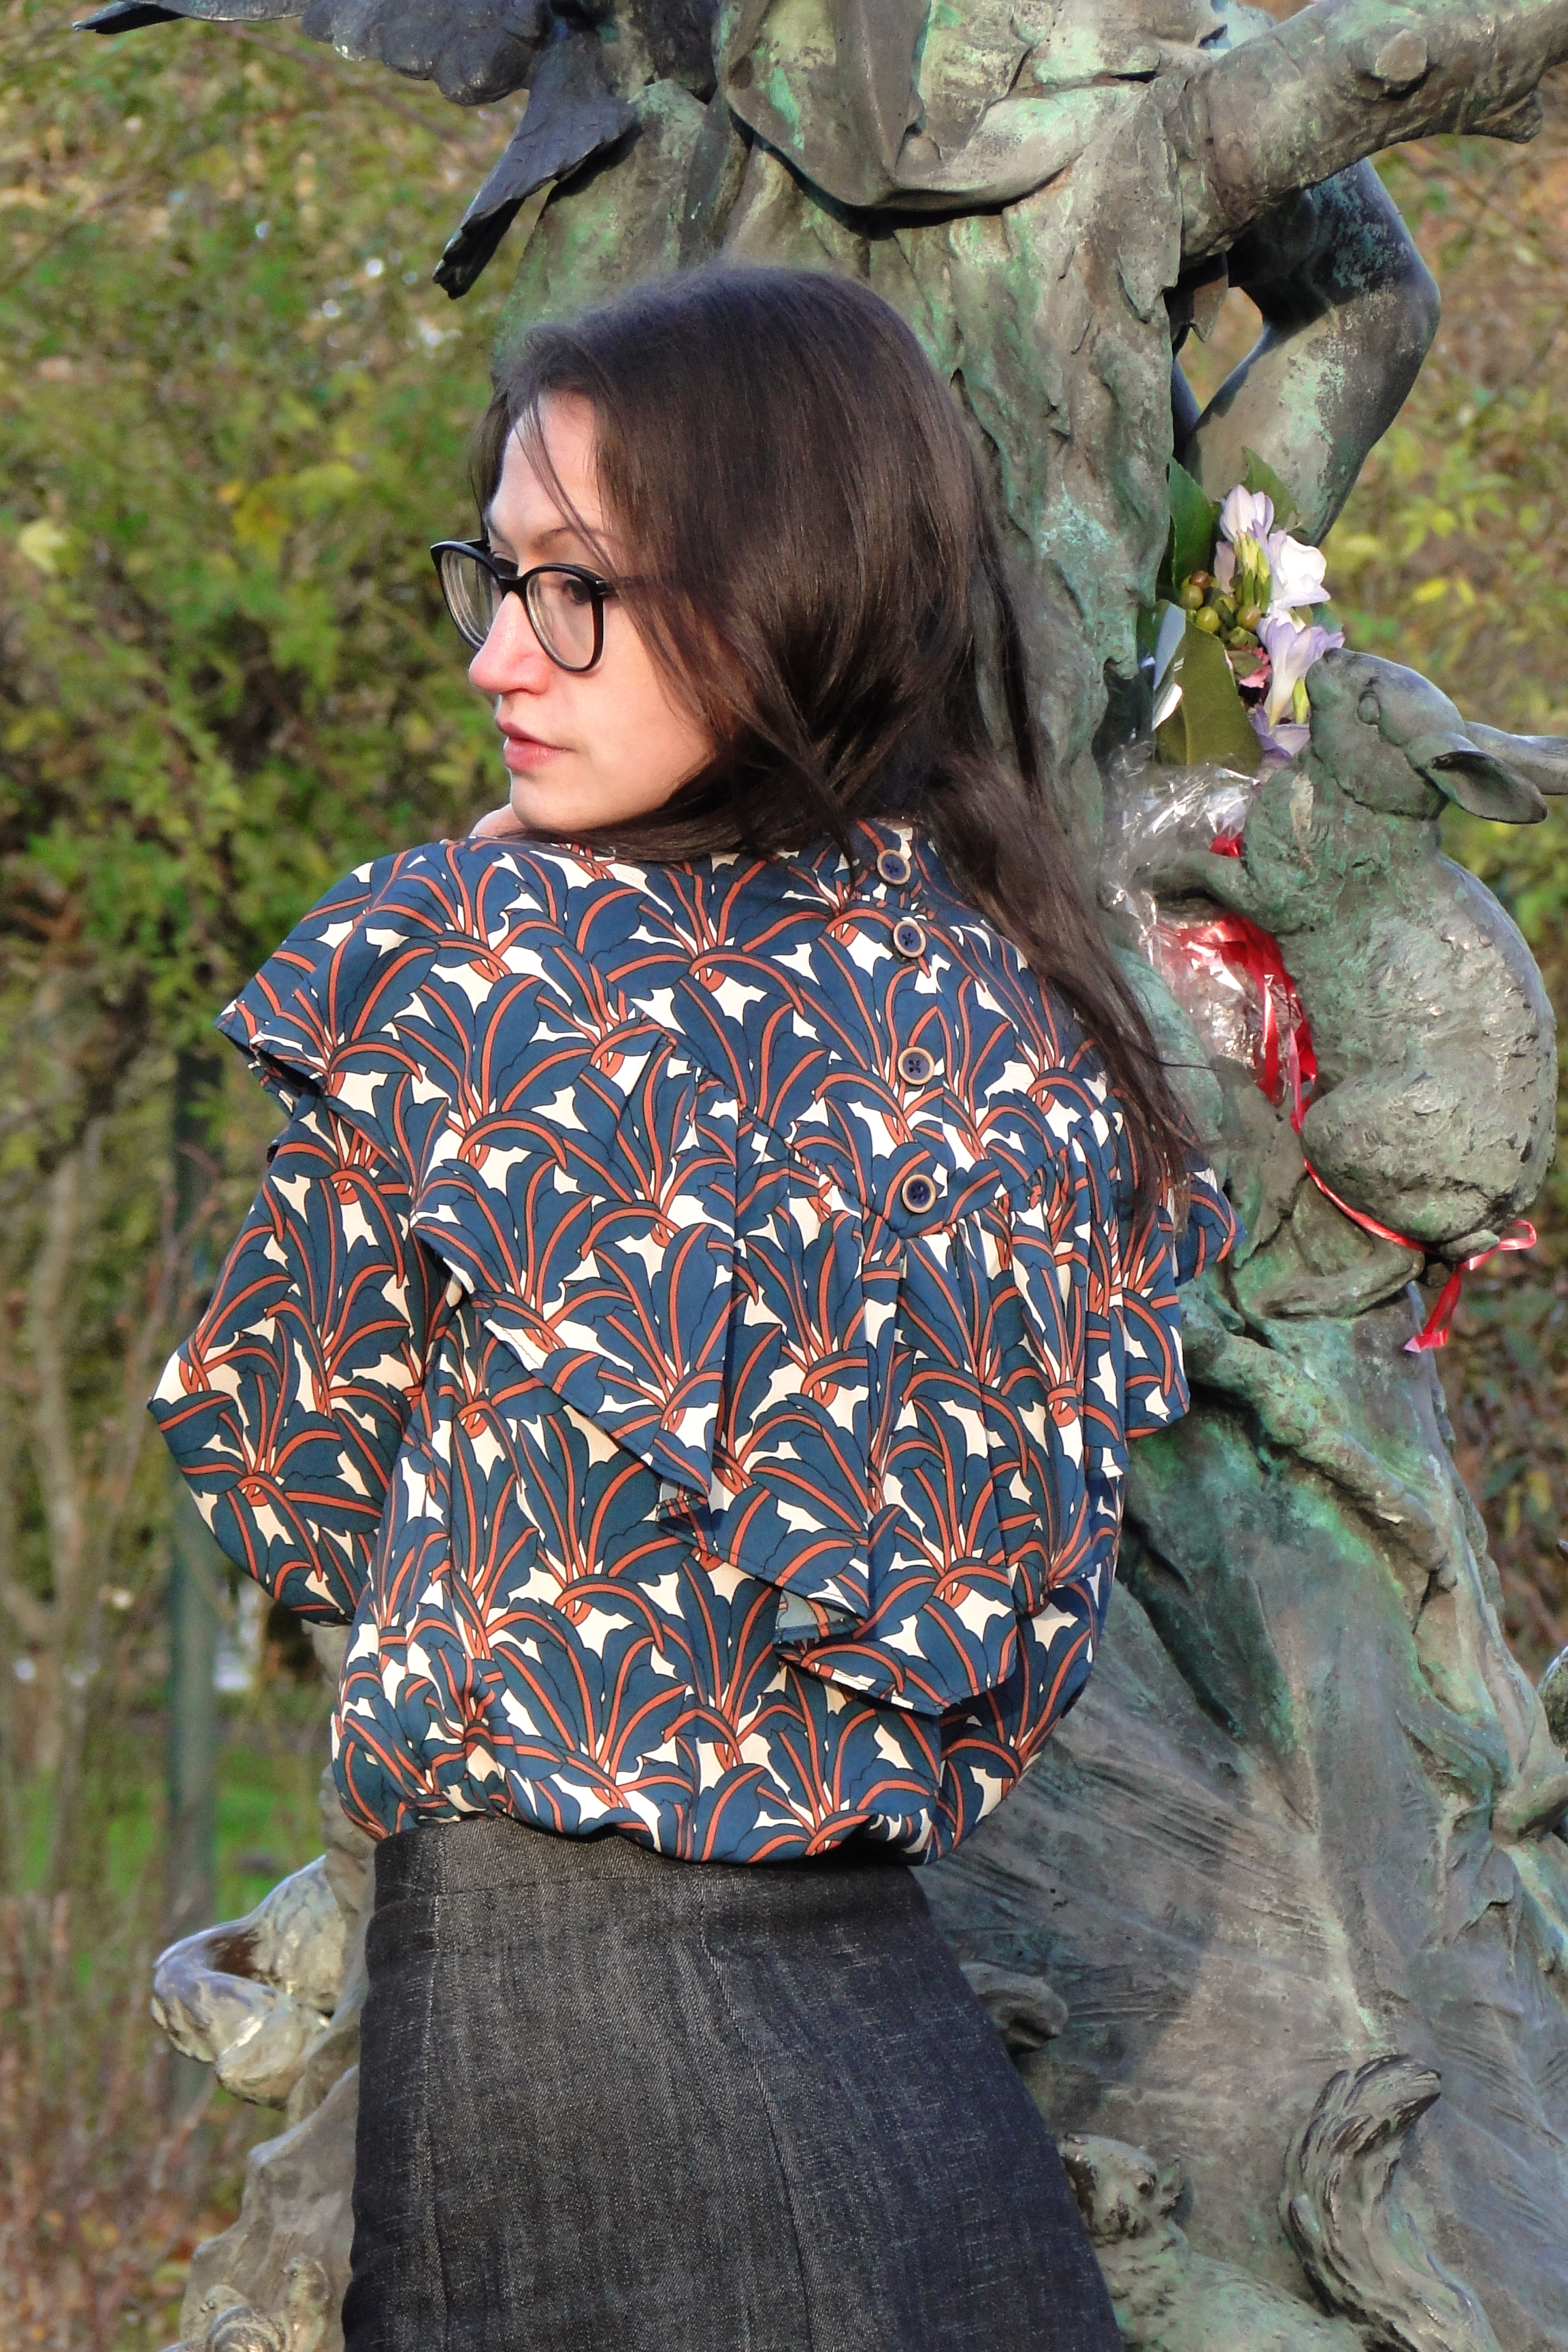
I would also recommend making sure you 100% include the tailors tacks at the insert/bodice points - as matching these up is integral to getting that nice neat V- finish. 


I followed the instructions pretty mcuh down to the T- overlocking raw edges before sewing them and pressing them open (not like me at all as I pretty much ALWAYS finish them together after stitching the seam). As the fabric was quite delicate though I thought this could make all the difference. I did however change up how I stitched the neck band on though - I stitched the outside to the top neckline and then slip stitched the inside down by hand, instead of sewing the inside down then topstitching the outside down. Basically I didn't trust that my topstitching was going to be very neat, and the pressed edge was still a bit springy so didn't trust it to behave when sewing it down from the top. There were no detrimental effects from sewing it my way, so if you're not feeling super confident about your top stitching abilities then I would deffo recommend sewing the inside down by hand. 


I also omitted the top stitching around the ruffle. Once I'd sewn it in, I really loved how naturally all the pieces seemed to fit together. Again- worried wobblie topstiching could ruin the effec, I decided not to sew down the ruffle's seam allowance. 


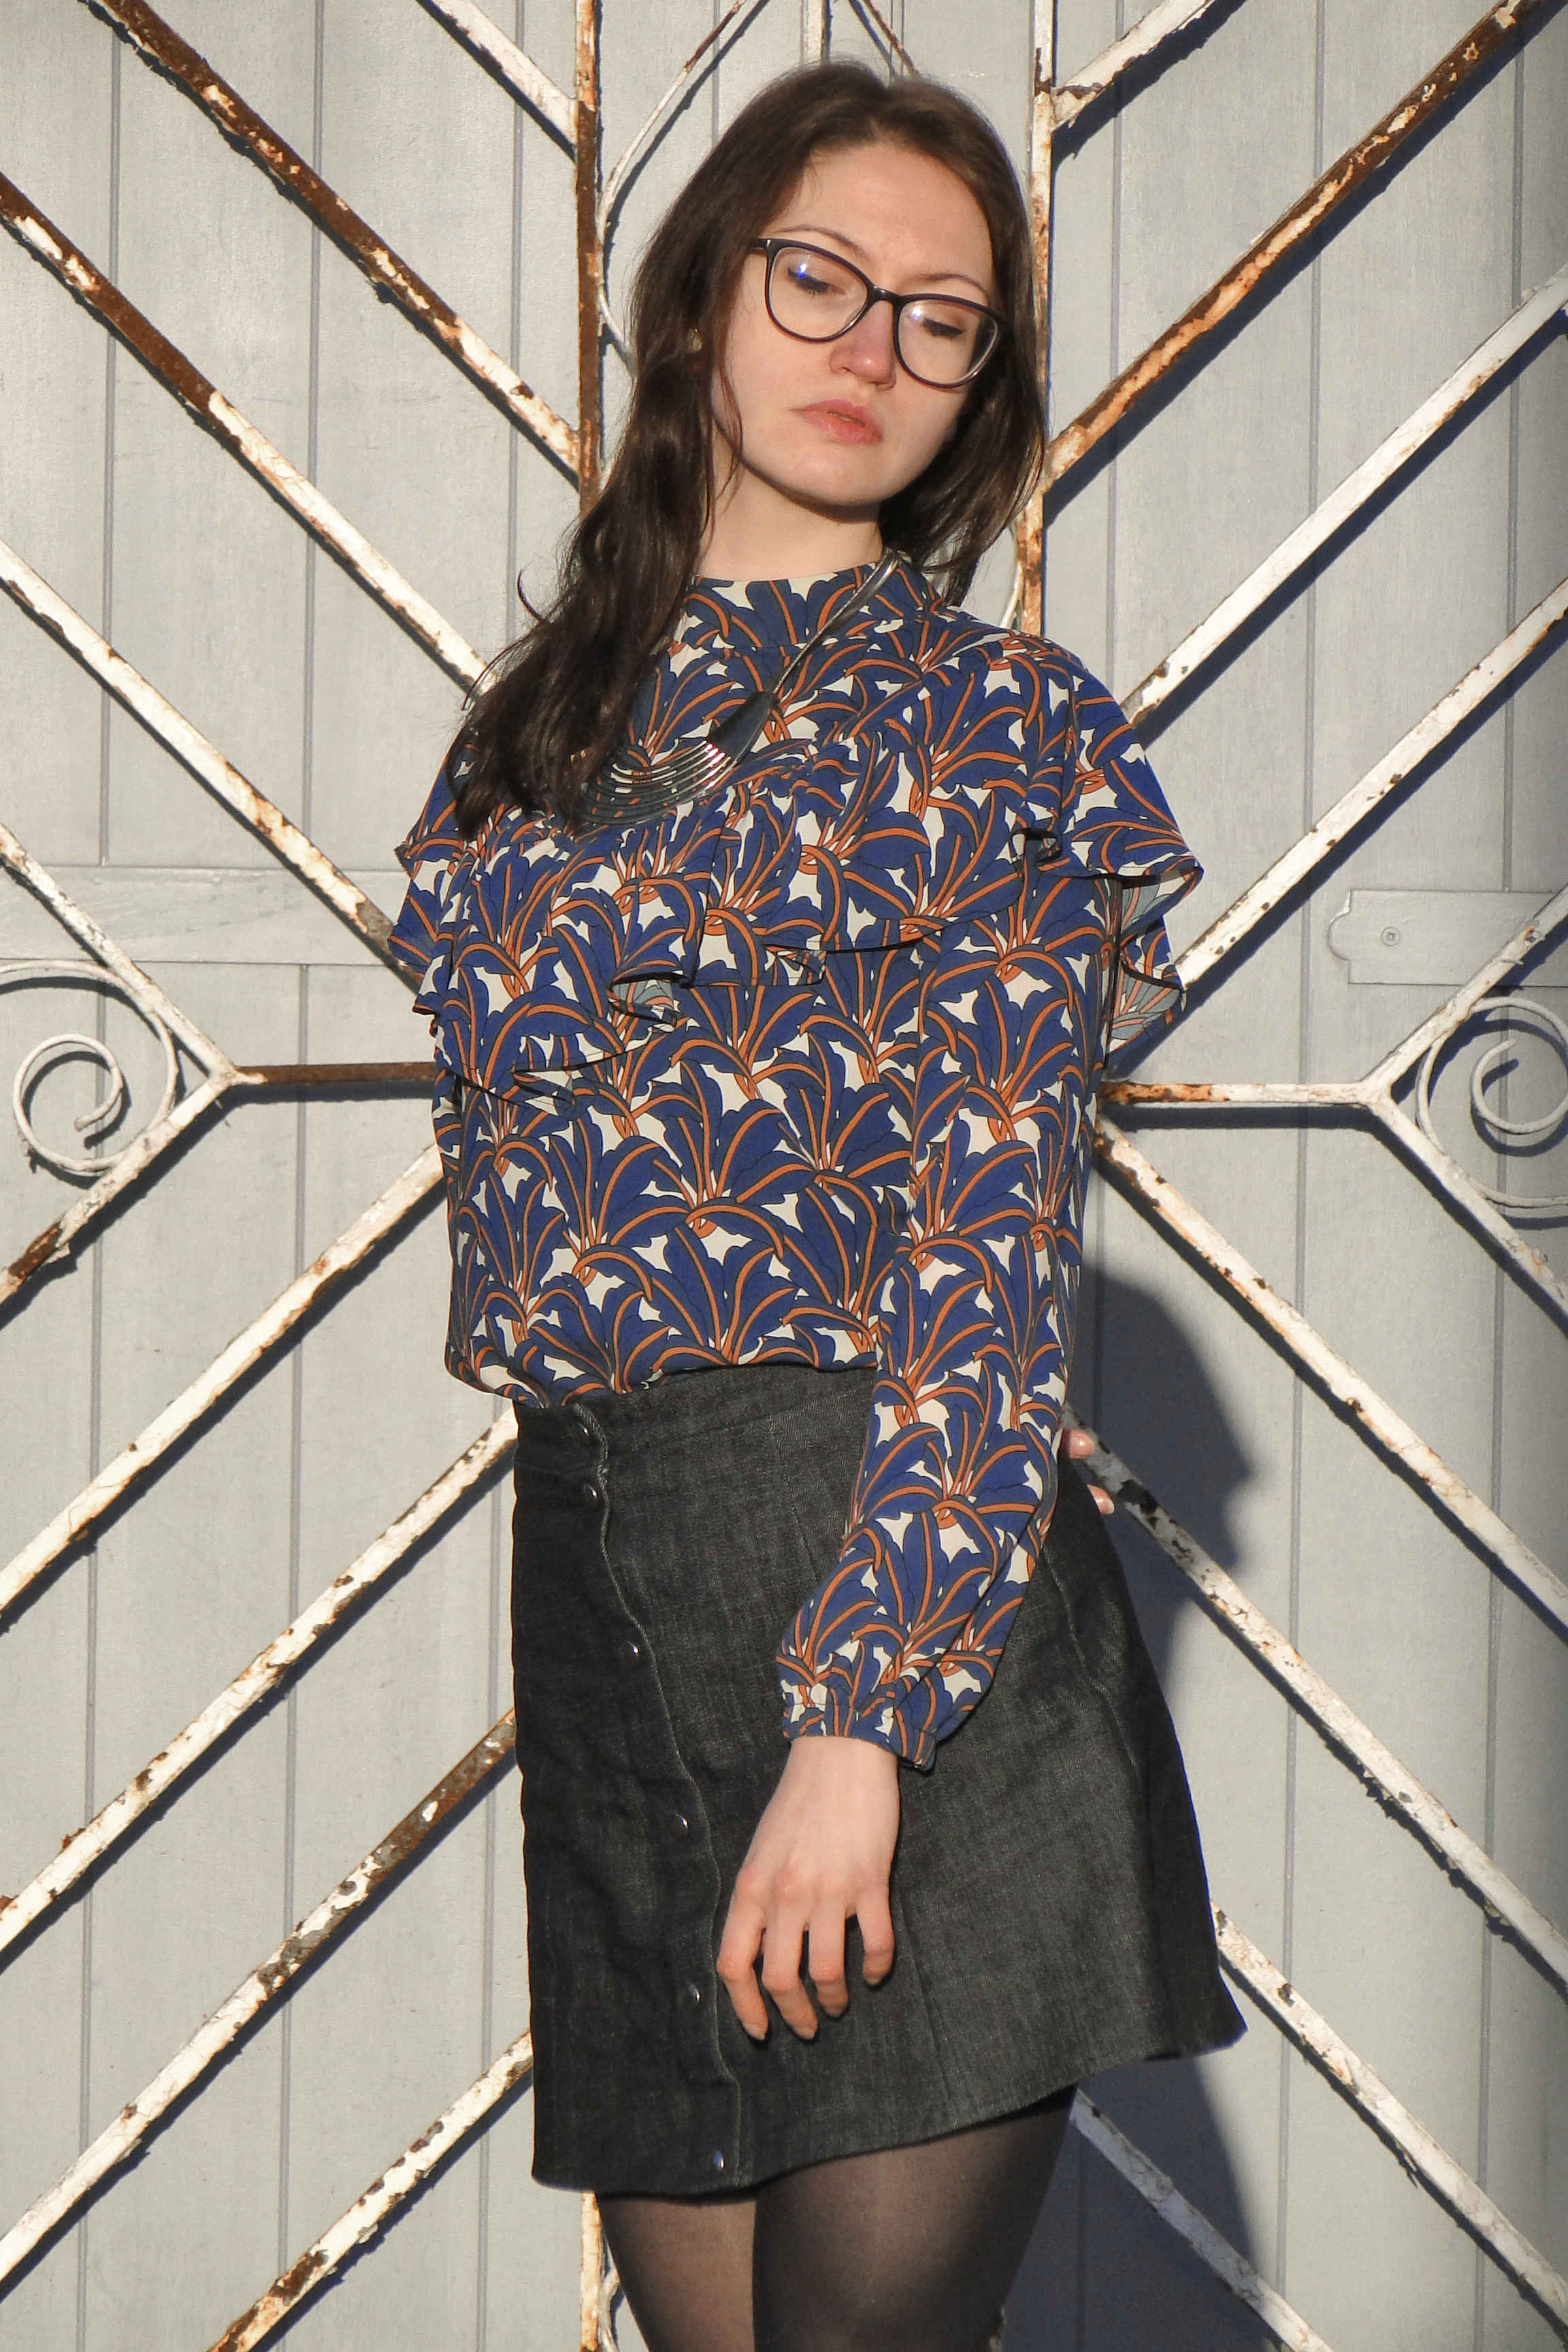
The fun part of this blouse has got to be making the ruffle. Pay attention to those notches on the side seams as you want the ruffley bit to sit in between these and be flat over the shoulders. This is such a simple idea in the design but really perfects the silhouette of the blouse and stops the shoulders becoming daft and bulky. 


The hardest part of the pattern, which I think most people will agree with, is battling though those beautiful ruffles to neatly stitch those V-points where the yoke is sewn to the top without getting anything caught where it shouldn't be. If anyone did this in one attempt I will be very impressed!! I was nervous that my delicate fabric might not take kindly to too many attempts at this, the last thing I wanted was snags running down from the points! To add to the stress here, you want to make sure the V is pointing directly to the V at the bottom of the ruffle otherwise it will be really obvious if you are off centre! 


I was really proud of my matching up, and the fabric ruffles and flows so nicely. The gathered effect is echoed at the cuffs too. Elastic is inserted into the hem, letting the billowy sleeves fit nicely at the wrist (be careful not to catch the elastic as you sew). I found this stage pretty fiddly too but the effect was worth it. I might make the sleeves a little longer next time, but I don't think this length was too short. 


I was a bit nervous about doing the buttons on the back opening, but with a bit of help from some fray stop (highly recommend!!) the buttonholes are really neat and there's been no snagging. The buttons I found in Hillsborough fine fabrics are a lovely match to the print as well. Very happy with my find! 


Absolutely love this blouse. It's smart enough for work, but special enough to be eye catching and suitable for social events and errrrrm, wearing in your own music video. The neckline gives it a bit of a 60's feel and the ruffle gives it a bit of a superhero feel (yep I said it), power-points all round! The ruffle is omittable, customisable, aching to be crafted from a contract fabric... there's so much fun variation to be done here. 

A great introduction to Fibre Mood patterns! 

x
Location: Sheffield Antiques Quarter / Botanical Gardens
Currently listening to: No Move Virgos, CMAT

Sunday 6 November 2022

So, Zo... Strappy Vest Top III


I highly recommend this pattern as a cute little scrap buster. I had some of this soft stretch chevron fabric left over from a fabric haul a few years back. I never did know what to make with it! I ended up making a very unadventurous T-Shirt and had an awkward amount left over. 

The amount was so awkward in fact, that I played about for quite a while making the pattern shorter and shorter to get it to fit on my remenants. 


The most important thing for me was to make sure the chevrons at the front and back were equal. I needed them parallel to the hem and also equidistant from the centre front / centre back so there was no chance of looking lopsided! I would have been happy to make a super croppy version of the vest but there was enough fabric left and it was soo stretchy that I couldn't even really tell that I'd made the pattern any shorter. 


I asked for a roll of black fold over elastic for my birthday this year, so there was plenty to go at to bind the edging and make straps. I tacked this to the top by hand first, as the machine was keen to chew up the fabric before everything was lined up. I then secured with zig zag stitch over the straps and neckline. 


And thats it really! The pattern is so versatile, you can use pretty much any stretch fabric that takes your fancy. I would like to make a tiny croppy version for next summer, or to wear as an under-layer for all these autumn cardigans. 
Scrap-busting here we come! 


x
Location: South Parade, Doncaster
Currently listening to: No More Virgos, CMAT

Sunday 30 October 2022

Mood Sewciety, Almond Bodysuit


Do you like free stuff? Do you like to do a bit of problem solving? Do you like fitted body suits and stretch fabrics and mildly suggestive cutways? Yep Yep to all of the above. 

The Almond Bodysuit is a free pattern from Mood Sewciety. The problem solving comes in the form of maneuvering your way through the slightly sketchy instructions on the website. There's a bit of filling in the blanks needed as you work your way through, you need to really tune in to how the crossover sits at the neckline and shoulders, making room for the seam allowances where the neck band and sleeves sit. 


The pattern suggests cutting a slit down the back of the neckline, and I later saw something about adding velcro to the neck?? Let me just say, if you're using a stretchy fabric I'm sure this is all completely unneccesary. My fabric didn't even have the greatest %stretch but I had no problems in getting my head through the headhole when I'd done. 


First major problem to tackle is not stretching out that outside curve of the over lay when you hem it. Zizzag stitch was just sending the fabric a bit nuts - I didn't want to press the hem too much and add too much heat to make it stretch out, so I turned this under by 1.5cm, pressed lightly and tacked by hand before using a piece of pattern paper between the machine and the needle. The overlay doesn't really need mcuh stretch to it, so to avoid over-handling the fabric here I just used a long straight stitch to hold down the hem. 


It came to finishing the shoulder seams (slightly chunky due to the layers of the overlay but not insane), and my overloacker had a bit of a nervous breakdown. I've notitced it getting a bit jammy and fluffy around the blade for a few projects now.... And is it any wonder handing never changed the blade in 9 years! It slowed me up to mailorder new blades.. and slowed me up a bit trying to change them (queue MY nervous breakdown), but once it was done.............. Oh my my my how easy overlocking had suddenly become! I can't eve begin to epress the joy! It was like being reborn! Bulky seams no longer a problem I was able to finish edges without any more drama. 


My go-to bodysuit pattern is the Simplicity 8513, from this I knew that I would absolutely need to include a centreback seam for a close fit to my back curves. This was a bit of a winging it process- just grab the excess fabric in the centreback and effectively sew a massive dart starting somewhere between my shoulder blades (widest part) and ending at the widest part of my bum. Once happy with the fit I trimmed the dart and pressed it open which helps release the curve and fit that little bit better to my lower back curve. 


This pattern gets a lot of stick for it's superlow neckline. It doesn't offend me, and I think using a fabric with a better stretch recovery would have made me feel a bit more, er, secure, but this is something I would alter if I made the pattern again. It either needs to be not as deep or not as wide. In turn I would probably also extend the width of the overlays at the underarm where they meet at the side seam. 


Instead of just turning under the raw edge of the legholes I attached some underwear elastic with a nice picot edge. This helps with the fit and prevents any gaping around the crotch (no one wants that). 


If I'm honest there were times I almost give up on this garment. My motivation was thwarted by getting dumped mid-make, leaving the garment sat on my attic floor for two months while I tried to stick my life back together. It didn't take me long to realise the fabric could have done with being a bit more 'springy' in it's stretch and I was worried the whole thing would be a waste of time. The overlocker blades finally calling it a day almost made me do the same to be honest. Hating leaving anything unfinished though I powered on, and I was pleasantly surprised at how it turned out. Yes I would make a few changes if I made it again, but if I found the right fabric I do think I *would* make it again. 

Have you had any lucky free-pattern finds? Or any to avoid! Do you have fitting issues in the back everytime you make something fitted? What are your usual pattern hacks to aid this? Drop me a line.


x
Location: Doncaster City Centre, Multi-storey Carpark
Currently listening to: With A Woman, Tempesst

Sunday 25 September 2022

Closet Core Patterns, Kalle Shirt


The Kalle Shirt has become one of thise iconic patterns like the Ogden Cami, like the Linden Sweatshirt, like the Bakerlou Blouse, that pop up and you instantly go YES. I think it's been such a hit because it can be made to suit literally anyone for literally any occasion. There is so much room for personalisation with this pattern. The length, the placket, the hem, the back pleat - start teaming those variations with different fabrics and you've got endless options. 

This is my second Kalle, my first was in quite a heavy fabric, so I was excited to use a lightweight viscose to see how differently it would hang. With this warmer weather we've been having recently I wanted a short sleeve shirt that was appropriate for work, but in a fun fabric that had a bit of individuality to it. 

That's where this gorgeous new tiger print from Minerva comes in. This is part of their lush new, exclusive range of viscose challis fabrics that have just hit their website. The range is worth a browse, there's summer vibes a plenty with leafy, tropical style prints, jazzy styles in neutral tones, and if like me you're a fan of creatures making an appearence, there's plenty of wildcats prowling their range too. I love these felines as they are so subtle and understated, yet undeniably feirce. In the list of stellar qualities my bestie put in my 30th birthday card Feirce made an appearance, and although I don't think I've been feeling it recently, I'm hoping this shirt will inspire me to be a bit more kickass! 

The fabric itself has a lovely drape to it, feels comfy against the skin and didn't ladder when sewing or cutting my button holes. Overall just lovely to handle! I would just recommend being careful when interfacing as I did notice a bit of shrinkage when applying heat to fuse. 

There are some really lovely tones across the whole range of new Minerva fabrics - I can imagine pairing some of these together to build a little capsule wardrobe. 

I made a tiny change to the pattern from last time, and that was to make the back shorter and do away with the curvy biasbound hem. I really enjoyed sewing it on the last one but I'm a tuck-it-in kinda girl so that extra length in the back was just a waste of time. I altered the hem so it was still slightly curved and still slightly longer at the back, but all in all much less dramatic and easier to both tuck in and sew! I did a simple double turned hem which also meant I didn't have to cut through a load of fabric to make some bias binding. 


Button choice, I went for classic gold to match my glasses and bring out some of the yellowy/oranges from the tigers. These were like 30p each from the market or something. I still super hate doing button holes but I have found they have been much improved since using a fray stop in them as soon as I've cut them and I invested in a new quick unpicker! About time! With that and new blades on my overlocker I was slicing my way into absolute sewing heaven this weekend. 

Cutting out is always my least favourite part, but once that was done it took maybe a day's casual work with lots of breaks for snacks and dancing and posting on Instagram, for the shirt to be completed. There's no darts so fitting is simple! The placket is maybe the hardest bit, but it's also the first bit so you get that done while your attention is still fresh! My advice is just make sure you transfer the pattern marking really well and follow the instructions. Take your time and you'll earn yourself a beautiful placket! 


This was such a great project to help get my sewing mojo back. I have been a bit all over the place of late, trying to figure out what I want, how to do it and who I want to do it with. Learning new things has been exciting and a good distraction to get me out of the house but I have missed sewing so much. Next up I really do want to make something sporty so I can feel feirce as f*ck next time I'm at the badminton courts, Or the Netball courts, or the Boxing ring, or the driving range or the swimming baths. Like I said, it's been a busy time, but god it's good to be back. 


x
Location: Charter Square
Currently listening to: Take Me Out, Franz Ferdinand