Showing posts with label Gertie Sews Vintage Casual. Show all posts

Saturday, 22 July 2017

Hacked Gertie Pin-Up Sweater


I love my muted orange cropped sweater so much I knew it wouldn't be long before I made another.


I'd had my heart set on making something fitted out of some ribbed jersey fabric for a while, so didn't feel guilty when I chucked this black rib into my stash at this year's Sew Up North event in Leeds.


I originally wanted to make a fitted cropped sweater with a narrow hem on the bottom and the sleeves and a round neck. I knew there were a few alterations I needed to make to the pattern after my last two Pin Up sweaters I'd made based on the pattern from Gertie Sews Vintage Casual book.
The first, is I really needed to scoop the arm holes a little deeper to stop the jumper pulling at the underarms, then adjust the sleeve a little to fit. Thankfully the fabric is so stretchy very little adjustment was needed on the sleeves to get them to fit. I also sloped the shoulders a little for a better fit at the neck.


Everything was going well and my jumper looked to be fitting nicely. So I came to hem the bottom and got SO frustrated as the rib just stretched out something crazy as I stitched. It should have been a 10 minute job, but I decided to unpick the lot and attach a band like I did on my orange jumper. Thankfully adding an extra width of fabric meant that I could hack off the stretchy bottom of my jumper and act like it never existed.


My second failing came at the sleeves. I thought they would look cuter shorter, so I cut them down a little, then prepared to hem them. Yes you guessed it, the sleeve hems stretched out too and I was far from happy! I came to the conclusion there was nothing I could do. I cut off the gaping fabric but knew that if I had a second attempt I could end up with no sleeve left!! Luckily my fabric doesn't fray or unravel so I settled on leaving them raw. They are a little flappier than I would have liked them, but I don't think anyone would notice if I hadn't said.


What I wanted was a cute casual jumper I could wear with jeans or a tight skirt and that's what I've got. A couple of design changes along the way, but she fits pretty nicely

x

Location: Vault Car Park, Abbeydale Road, Sheffield
Currently listening to: Fast Fuse, Kasabian

Sunday, 19 February 2017

Hacked Pin Up Sweater


Whenever a new month or a new season rolls round, I always find myself thinking 'what was I doing this time last year'. I've come to find it's painful if it was something good and it's painful if it was something bad, so it's probably a habit I should shake. This time last year in sewing world though, I was doing quite nicely. I'd taken a sewing holiday and among the makes was a kick ass orange jumper that is still one of my faves, and soon my first Gertie Shirtwaist Dress would arrive.


After finishing my big Rosalie project this Jaunuary, I was a little scared about what would come next. Finishing Rosalie was like getting out of a long term relationship and not knowing what to do with yourself! The commitment it took into getting her ship shape was more than I've ever dedicated to any man! Oh and the return she gave me was too! Haha! But when she was done I needed something quick and easy and instantly satisfying to get back into the swing of things before I lost my mind entirely.


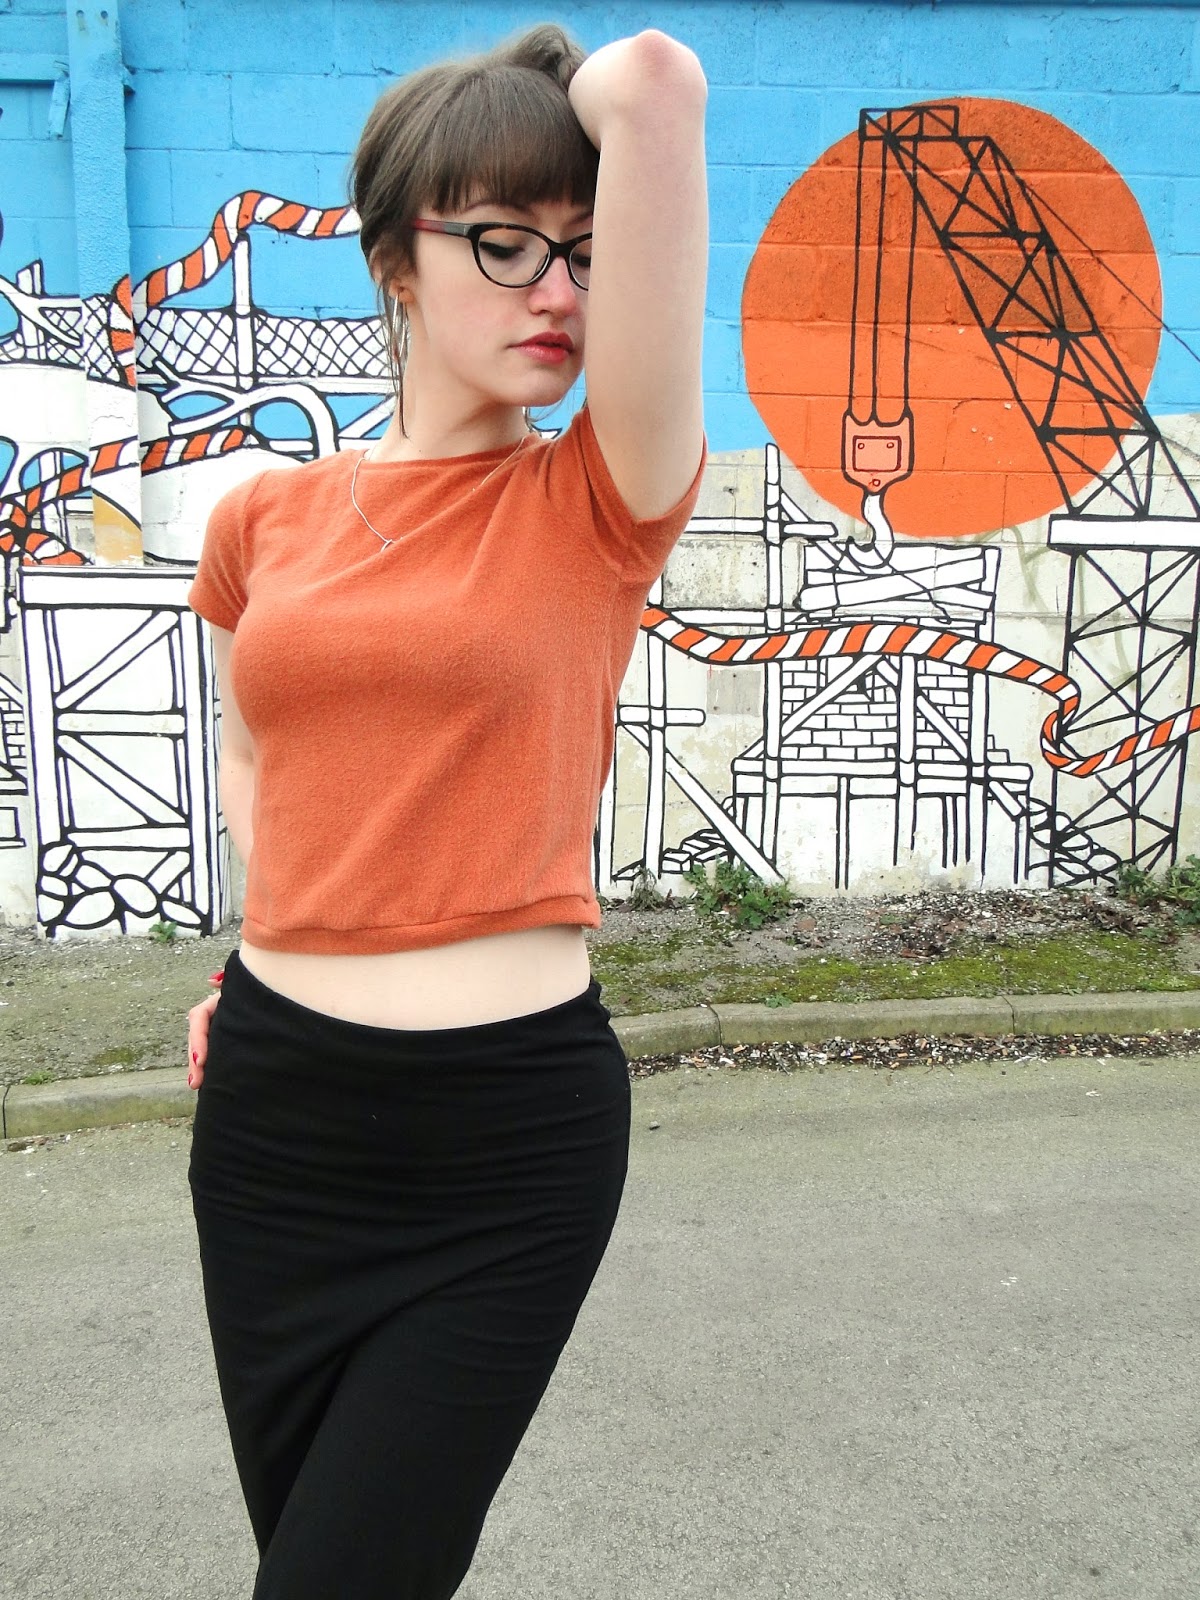
It's been on my mind all year round that I had an awkward amount of orange fabric left from my jumper that I was certain I could make something out of. The fabric itself is a fluffy jersey, not so fluffy as it all gets stuck to your lipgloss or owt, but a comfortable warm affair that makes me feel special when I touch it.


The colour is perfect, any colour aficionados know what shade we'd call it? It's orange, but somehow not bright. But definitely not brown. I don't often feel comfortable in things that aren't mainly black, so this blows my mind!


For the basis of the pattern I used Gertie's Vintage Casual Pin Up Sweater with a few alterations. First up, due to fabric restrictions I cropped a load off the bottom. Was happy with this though as I'm loving crop tops at the mo (knew all them gym crunches weren't a waste of time). Then I made sure I lowered the arm holes. My first sweater which followed the pattern, pulls a little at the underarms and it took me ages to figure out it was because I needed a little extra room cutting into the bottom of the arm hole. I wanted my new sweater top to be a little less fitted and a little more casual anyway, so made sure I scooped out a couple of centimeters. Not really sure how, but I knew I needed to make up for this on the sleeve, so added a couple of centimeters to the bit at the bottom of the sleeve that joins at the side seam.


Overall sleeve length was determined simply by how much fabric I had. It was looking a bit close at one point, but I just halved what was available and drew as much sleeve on as I could. Miraculously I am more than happy with the length!


The sleeves are set in before you sew up the side seams, so much easier to get that shoulder curve. Nice.


To begin with, the front and back were cut exactly the same. I knew I would want to play around with that neckline a little. I expected that I would want to scoop the front down a bit (fine, quite a bit), but when I tried on before altering it I found I really liked the high neck. I just took a tiny bit out of the front so it didn't look like I had it on back to front!

I wavered quite a bit from the pattern at the side seams. Instead of shaping into the waist and back out for the hips with a curve, I initially just cut a straight line from the bottom of the arm hole. I stitched up at this and liked it a lot, but as I planned on putting a waistband on I wanted to taper the bottom in a bit so there wasn't loads of fabric in the jumper to stretch the band around. I took about 2.5cms in from each side seam at the bottom and then drew a straight line that tapered from the bottom of the arm hole to my new point.


This fabric is awesome! It's got lots of stretch but somehow doesn't stretch out as you sew it! Magic.


Again, different to the Gertie jumper and more similar to the raglan jumper I made from this fabric, I decided to add a stretchy waistband to the bottom. I cut it about 6cm wide by about 90cm, then pinned it on, stretching as I went. I didn't need the full 90cm (not sure how long it was in the end but significantly less), so was glad I'd pinned to check. Then I stitched up at the side of the band and overlocked it straight onto the bottom of the jumper. Holding my breath all the way. Turned out pretty good though!


A similar process for the neckband, only I cut this about half the width of the waist. It's always so risky as to whether you've got too much or not enough or just the right amount of stretch in your band around the neck. Too much and your jumper might pucker, too little and it will stick out on the shoulders. It's tricky to pin on and try on (prickly on the neck, I've now got a few dodgy looking scratches), and even then can't really be certain if it's right until you've stitched. After pinning though, it was obvious to me that the band bought the neck a little too close to my throat again, so I trimmed off 7mm right the way round the head hole then overlocked the band on.


Success! Phew!! So so so happy with it! Perfectly round and (so very ALMOST) even!! Just don't look too close alright? I think I'm just being nit-picky, I definitely wouldn't notice if I'd just picked it up in Top Shop.


Decided against bands on the sleeves incase they made the jumper look a bit puffy? Instead I did a cute little narrow hem. Pretty perfect.


Love this jumper! Thanks to Gertie for the original pattern, but also go me for making it into what I really wanted! The colour, the shape, the texture, the constriction, what it does for my boobs and what it does for my confidence... Very happy, super sassy!

#Sassy17


x

Locations: Wellington Street Carpark
Vulgar, Devonshire Street
Devonshire Lane
Sheffield
Currently listening to:To Be Without You, Ryan Adams

Sunday, 27 November 2016

Gertie Sews Vintage Casual, Pin-Up Sweater


It's been a busy month so far and it's been a struggle to sit down at my machine and get anything finished!
For my next make I decided to make something fairly simple for a quick win and confidence booster.


The journey of my Gertie Sews Vintage Casual Sweater started at the Sew Up North event in Leeds at the beginning of the month. Myself and a group of other stitchers from up North spent the day talking stitch perusing Leeds' fabric shops as well as raising money for charity, eating cake and swapping unwanted patterns and fabric. This ribbed white and navy jersey was from the fantastic B&M stall in Leeds Market... And I wasn't the only one pawing over it!! I opted for 1 metre, with it in mind I was going to make something tight and fitted.


The Sweater is just a front piece, back piece, sleeves and neck band. Pattern matching is essential!! I'm getting sick of telling you all- but I'll tell you again, I don't trust cutting on the fold when matching patterns so I cut the lot out on a single layer and flip over to get a perfectly symmetrical piece. Basically I am ensuring here that all the horizontal lines are at a right angle to the grainline, and therefore will not be going diagonally across my body.


I cut a size 10 but added a little extra in at the waist after consulting the size chart (note to future me- didn't really need to, especially when my jersey is quite so stretchy). The front and back pieces appear to be exactly the same apart from the neckline on the front is lower. I made sure that the front and back pieces were cut at the same point on the fabric design (as in, stripe placement) to everything would match up nicely. To do this I marked the navy lines of my front piece onto my paper pattern pieces and lined up with the lines when cutting the back.


Step one of sewing is to match up at the shoulders. Where the lines match from front and back makes these cute little Vs. Check out my symmetry! Before putting in the side seams you insert the sleeves. This saves and fiddly sleeve setting in. you just have to match at side seams, then pin the curves to fit. I tried like hell to match the navy lines across my chest and over the top of my sleeve! It's hard! As you're working from the inside when pinning its difficult to see exactly what will match with what when you put your actual stitch line in.


After inserting the sleeves, I tried to try on- which isn't easy or super insightful when you don't have any side seams yet. I pinned the sides and decided that I would make the seam allowance 2cm instead of 1.5cm.


Top make sure stripes matched at the side seams I pinned ALONG the navy lines through front and back to make sure they were all in line. I then used my sewing machine (not overlocker) to effectively tack down the sides being super careful to make sure the lines all matched up at the side of the fabric. Only when I was happy nothing was skew-wiff did I overlock these seams.


So I might have mentioned stripes a few times in this post, and how important it is to treat them with care so they don't look shit. This is true also for the neckline! Possibly even more so as realistically, more people are going to notice a wonky neck-hole then a dodgy underarm seam.
The neck band it is about 5cm wide, this is pretty easy for cutting when you have nice straight lines to follow!
The neckband needs to be a little smaller than the head hole... but apparently there's no rule to calculate by how much!! The book suggests about 2 inches. This is what I did, but with my fabric I think it is a little on the small side. The aim is to stretch out the band a little but not the head hole.


Firstly, it's important the stripes meet at the back of the neck where it joins to make a hoop. Secondly when sewing the right side of the neckband on to the sweater before folding over to the back it's important that the same amount of stripe is showing right the way round. If your stripe is wider at one point than another it will be really obvious. This is also the case when folding over the band- I was super careful to make sure the white stripe was the same width all the way round before I pinned and tacked it.
I used a narrow zig zag to attach the neck, then used my twin needle to topstitch and hold down after folding over to the back. I tried overlocking the long raw edge of the band before attaching, but it was really messing up the stretch factor so abandoned that!


It might all sound a bit daunting for such a simple top, if that's the case I would suggest using a plain fabric. This would look great in any kind of ribbed jersey. If I make another I think I might ditch the stripes!


x

Currently listening to: Three Alley Cats, Roy Hall
Location: Damflask Reservoir, Loxley Valley