
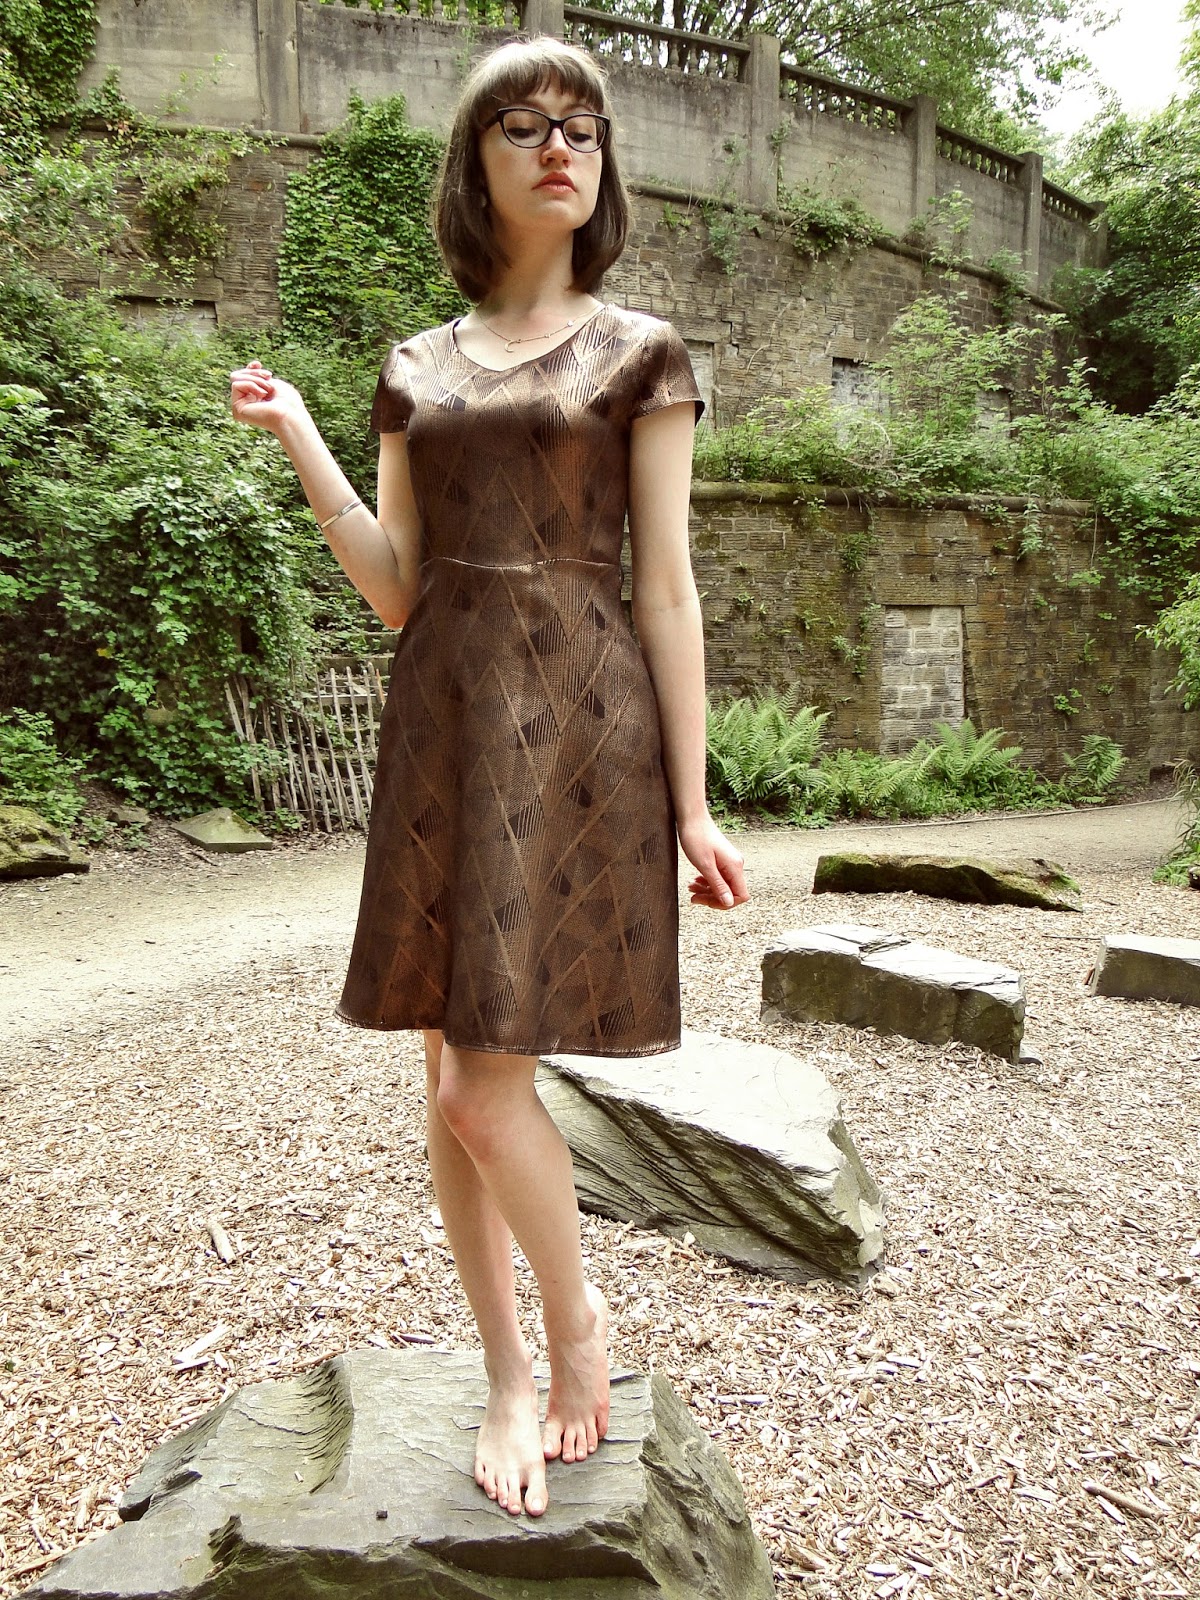
Excited and inspired by a trip to see Ancient Egypt at Manchester Museum on my Birthday, plus this lucky fabric find at Sheffield market lead to the English Tea Dress pattern looking a bit more like an Egyptian tea dress.
Having not been particularly excited by the pattern when I first saw it, this make was all about the fabric. The angular lines on the material teamed with the V neck and shaped bodice seemed like a match made in heaven. The only problem here, was I knew I was going to have to be super precise with my pattern matching. It took a few attempts lining up the pointy bits of the fabric design where the bodice meets the skirt- especially when it became clear to me that 'It'll do' definitely wouldn't do, as my eye was repeatedly drawn to my off centre points! A few tweaks and I go it a little better, but still not spot on. Next time eh?

Although I fell totally in love with the fabric when I saw it, it certainly didn't come without it's cons. It was a fraying nightmare most of the time, and unpicking things turned out to be a bit of a bugger. Also, I felt a lot of the gold threads pull and break while sewing. I'm guessing maybe a sharper needle might have helped? The visual result of the snapped gold threads could easily be hidden by cutting of remaining straggly ends, but I wasn't totally prepared for the discomfort factor! The dress is particularly itchy around the shoulder area, and though I think I could deal with it for a night out, I really don't fancy being stuck in it all day! I think it would certainly be a good idea to consider lining anything I decide to make with this fabric again...
Also, it has a particularly weird drape to it. Although very amenable with the iron, there's a kind of tin-foily quality to the fabric that stops it hanging quite right in the skirt! The next Egyptian English Tea Dress is definitely going to be made out of something a little more floaty and summery... Because despite it's faults, or shall we call them, characteristics, the fit of this pattern is great! I graded the pattern between a 10 and 12, the only change I think I need to make next time is adding some extra cms to the front arm holes as I can feel them pulling as I lift my arms up- which is a pain as I need to to get the damn zip down (I might need some help, eh?). The fraying 'characteristic' of the fabric has already lead to a slight tearing at the front of one of the sleeves... Which is pants because I've only had it on once!

But talking of sleeves- I absolutely love the design here. The pattern supplies three different sleeve lengths, the shortest being these cute little cap sleeves. The instructions however don't really shed any light on how to actually attach them, so I was lucky I found this wonderful tutorial over at After Dark Sewing. As the sleeves don't reach all the way around the arm hole, the trick is to apply bias binding around the gap. Beth at After Dark Sewing applies this binding right the way round the seam allowance, but I'm a little lazier than she, and I made just enough to tuck under the sleeves to keep the joins hidden. The rest of the sleeve seam allowance was overlocked.
(Please note future Angela, when you are reading back over this about to make Egyptian Tea Dress Two- or whatever culture you're raving about this week- it is important to put in the sleeves BEFORE bias binding the gap- otherwise it just doesn't work... But maybe you won't forget that in a hurry...)
Oh, and another word on sleeves while we're here. From my last post about the Big Simplicity Blog Meet Up you will see that I learnt a few tips off of the one and only May Martin when it comes to setting in sleeves. If you read my blog regularly (which turns out some of you do! Crikey!), then you'll maybe have got the gist that I think setting in sleeves is a massive pain in the arse and I'll do what I can to avoid poofy shoulders, even if it means just lopping them off altogether. So it was most handy when May Martin demonstrated this little technique she's named bubbling. If you missed it you can read about it in my Big Simplicity Blog Meet Up post, but what I want to say is I tried it here and it worked a dream! By far the smoothest sleeve experience I've had to date.

Another thing I am loving about this dress is my attention to detail in the zipper area. I knew I wanted the 'V's of the fabric to meet up down the centre back, and knowing there was no getting out of putting a zip in this time I had to take care when cutting out the fabric. I read a thing ages ago regarding pattern matching where you fold under your seam allowance on your paper pattern then line up your new edge against the fabric (don't forget to fold back out before cutting). This gives you a clear idea of exactly what you will see when you have sewn up- so knowing what area of the fabric I wanted at the centre back I used this technique to make sure I could match both halves. This uses a little more fabric as for the second half you cut you have to use a different area of the fabric in order to match (as you have cut through the design with the seam allowance of piece 1). So I did that- then using another tip from May Martin, I pressed the line of the seam allowance on both back bodice pieces so that I knew exactly where to line my zipper teeth up to. This avoids a wonky zip (why haven't I done this before?) and also guarantees the pattern match. Nice one!

Hemming was a pain- thinking my twin needle was going to add a nice finish, but it actually just puckered the fabric right the way round, as well as then experiencing some 'tunnelling' that Aimee had bought up on the train to Manchester last week. I might save the twinnie just for jerseys in the future.
I was surprised when I put this fraying, itchy, tin foily, puckered and slightly misaligned dress on, that it really didn't look so bad!
Someone get me some gigs then I'll have an excuse to wear it.
x
Currently listening to: Backwards Bird Inc, Morgan Delt
Location: Sheffield General Cemetery
That fabric is divine..... great job! (I would think the twin needle hem would have caused some nightmares.... a hand rolled one could have worked - I dont use my twin needle a lot as it can pull fabric a lot) - really lovely dress and that zip is a work of art in itself!
ReplyDeleteThanks Eimear! Definitely could do with a lining! But adore the gold xox
DeleteJust read this post... What an achievement twinks. The pattern matching at front and back is phenomenonal and you've really upped your game working with tricky fabrics. As ever my inspiration xxx
ReplyDeleteThanks Aimee. In hindsight this fabric was a nightmare ha! xox
Delete