Sunday, 26 January 2020

Simple Sew, Classic Sweatshirt Hack


I had some leftover fleece from my Simple Sew Cocoon Jacket thanks to the fab Remnant Kings. I had enjoyed working with fleece on my Cocoon Jacket- it has a forgiving amount of stretch but is also very well behaved. It is easy to cut, doesn't make loads of mess like some fibery fabrics and doesn't need to be overlocked! Also did I mention it is SO warm and snug, perfect now winter is here. Oh, and I used a ballpoint needle to sew the fleece together as it is a bit stretchy (Thanks Google for the advice).


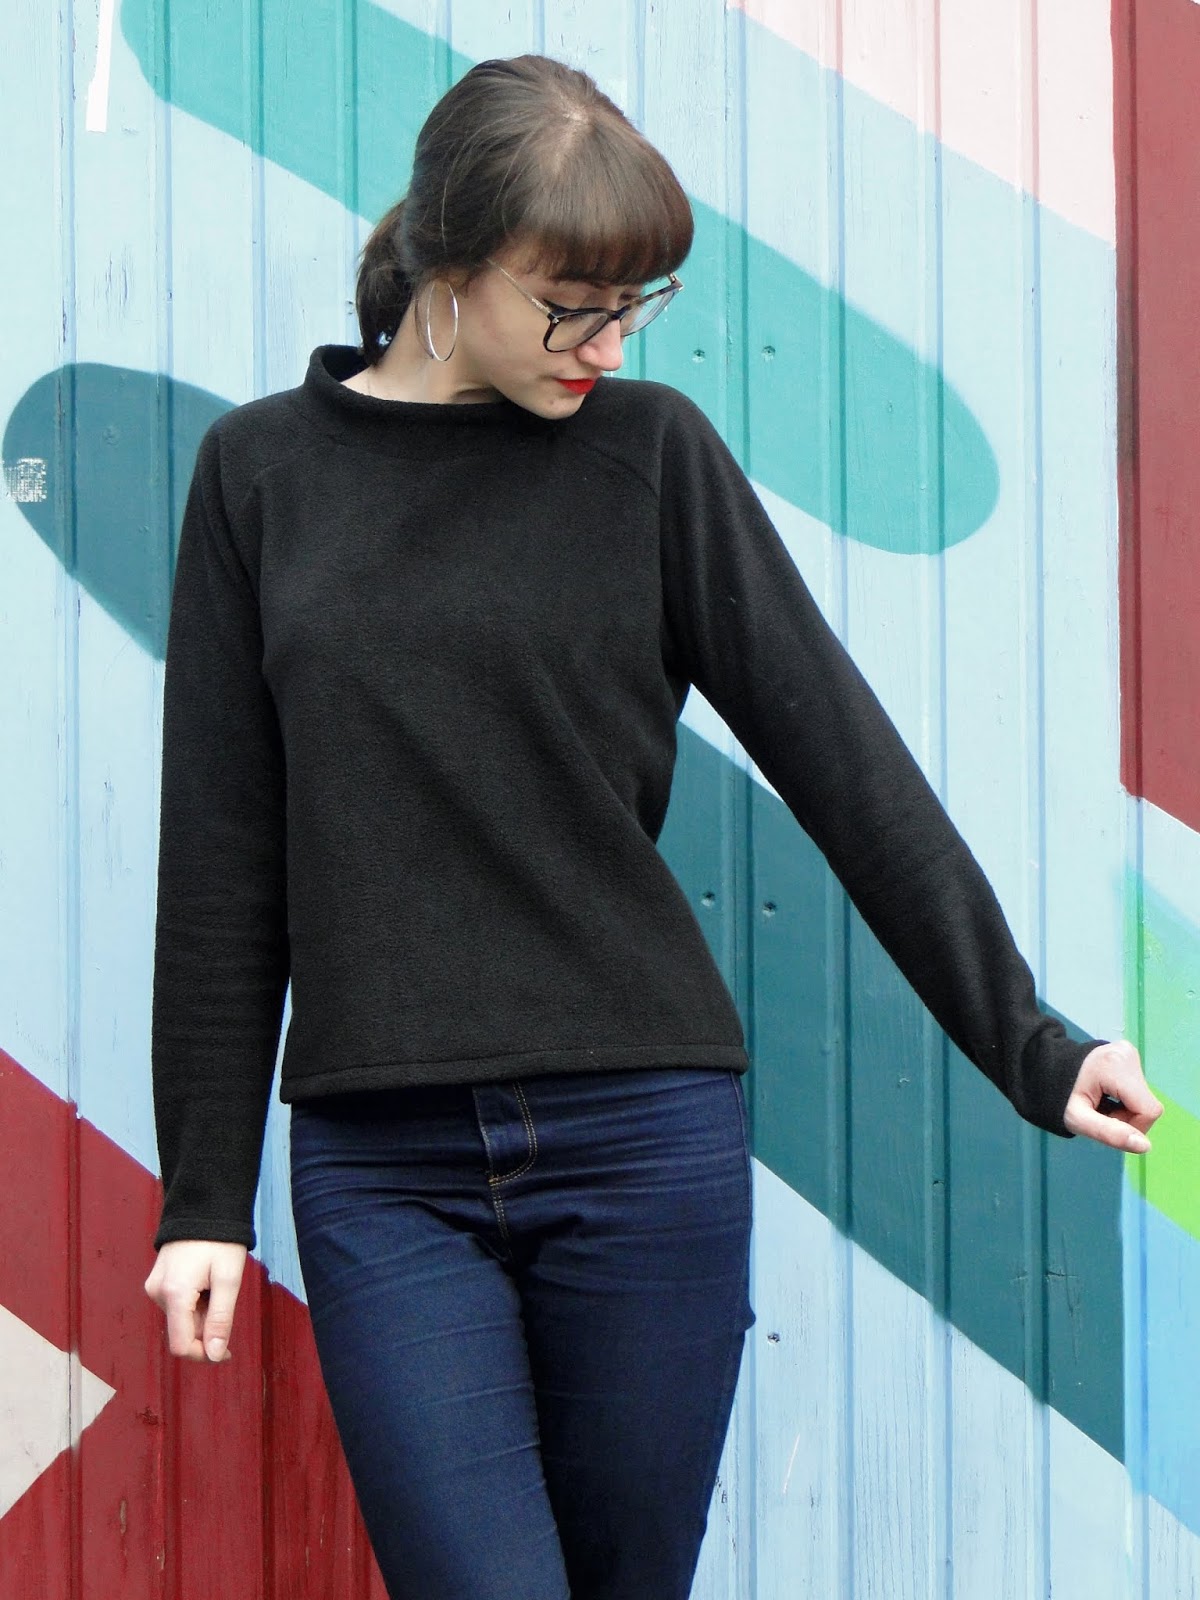
I have made the Classic Sweatshirt before, this time I wanted to make a couple of changes. Firstly I wanted to have a go at adding a raised neckband for extra snugness. This was very much a process of trial and error. As fleece is not as stretchy as the jersey the pattern was designed for, I cut the neckband longer than the pattern piece. I was initially unsure how wide I wanted the band to be too, so I exaggerated the height of the pattern piece, bearing in mind that this piece would be folded in half lengthways before being attached to the neck opening.


I also decided I didn't want to add cuffs or waistband to the jumper this time and opted for a simple hem. I wanted to try and avoid making the jumper look too sporty, as I thought the high neck added a kind of classy 60s vibe.


With it in mind that I wasn't adding cuffs, I added 2cm to the sleeve length for the hem. As I had shortened the length of my first classic sweatshirt before adding the bottom band, I played around in my head with the length this jumper should be. I didn't want it to be cropped but I didn't want it super long either. In the end I made it 9cm shorter than the original pattern piece, allowing again for a 2cm hem.


I made no changes to the raglan sleeves or the shape of the actual body of the jumper.


To determine the length and width of the neckband I folded it in half and pinned to the raw edge of the neckline, matching front, back and shoulder mid points of the band to the opening, stretching out the neckband as you go (this needs to be shorter than the head hole). Trying on is a bit tricky, you have to be really careful not to impale yourself in the neck with pins, or scratch yourself in the face when putting it on!


The aim is for the neckline not to pucker but the neckband not to look too baggy. I kept reducing the width until it felt comfortable (in the end the band sits 4cm above the seamine, so both sides plus seam allowance on both raw edges means the piece was about 11cm high when flat). To get the length right I kept pinning a little more out of the centre back and restretching it round the neckline for the perfect fit.


I then overlocked all the raw edges together, adding tension to the band so that the centre front/ centre back and shoulder points all matched those of the neckline.


To finish I used a stretch stitch on my machine (for the first time!!!) and hemmed the sleeves and bottom. I love the finish this adds to the jumper!


I'm excited to have a play around with different necklines and different fabrics. How about s drapey cowl neck and maybe some oversized wrist cuffs? Or a cropped sporty sweater with baseball top style sleeves and neckband? I hear the fabric shop calling...


x

Location: Picture House Social / Pirate Ship, Abbeydale Road / Leavy Greave Road, Sheffield
Currently listening to: Fuck Love, Rosalie Cunningham

Tuesday, 24 December 2019

Simple Sew, Cocoon Jacket


I had read a few reviews of the Simple Sew Cocoon Jacket and everyone seemed to be in agreement that the pattern is rather spacious. With this and my small shoulders in mind I went straight to the smallest size and cut a 6.


I had ordered some lovely fleece ready for winter from the super cool Remnant Kings - black for the main body and cream as a contrast for the facings, just to add a bit of a visual pop to the jacket. The fleece is super soft and warm, aaaaand there is the added bonus that is doesn't need to be overlocked!! I know it's sort of cheating, but I quite like that crisp, cut edge that I have left on my seam allowances and cuffs.


The pattern is really fun because all these big chunky pieces suddenly come together and create sleeves! I can see how you could easily lose yourself in this jacket though. I was very glad I cut the smallest size.


I love the big roomy pockets. I added a 4cm strip of interfacing to the top before I folded it over to add a little more stability. In hindsight, I could have done this to all the edges just to add sharpness before attaching.
The pattern doesn't actually state how much to fold under to make the pockets, but I turned in 1.5cm around the sides and bottom and 2cm across the top, and this fit perfectly between the dots on the front pieces.


Once the darts are in place (two at the back neck and bottom back, plus some clever ones at the elbow that help absorb some of that excess fabric) and the pockets are in place, the really fun bit starts and you start to see how the construction of the jacket really works. Susan Young pointed out in her blog that the image in the instrutions for sewing the front to the back is actually incorrect. If you check out Susan't blog, she has done a spot-on image of how they should fit together.


Once the front and back are stitched, the centre back seam is sewn and then the underarms. The pattern doesn't state it, but I clipped into the curves at the underarms to help the fabric sit happily. It looks like a jacket now! Time for a try on!


The roominess of the jacket adds to the snuggliness, but I just found it way too long for me. Without any real shape in the waist I felt like I was drowning a bit- though I'm sure this length would look brill on others. I turned up the bottom and pinned. I found it more flattering on me at a sort of donkey jacket length, finishing just below the pockets.


I cut the full length facing in cream, just to check that I wasn't any more keen on the length once there was a flash of colour in there to break it up. The pattern doesn't suggest interfacing anything but I did all of the facing to add some stability.


I attached the facing around the neck and front opening- right sides together, then turned to the inside and understitched close to the seam. I'd been tempted to sew the facing flush- wrong side to wrong side as I had liked the crisp cut edges, but decided against it as it was a bit lumpy at the back neck where the darts and seam allowances sat.


Once you've attached the facing you are almost there! I decided to cut 13.5cm from the bottom and allow for a 2cm hem. For this I unpicked the bottom back darts before I cut, otherwise I wouldn't have been able to turn up the hem.


A quick try-on after cutting suggested the back may be a little too roomy still, so I cheated (again!!!) and took a wedge out of the centre back seam, starting somewhere around the middle and taking out a few cm at the bottom. I know it's frowned upon to take the centre back off of the straight grain, but after pinning to start with I found it added just the little tuck I needed.


I hand stitched a blind hem, turning up 2cm around the bottom. The sleeves were a little too short to add a hem, so I left these crisply cut! ;) Next time I will add a couple of cm to the sleeve length so I can turn them up, or alternatively use some contrasting fabric for cuffs.

The Cocoon Jacket pattern is fun! It only took me a day to cut and sew together. It would be pretty simple to line as well, just by cutting out the same pattern pieces in your lining fabric and inserting, before hand sewing the hem. I probably would have done this is I'd have had enough cream fleece. I'm really excited to play around with some different fabrics for facings/linings. How cool would tartan look?! I played around with some leopard print that looked pretty ace but was sadly a little too stretchy to use with fleece.


Has anyone else changed up the length of the Cocoon Jacket? The pattern is sooo simple there's loads of potential for playing around with it... Thank you Simple Sew!

x

Location: Sheffield Christmas Market
Currently listening to: Let It Snow, Chris Isaak

Sunday, 22 December 2019

Simple Sew, Chelsea Skirt


Twice a year The Identity Store hold a leather fair at the village hall in Matlock. There is a crazy amount of different leathers and suedes and furs, some shiny stuff, some unusual bits and pieces, hey, it's worth a look even if you have never worked with leather before. This was my third trip to the fair, and having finished my first Simple Sew Chelsea Skirt just the week before I was on the lookout for something that would make a nice panel skirt.


Initially attracted to some brown leather with the idea of making something a little bit Western inspired, after several walks around the stalls I changed my mind when I spotted a really big piece of black leather that was only £30. It sealed the deal when I flipped it over and found the suede side was this kind of wintery, distressed grey. This was a bit more exciting than the plain black side and would probably go with more of my wardrobe than the brown. Also there was maybe enough to make two! The leather wasn't too thick so would go through my machine without trouble, but also not so thin as it would stretch too much under the presser foot.


I cut out all the pieces of the skirt with the same pattern alterations I had made for my denim one. It was once I'd cut everything out that I started flipping the pieces over, wondering if I could mix and match the leather and suede sides. I loved the grey for the back pieces, but was quite excited about using the leather for the centre front, especially when I found that Prym make black poppers!


The skirt was quick to make as nothing needed overlocking (yay!). I interfaced one side of the waistband pieces and the centre front pieces where the placket folds over for the poppers. Nothing needed hemming as I was happy with the raw edge of the suede and thought the placket might be a bit bulky to fold under anyway.


The poppers were easy to insert (for future ref, the are spaced at 9cm intervals, but might be an idea to put insert the one at my hip point [widest point] first and work outwards to try and reduce any potential gaping. Maybe try doing them in pairs for something a bit different?). I loved the black on black effect.


The skirt looked pretty much perfect, I tried on with all my snaps done up and was very pleased..... But! It sat just a littttttle bit too low on my waist. I tried to forget about it, but I kept thinking about it. I knew the additional couple of cms I'd added into the waistband of my denim one when my denim shrank a little had made this skirt's waistband just a tiny bit too large around the top. I knew I would be put off from wearing it if I felt it didn't fit right....


...I made the decision to alter the waistband. This meant unpicking my understitching, unpicking the waistband from the skirt at the side seam and unpicking the facing from the waistband. As I had already clipped and graded my seams I had to be really careful as there wasn't much to play with.


I took 1cm in from the original seam at the top of the waistband and graded back out to where it joins the skirt. I'm not going to lie it was fiddly and halfway through I definitely wished I hadn't unpicked a thing!! Certainly this will serve as a reminder in the future to do it right first time! The result was a slightly bulkier waistband at the side seams, but a better fit at the waist :)


Next time I make the Chelsea Skirt I'm going to pay special attention to how my fabric behaves (How stretchy? Will it shrink when I press it?) so that I can cut the perfect length waistband first time!! I'm also going to really consider what weight interfacing to use for the placket so I can reduce the gape-potential between buttons.


Who knows, maybe spring will be rolling round when I make my next and I'll be able to pick some floaty summery fabric for my button down skirt ☀️


x

Location: Aizlewood's Mill, Sheffield
Currently listening to: Fractured Air (Tornado Watch), Calexico

Sunday, 24 November 2019

Simple Sew, Chelsea Collection Skirt


For my original toile I cut a size 8. I found it could have been clearer which sides of the side panels attach to the centre front / centre back, as the notches are in similar positions on both sides of the side panels. One side could have benefitted from double notches for clarity. I made sure to label the front and back side panels before I started sewing to avoid confusing myself later on!


The size 8 was a little bit tight! I realised then that the sizing of the pattern must be actual garment size not body size. This was okay though as I found I really liked the fit at the back (small back strikes again!). I restitched the whole skirt using only 0.5cm seam allowance on the side seams and panel seams (ie, added 1cm to each seam but did not alter the front opening).


I found this fit around my hips much better but was now a little gapey at the waist on the side seam. I graded back in at the waist, taking about 2cm in at the top of each side seam.


I made these alterations on the paper pattern, adding 1cm onto the side/panel seams and tracing my waist alteration. I found the shape of the gradient from waist to hip looked similar to that of skirts I have previously made... This was a good sign!


I already knew I was going to have to re-draft the waistband. The difference in circumference between my hips and waist means a simple straight waistband with top fold just sticks out at the top.


Loosely based on the waistband of the Simple Sew Shannon Shorts , I reshaped the band so it was now curved and had side seams to shape with. Instead of cutting the front on the fold, I added 1.5cm for seam allowance and cut 2 pieces to allow for the centre front opening. I cut the back piece on the fold, taking out the 1.5cm seam allowance where the Shannon shorts zip would sit.


Happy with my toile and happy with my almost waxy denim that I found in Abakhan in Shrewsbury, cutting out the skirt was quite simple. The denim was very well behaved, so sewing the panes together was really easy. I overlocked all the panel seams before assembling as I knew I wanted to press the seams open. I made sure the buttons / button hole placement was really clearly marked to save myself trouble later down the line.


I cut the waistband- 6 pieces in total - 2 front and 1 back, then the same for the facing and interfaced all the pieces. I stitched the side seams of the waistband and then stitched together along the top, ensuring the side seams all matched. As the band is slightly curved I clipped then graded the seam allowance. I pressed open then understitched to the band facing.


I overlocked the outside edge of the facing, then attached the waistband edge to the top of the skirt. It looked soo professional and I was so happy that my reshaped waistband fitted to the skirt so well. I tried on.... Only to find it felt too tight at the waist!! Oh no! After a bit of whinging on Instagram, it was suggested that my cotton fabric may have shrunk when I interfaced it. I had applied quite a lot of heat so this made sense. I was faced with two options. Diet, or remake the waistband!!


....... I re-cut the waistband, adding 1cm to the top of the side seam of each piece, then graded back out the the hip. This still left an obvious gradient between waist and hip size... but allows me to sit down!


Perfect! What a relief! Once attached to the skirt I turned the end of the waistband right sides together and stitched a straight line at each front opening. I made sure I trimmed the seam allowances as I didn't want to have to battle too much bulk when I inserted my fastenings.


I turned up a narrow hem and was then ready for fastenings!


I decided on snap fastenings, mainly because if I messed up a button hole there would be no hiding it on the centre front! I was very grateful to my past-self for creating this handy guide to inserting snap fastenings as it had been so long I had definitely forgotten. The fabric was quite bulky so just had to be super careful to make sure everything lined up nicely before I squeeeeezed those pliers! Thankfully they all behaved really well!


I love the skirt! I have previously avoided button down skirts, both sewing patterns and ready-to-wear as if they don't fit quite right the gaping between buttons really bugs me. I'm glad I took the time to get the fit perfected. I can see myself getting a lot of wear out of this ❤️


x

Location: Twinkl Way, Sheffield
Currently listening to: Candyman, Serpent Power