Showing posts with label Shorts. Show all posts

Saturday, 19 July 2025

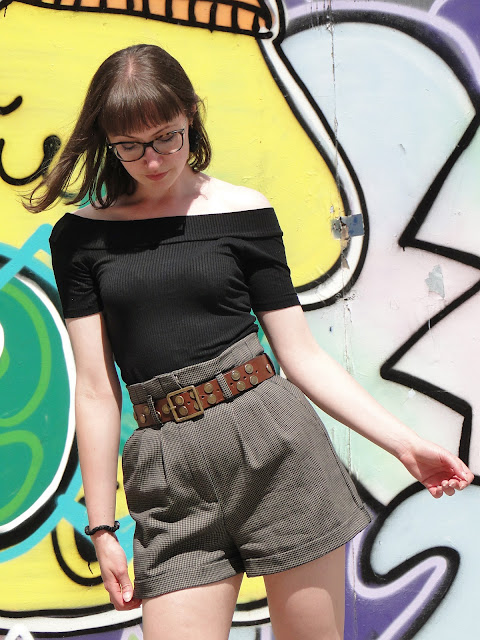
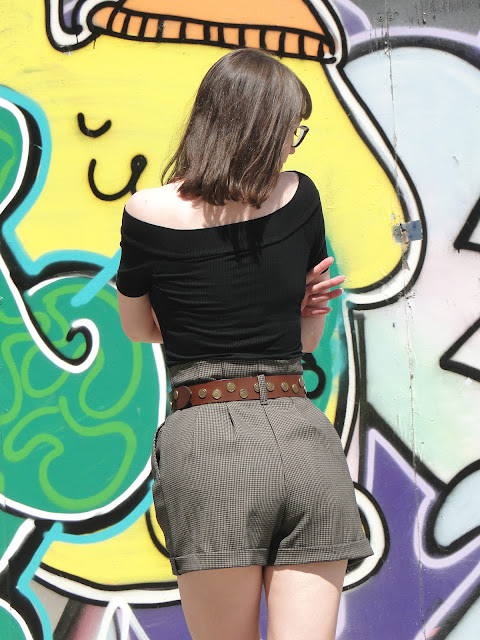
McCalls M7726, Houndstooth Shorts


I have used this pattern to make trousers before, I have always likes the pleats and the paper bag-style waist. I believe the pattern has since been rebranded as McCalls M8168 - I'm  not sure if anyone knows of any changes made to the fit when the pattern was renamed?


Aaaaaaannnnddd...... It has pockets! 


If I remember right, this fabric was the end of the roll at Hillsborough. The man serving us said something about his grandfather hand spinning it in Scotland or something, and he seemed to have a 'take good care of this' glint in his eye. Could have all been a fanciful ruse, but I couldnt help but feel I had bought something special. 


So there was enough fabric there for a pair of shirts with a chunky pleat feature on the front and back. I re-traced the pattern as I emebered taking looooads out of the trousers and they can still be a bit large on a skinny day. So I sized down and found that the pleats are slightly different on the shorts, in that they are secured all the way up, and create less of a fanned-out paper-bag look above the waist. 


The pleats are still super effective though. There's something really constructive and architectural about a good strong pleat thats super satisfying to assemble. I added some interfacing into the waistline to enasure the folds and the opening of the shorts were super crisp. 


Following the instructions on this one was fun. The pockets and the fly opening came out really neat, is there anything in the sewing world more pleasing than something pretty and functional, and symmetrical? Talking of symmetrical, maybe next time I'll pay a bit more attention and sew the front belt loops on in equal places on my first attempt! I had finished the shorts, was really pleased with myself, looked in the mirror to find my front loops were lopsided! Ooops! 


Fit-wise, I found I did have to take more in for them to fit nicely on the hips, which left me wondering if I should have sized down even more?? Some days I feel I am relying quite strongly on a sturdy belt to keep them where they should be (how cool is this one I found in Glass Onion Vintage in Sheff city centre??!). 


Of course taking some out of the side seams late in the day reduces the size of the pocket opening, so maybe grading down a size next time would be the way to go. 


I'm a big fan of a turn up, I like the depth of these turn ups, but I took some convincing in the early stages that the fold didn't look too baggy. I think they would have benefitted from a bit of interfacing to keep them crisp like the waistband. It wasn't a big enough niggle for me to unpick and re turn-up though. 


I love these little explorer shorts! I feel like I'm off on safari! I love the lil houndsooths on this super spacial woven fabric. 


Thanks McCalls for another joyful pattern. 


x
Location: Castlegate, Sheffield City Centre
Currently listening to: Space Between Us, Franc Moody

Sunday, 26 June 2022

Mood Sewciety, Piper Shorts


Recently I've been browsing the Mood Sewciety website on pretty much a daily basis - who knew there were SO MANY FREE patterns on there?? I feel like I've been missing a trick here, there are patterns for everything from underwear to overcoats, all with clear, illustrated instructions. 


In search of summer patterns, I landed on the Piper Shorts - a paperbag style short with elasticated waist and cute tie belt. You're right- that means minimal fabric requirements and no faffy fastenings! 


This lush mocha coloured twill fabric was from my birthday haul (thanks moma!) from Hillsbrough Fine Fabrics in Sheffield. It was £7.99 a meter and I managed to squeeze these shorts out of 1 meter by cutting the tie belt in two halves instead of all in one. 


I made a toile from my brother's old curtains (!) and found the shorts a bit too long? Did anyone else find this? Compared to the piccy on the website my toile seemed a bit more pantalon than cheeky shorts! I took 6cm out of the crotch length so that the waist channel sat on my waist and the crotch sat comfortably. I also altered the curve in the front crotch a little so that it didn't look so baggy. 


After taking some length out of the shorts I also took some out of the back pockets too so they would still fit happily on my bum without disappearing into the turn-ups. This was my opportunity to do some crazy top stitching, but I chickened out! I think I'm gonna perfect an AH embroidery logo then have a stab at this next time I do back pockets. 

The good thing about the elasticated waist is you can shuffle the fabric round to allow for more fabric where you need it. This helps create a really good fit - the 'paperbag' bit at the top helping to create a flattering silhouette. I guess the lower you have your waist channel the more paperbag you get? 


Also helping to create that silhouette is the addition of this cute little bow belt. I made sure to interface my belt so it didn't get creased up and held onto its structure. Due to fabric restrictions, I cut it in two halves and attached together. 

I strayed from the pattern and added three belt loops at the side and centreback seams to keep the belt in place when I moved (had a habit of riding up off the shorts at the back if I didnt). To do this I just folded a strip of fabric in half to the belt look was 1cm in width, trimmed the seam allowance then turned. I cut the strip into 3 equal pieces, about 6cm in length, then top stitched the edges of each loop. I turned under roughly 1cm and stitched down close to the elastic, but without actually sewing into the channel. I love these as a finishing touch. 


I turned the bottoms up three times to create these chunky turn ups and secured with a few stitches in three places around the top of each. I think there is probably a way to turn these up so the right side of the fabric is still showing? Maybe I'll experiment with this next time. 


x

Location: COCO, Division Street
Currently listening to: 1%, Black Halos

Sunday, 8 August 2021

Simplicity 1370, Skort

This is my second version of Simplicity's 1370 Skort Pattern. I touched on my last post that I love the practicality of a skort- the "can go shorter than a skirt without flashing"-ness of them, the "I can power walk up this hill at a greater speed because my skirt isn't riding up"-ness. This pattern even includes pockets for stashing your important practical items (so long as they are small cause they're not super deep ok?).
I made a few very subtle changes to the pattern as I went a ong which I identified could be done when I made my first. The first change really was taking a little bit in at the hips. The pattern packet does suggest the skort is worn below the waist, and to that brief I do think my first one fits well. I do however have the desire to wear it a little higher every time I take it out the wardrobe- I think because the weight of the flaps on the front just cause it to sag a little at the front. So to combat this I took in 1 cm at either side of the waistband then graded back out to the hips in the skort. 
As mentioned in my previous post, I added some really light interfacing to the two front flaps to add a bit more structure. I think this was a really successful move, the seams are just a bit crisper and the flaps don't crease so much when sitting.

Invisible zip! I was dying to add one of these to V1, but by the time I'd identified this I'd already sewn and overlocked the crotch seams and I thought it would have been difficult to insert without being able to flip the shorts legs around when stitching the zip in. This time I was prepared though. I left finishing the crotch seam until the zipper was in. I think it worked really well. I was also able to manipulate how much seam allowance there needed to be in the centre back (I think it ended up being about the width of the zipper tape). This could easily have been increased or decreased had I taken in too much or not enough on the side seam alteration.

Again I chose to blind hem the hem instead of having a visible stiching line. I do quite like the chunky wide hem on the pattern but I think this would only have really worked if I had a visible seam line on my flaps (I'm conscious of how many times I've used the word flaps now aghhh). Again I lined the.. flaps, this time I had a brainwave and used some leftover pink satin which has this lovely iridecence to it. I think the pink lining looks sooooo chic! I'm really glad I chose it, and also that there was enough left to use haha!
I think that's it for changes to the pattern really. I double interfaced the waistband again as I thought the skort was calling out for structure. My stitch in the ditch was perfect and caught the inside of the waistband facing perfectly first time! I'm also happy with the matching up of the two sides of waistband at the zip. It's little details like this that I love because they really highlight how far I've come as a stitcher- particularly when the techniques are now coming so naturally.
A special mention has to go to my lovely lovely fabric. This was £11.99 a meter - which is probably more than I would usually spend on something, but a) I love houndstooth! And I feel like it's been sooo long since I made or even bought anything houndstoothy! b) I had a voucher from my mum for xmas to use in Hillsborough Fine Fabrics and when they finally reopened after lockdown I was chomping at the bit to treat myself c) I knew the skort didn't require much fabric, so I only bought a meter and it was plenty. There is a little square left of it which might come in for patch pockets or something on a garment one day. d) And finally, I could tell it was good quality- it felt nice to touch and had some level of wool content in it. I'd done all the groundwork on this pattern and knew I was on to a winner.
I hope you like my chic little skort as much as I do! This time I inserted the flaps the right way round! Who else has made one? Were you tempted to line the panels? Or maybe you've tried the skirt pattern or the shorts featured in the Simplicty 1370? Or perhaps a different skort pattern all together? Or maybe you've got big plans for some houndstooth of your own?? I would love to see.
x
Location: Biddulph Grange
Currently listening to: I Hate Boys, Christina Aguilera

Sunday, 27 June 2021

Simplicity 1370, Skort

I'm a bit fan of a Skort. The most confusing item of clothing to all men (wow such a short skirt, wow but it has legs, wow but it's a skirt? But it's shorts? No I don't understand), and the most essential item of clothing for any girl in a band (wow, it's such a short skirt, but no you can't see my knickers from the front row and it's not going to ride up against my guitar). 

I'd had my eye on the Simplicity 1370 Skort pattern for a while. In fact it's been in my stash almost a year I think. With summer just around the corner (it's still coming right????) it seemed like a good time to get my skort ready to go. 

This red herringbone was exactly the kind of weight fabric I was looking for in Hillsborough Fine Fabrics. It's sturdy and presses well but doesn't seem to shrink with heat. The herringbone was both a nod to my love of geometrics and a handy helper for lining my pattern pieces up along the grainline and getting symmetrical pieces. 

I think I got this fabric a bit cheaper due to it being 'end of season'. There is something certianly a bit autumnal about it, but with the weather feeling a bit more September than May right now I think we can get away with a bit og herringbone all year round. 

I made no alterations to the pattern sizing! I think I could take a little bit out of the waist or maybe scoop a tad out of the back for a slight swayback alteration, certainly if I was using a thinner fabric, but I'm reallllly happy with the fit of the medium. 
Watching the shape come together is so fun (have I said that in every single blog post ever?!). Flaps!! I decided to line the flaps to give them a bit more stability. I could apply very light interfacing to them next time for crisper seams and points, but I am really happy with the finish of them as they are. Attaching the lining with a 1.5cm seam allowance meant that I didn't have to turn under the hem of the flaps,. If you aren't lining them you can just turn them under 1.5cm like the pattern suggests. I then understitched the seam alloance to the lining as far as I could and stay-stitched the lining to the skirt along the top and side seams so it could be treated as one when attaching to the side seams and waist band.
I swear my herringbone fabric was exactly the same on both sides, which made it really hard to identify the front and back of the flap before I lined them.... and as a result. I. Maybe. Ended up with a mirror image of the flaps on the pattern packet but I really do think I prefer it that way!! No really!! 
I love the sneaky pockets (my Topshop skort definitely doesn't have pockets), they aren't super deeo or spacious but a great feature. I guess you could omit them without altering the pattern too much if you were running low on fabric supplies, or you could cut the side panel piece in a contrast fabric.
I decided to do a blind hem instead of visible hem seeing as I didn't hace a visible stitch line along the bottom of the flaps. The hem would have benefitted from some interfacing for a bit of a crisper finish but thats an easy one for next time! 
I didn't scrimp on interfacing in the waistband though! I interfaced both the waistband and the waistband facing as I seam to remember one of my old teachers sayign you could never add too much interfacing to a waistband. Anyone else heard this one?
I made a little change to the suggested zip style and decided to do a concealed zip instead of a semi concealed zip. The fabric around the waitband just seemed a little too bulky to press an exact seam allowance in to create the lap. Instead I machine tacked the back and waistband where the zip would sit and then placed the closed zipper along the seam and attached to the seam allowances only. Flip the skirt to the right side and then topstitch down evenly through all the layers to get a nice even zipper placement. Unpick the tacking and whoa! One lovely lil zip.


I'm in love with my finished lil skort. It's structural, it's practical, its a little bit sexy and it has pockets!! It makes a fab team with the Simplicity 8513 bodysuit and suspect it will make a great little scrap buster for left overs in the future too. If flaps ain't your thing, there's an option of basic shorts or mini skirt too. 
x
Location: Mortimer Road, Sheffield
Currently listening to: Never Look Back, Night Beats