Showing posts with label Trousers. Show all posts

Saturday, 19 July 2025

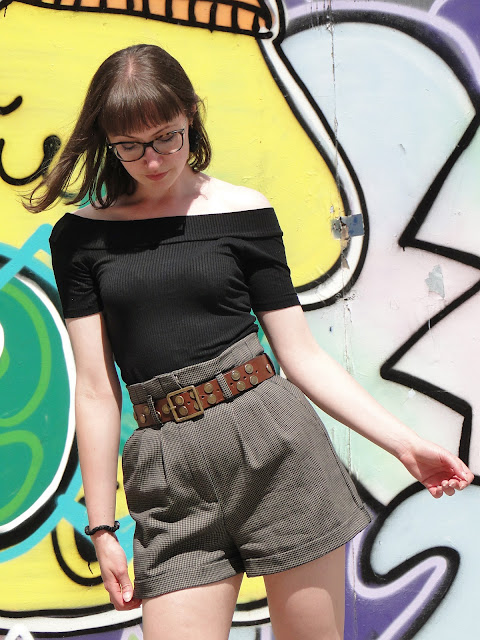
McCalls M7726, Houndstooth Shorts


I have used this pattern to make trousers before, I have always likes the pleats and the paper bag-style waist. I believe the pattern has since been rebranded as McCalls M8168 - I'm  not sure if anyone knows of any changes made to the fit when the pattern was renamed?


Aaaaaaannnnddd...... It has pockets! 


If I remember right, this fabric was the end of the roll at Hillsborough. The man serving us said something about his grandfather hand spinning it in Scotland or something, and he seemed to have a 'take good care of this' glint in his eye. Could have all been a fanciful ruse, but I couldnt help but feel I had bought something special. 


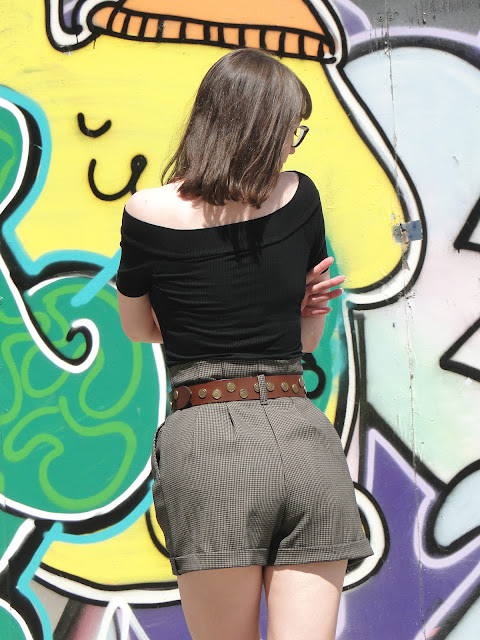
So there was enough fabric there for a pair of shirts with a chunky pleat feature on the front and back. I re-traced the pattern as I emebered taking looooads out of the trousers and they can still be a bit large on a skinny day. So I sized down and found that the pleats are slightly different on the shorts, in that they are secured all the way up, and create less of a fanned-out paper-bag look above the waist. 


The pleats are still super effective though. There's something really constructive and architectural about a good strong pleat thats super satisfying to assemble. I added some interfacing into the waistline to enasure the folds and the opening of the shorts were super crisp. 


Following the instructions on this one was fun. The pockets and the fly opening came out really neat, is there anything in the sewing world more pleasing than something pretty and functional, and symmetrical? Talking of symmetrical, maybe next time I'll pay a bit more attention and sew the front belt loops on in equal places on my first attempt! I had finished the shorts, was really pleased with myself, looked in the mirror to find my front loops were lopsided! Ooops! 


Fit-wise, I found I did have to take more in for them to fit nicely on the hips, which left me wondering if I should have sized down even more?? Some days I feel I am relying quite strongly on a sturdy belt to keep them where they should be (how cool is this one I found in Glass Onion Vintage in Sheff city centre??!). 


Of course taking some out of the side seams late in the day reduces the size of the pocket opening, so maybe grading down a size next time would be the way to go. 


I'm a big fan of a turn up, I like the depth of these turn ups, but I took some convincing in the early stages that the fold didn't look too baggy. I think they would have benefitted from a bit of interfacing to keep them crisp like the waistband. It wasn't a big enough niggle for me to unpick and re turn-up though. 


I love these little explorer shorts! I feel like I'm off on safari! I love the lil houndsooths on this super spacial woven fabric. 


Thanks McCalls for another joyful pattern. 


x
Location: Castlegate, Sheffield City Centre
Currently listening to: Space Between Us, Franc Moody

Sunday, 21 May 2023

Simplicity 2860, Amazing Fit Trousers


I've been scared of trousers for quite some time. I've made a few pairs but I've always felt like I was cheating, big pleats and forgiving gathers. 


The Simplicty Amazing fit trousers were what I needed to tackle my fear. The pattern instructions include a lot of fitting tips, and the pattern is designed with fitting alterations in mind, for example the seam allowances are bloody massive and there is a seam in the centre back of the waistband to aid with pinching in or letting out as necessary. 


The toile I cut was a good starting point. It was a little loose on the waist and hips, so I increased the seam allowance but 0.5cm at the waist and a further cm from the hips onwards. I wanted to keep the legs straight, so I was careful not to over-fit at the hips. 

I was prepared to have to make some alterations in the lower back area as I am often needing to tackle a swayback adjustment, but I found the waist/ butt darts gave a good shape to my behind. 


The main fit issue was a found the trousers a little tight in the crtoch area. I did a bit of research and found I needed to deepen the curve in the crotch (which felt sort of counter intuitive as I associate increasing a seam allowance with making something smaller and therefore tighter), and alter the angle of the inside leg seams. This worked for giving me less of a wedgie but did seem to make the front crotch area a little overly spacious. But hey that's what toiles are for! Lots of messing about until the fit is good and the fun bit can begin! 


I may have over-deepened (is that a word?) the crotch seam, but it did work to my advantage - they ended up a little more high-waisted with that extra room which is exactly where I wanted to wear them. I had to be careful though, as any higher and I would definitely have had to alter the darts in the back to fit the curve of my lower back. 

Wearing them a little higher meant that I also had to be wary of the length! 2cm further up the hips meant 2cm higher up the ankle! Luckily there were no disasters, but I did make a slightly narrower hem to be on the safe side. I then blind hemmed by hand so as no stitching could be seen on the outside. 


I loved constructing the fly zip (even if constantly swapping to the zipperfoot was a pain!). I could have done with sewing the left side a little further from the zip teeth so that the tag sat a little more comfortably behind it, but if I wiggle it in after I've zipped up no one would know! Also I learnt when making my toile that the outside of the fly pieces need to be overlocked before inserting. 


One of the only downsides of this pattern, is there's no pockets! But I totally get that this means altering the fit is much more doable at any stage of making. 


What it lacks in pockets it toally makes up for with beltloop bonus points. It's very satisfying adding them into the construction of the waistband right from the off instead of fiddling about with them at the end. There's also the added comfort knowing that if for some reason they need a bit of help staying up you've got an extra safety blanket! 


Other satisfying features of the waistband include the hidden button and buttonhole inside the fly. I was sooo pleased with the buttonhole (new unpicker for smooth slicing and some fray stop before any threads started running). I bound the bottom of the waistband facing with a satin bias binding for a super neat finish. I fastened down with my neatest stitch in the ditch, which for the first time ever you cannot see from the right side and I did not need to unpick a thing. 


Finally, a little note on fabric choice. I would love to make million versatile versions of these trousers. I can see a plain black pair quickly becoming a wardrobe staple. When picking fabric though I need to be really careful not to pick something that creases easily (crease crotch is the worst), but not pick something so heavy or stiff that it chafes (also bad). If I keep the wide straight legs, cord might look a but juvenile (I've already lived through the 90s once thanks), denim would work but only if it had very minimal stretch so as not to alter the fit of the pattern. 


Really pleased with the time I put into altering the fit. I got these guys finished in time to start my new job. Meet your new boss. 


x
Location: Millhouses Park
Currently listening to: Somewhere They Can't Find Me, Simon and Garfunkel

Monday, 28 December 2020

McCalls M7726, Paperbag Trousers II

I'd booked sometime off and didnt want to spend it faffing with patterns I would need to alter. McCalls M7726 was recently tried and tested by me and I knew that although the make required attention to detail structurally, I'd already got the fit right, meaning I could relax and get on with the fun part.

I bought this fabric at the same time as the blue fabric with these trousers in mind. I think both together cost me less than £15 from the fabric shop in Hillsborough. The only other thing I needed was a 9" zipper and a hook and eye bar closure for the top of the fly. These hooks and eyes come in twos at my local market!


The grey fabric actually yeilded better results as it is much less prone to creasing, making for a much smoother look after Ive been sitting at my desk all day.


This time I overlocked my leg seams all in one and pressed to the back instead of doing them separately prior to assembling and pressing them open. I feel like this resulted in better accuracy as none of the fabric had been shaven off by the overlocker before stitching the seams together.


I am particularly pleased with my blind hem on these trousers. The fabric pressed really well and it was perfect for secretly hand sewing the invisible seam. I gained the same level of satrifaction topstitching my pleats this time round as I did on my blue pair. There is just something so lovely about knowing those pleats are FIXED. Beltloops also so so pleasing, there's something about weaving a shop bought belt through them that feels almost tricksy haha!

Due to the drape of the fabric this time I didn't think it was neccessary to take any of the fabric out of the side seams. They could get away with being slightly more tapered, but I think they currently look quite balanced. I didn't want to risk over-fitting the legs and then finding the pleated area looked a bit poofy.

I would however like to get some more experience in making fitted trousers so I'm now on the hunt for a simple (- but not boring!) trouser pattern that relies less on pleating, gathering , elastic or drawstrings and more on just getting that perfect fit. Any ideas?

x

Location: BUNK, Carver Street
Currently listening to: Laughing Willy, Jeremy Ivey

Tuesday, 24 November 2020

McCalls M7726, Paperbag Trousers


The Pattern
Full length or shorts variation, wide ot narrow leg. The main feature of these trousers is the pleated waistbandwith 8 pleats in total to create a paperbag-style top. There are three belt loops (though I guess you could add more), allowing for the opportunity to accessorise with any belt, and lovely deep pockets so you can carry all your essesntials.


The Process
The pleats are the most iportant area to get right, as they will determin where abouts on your hips the trousers wil sit. My first toile turned out to be massive! So I scaled down to a size 10. The only changes I needed from there were to narrow the lefs a little, though I think you don't want them to be too narrow, as the pleats create a lot of butt/though room where they are released and you don't really want to create a narrow/wide/narrow silhouette that could end up looking a bit... farmer!?!


The pleats being the main visual feature also means You should pay close attention to getting them perfect! I would recommend not skipping any of the tacking steps as they really add to the accuracy of the pleats. The top stitching is also essential to get that professional finsih as well as adding an extra level of reinforcement.


To add to the structure of the trousers I added a light interfacing to the fold-over area of the waistband. It doesn't need much, but I found it really helped to define the pleats.


This pattern was my first go at making a fly zip. I waqs a bit intiidated to start with but if you follow the instructions and your fabric is as well behaved as mine it's simple enough. I used carbon baber and tracing wheel to transfer all the pattern markings to the fabric so there was as little toom for error as possible. There are a lot of fold lines and stitching lines to follow so it's important to get everything lined up correctly. 


The Fabric
I chose a plain fabric with it in mind that the trousers would look really classy with a simple belt to help accentuate the waistine created by the pleats. I do think if you can be bothered with pattern matching, plaid or checks would look really awesome too- though they would definitey highlight a dodgy pleat!
My fabric was less than £5 a meter, I bought 2 meters but could have got away with less. 


The Finished Product
Wearable trousers that fit, suitable for dressing up or dressing down! The legs are still a bit wide so instead of just increasing the seam allowance I will look at taking some more out of the pattern before I cut my next pair. The shape is great and I love the paperbag-style top. Fit-wise they don't feel too tight around the the bum or crotch and the pockets are so practical too. 


I assume taking a little less in at the pleats would allow the trousers to sit a little lower on the waist if you were less of a fan of the high-waisted look.. but I dig it!


x

Location: o2 Academy, Sheffield
Currently listening to: Love and Pride, King