Showing posts with label Sew Magazine. Show all posts

Sunday, 3 April 2016

New Look K6035, Skull Vest


I've been eyeing up this fabric for weeks! But it's rather see-through quality left me unsure what to make. On a trip round town I fell in love with a cute little crop top in M&S and knew it would be perfect, maybe a bit flirty (!), under a sheer top... So I set to- deciding to make another New Look K6035.


It's a pretty simple top, and I think with that in mind I maybe didn't make the best job of putting it together. Instead of trying it on when gathering the front, I just let Celine wear it and pulled the gathering stitches to fit her. In theory this should have been fine, but on account of me having proper arms, after sewing it all up and trying on I found that I'd gathered a little too much and it pulls ever so slightly across my chest. Good job new crop top isn't padded, eh!


When I finally did try on I realised that the side seam placement made the top much too roomy- I'm not sure if this was just because in this top you can actually see my body underneath and it just looked a bit weird? Because my blue version of this same pattern fits really well? Anyway, this was particularly annoying because I'd used french seams on the sides and ended up just hacking them off with the overlocker, making for a bit of a lump-fest where the armhole binding joins. BUT I'm glad I did change the seams as it fits so so much better.


Not massively happy with this top, but I am still in love with this fabric. Any suggestions of other things I could make with more of it would be great? I thought possibly another kimono, but we never get the weather to wear the ones I've already made... Plus I'm not mad on those massive sleeves. Any ideas?

x

Currently listening to, Firecracker, Ryan Adams
Location: Chelsea Park, Sheffield

Sunday, 7 February 2016

New Look K6217, Moth T-Shirt


The final make of my sewing holiday was another New Look K6217 top. This easy, wearable pattern is my new go-to especially when fabric supplies are minimal!


It's really simple, and I didn't really make any changes to the pattern from the last two I made. A front and a back in two halves- this time utilising a centre-back seam to allow for a slight slit from the neckline, fastened up with a pretty button. I took extra care to make sure my moths on the two back pieces were all inline this time... Not like on my anchor top!


Hemming the sleeves was made easier with the aid of the overlocker- just turning under the overlocked edge and hemming down. Again the side and shoulder seams were french seams to avoid fraying.


Simple.

x

Currently listening to: Speak Out Reach Out, Johnny Marr
Location: Milton Street Movie Park, Sheffield

New Look K6035, Vest top


Day 3! This was a prime example of spotting gorgeous fabric and buying it before having any idea what to make from it. My options were narrowed down by the fact this offcut from Abakhan's was only about a meter in length. Searching through my patterns I found a pretty vest top with central gathers that I could just about squeeze out of my fabric.


I was worried the gathers in the centre might sit a bit funny, so I faffed about with them for aaages before tacking them good and proper into place... I only found out after (when I actually read the instructions...) that I was meant to pull the gathering stitches to fit the length of the bias band round the neck and not just make a band to fit. Thankfully though, the amount of faffing paid off, and I'm really happy with the neckline.


Due to having minimal amount of fabric to play with, the bias band I made was out of two lengths and the shoulder seams of the vest top wouldn't line up with the joins in the binding. I don't think it notices when it's on though! I made sure the joins in the bias binding were symmetrical to each other. I'm quite proud of how neat it looks despite this.


I used french seams on shoulders and sides as the fabric is quite thin, and I turned the hem up twice, keeping it narrow. Another cute feature of this top is the little splits at the bottom of each side seam. Although not necessary for fitting purposes, they add another bit of interest to what was quite a simple pattern

x

Currently listening to: The Trap, Johnny Marr
Location: Milton Street Movie Park, Sheffield

New Look K6230, Raglan Sleeved Jumper


With the skills I'd learnt on Day 1 of my sewing holiday, Day 2 was a breeze!

Every time I'm out shopping I seem to pick up either a mustard yellow or an autumnal orange jumper, then put it back on the rack wondering if I'll ever actually wear something not black. This jersey fabric in Abakhan's jumped out as the perfect autumnal orange. I was immediately drawn to it's fluffy texture, knowing it could be just what I needed to keep my pesky chilblains at bay.


As luck would have it, the pattern in the current issue of Sew magazine was a long raglan-sleeved top which I knew teamed with my autumnal orange, could make a super cosy jumper.

I made a couple of alterations to the pattern. The first was to omit the centre back seam. I have no idea why it was there!?? Then I added a little to the seam allowances at the waist to add a bit of slouch-factor.
Inspired by my last make, I decided to draft a waistband and cuffs. I made sure the length of these were slightly shorter than the opening on the jumper, then matched up the midpoints as I overlocked band to garment.


The neckband situation was less stressful, perhaps as the band was thinner and the neckline was less baggy than that of the jersey top. Then my jumper was finished! It took about a day including tracing the pattern and cutting out. Using the overlocker to do all seams made for a very speedy process.


I quite fancy making a cropped version (Maybe adding the waistband on and not altering the length made this one a little too long?). Perhaps if I find some mustard yellow fluffy jersey I can get started on jumper number 2!


x

Currently listening to: Back In The Box, Johnny Marr
Location: Milton Street Movie Park, Sheffield

Sunday, 30 August 2015

New Look K6217 Floral T-Shirt


It's another K6217! This was the third project I had in mind using my Abakhan supplies. I kept walking past this bold print, picking it up, putting it in my basket and putting it back until I held it up and Aimee said the print was great against my skin tone. I must say I too was feeling it when I held it up and thought another simple K6217 T shirt would be as good a pattern as any.


There was very little difference in how I made my Anchor K6217 and how I made this Floral one. If you recall what really bugged me about my previous was that I didn't pattern-match the centre back seam. Well this print is much bolder so it didn't matter this time round!
I stuck with the extra inch or so that I'd added to version one as I found the extra length is really handy for tucking into a pencil skirt for work, and also for teaming with jeans for say, a date to the cinema or something!


This time I also decided to french seam the side and shoulder seams which looks dead neat. I used a twin needle to hem the bottom, just for a bit of a top-stitch feature. Very happy with my bias binding neckline- also very neat!


And that's about it really! A good example of how lovely fabric can really make a simple pattern come to life.


x

Currently listening to: All My Friends, LCD Soundsystem
Location: Botanical Gardens, Sheffield

Sunday, 23 August 2015

Sew Magazine, New Look K6107 Blouse


Project number two to feature fabric from the Abakhan trawl is another free pattern from Sew Magazine! I thought it was about time I made a blouse for work that wasn't a Lottie! Though this pattern is not without its similarities- a neckband/tie and gathered sleeves. The differences that attracted me however were the cute cuffs and button up front on the blouse.


I had my reservations about using such a sheer fabric. I've read about enough of other Blogger's disasters when using sheer fabric, so planned on being as accurate as possible when cutting out. I used lots of pins with my pattern which was great but did find the bottom layer of fabric did distort and in some cases ended up a rather different size to the top piece.
Also, besides being stretchy and slippery, it was also prone to fraying! I kept an eye on this though and opted for French Seams where possible- making sure raw edges were thoroughly encased! Size-wise, I cut a 12 but was a 10 for the bust so used a 2cm seam allowance for the side seams that I gradually graded out to a 1.5 at the waist and hips.


My favourite part of making the blouse was constructing the facing/button area at the front. Instead of buttonholes this pattern uses button loops like on my Crab Dress. So I'm finding I'm getting pretty good at loops! The loops are cut on the bias so they have stretch to go around the button. This is a good job otherwise my buttons would have been a squeeze too big! On the opposite side to the button loops there is an underlap which sits behind the buttons and hides any gaping between them. Never done an underlap before! I thought my debut turned out pretty neat.
Both sides of the opening are faced. I had a bit of a panic when starting the garment as I have never interfaced sheer fabric before! And I'm sure I remembered something off of this years Sewing Bee about not using standard facing for sheer fabrics. So I read up a little, and instead I cut an additional piece of that stretchy, slippery, fraying fabric and stitched it in as interfacing instead of using iron on. I've got to say- It worked out pretty well! Go me!


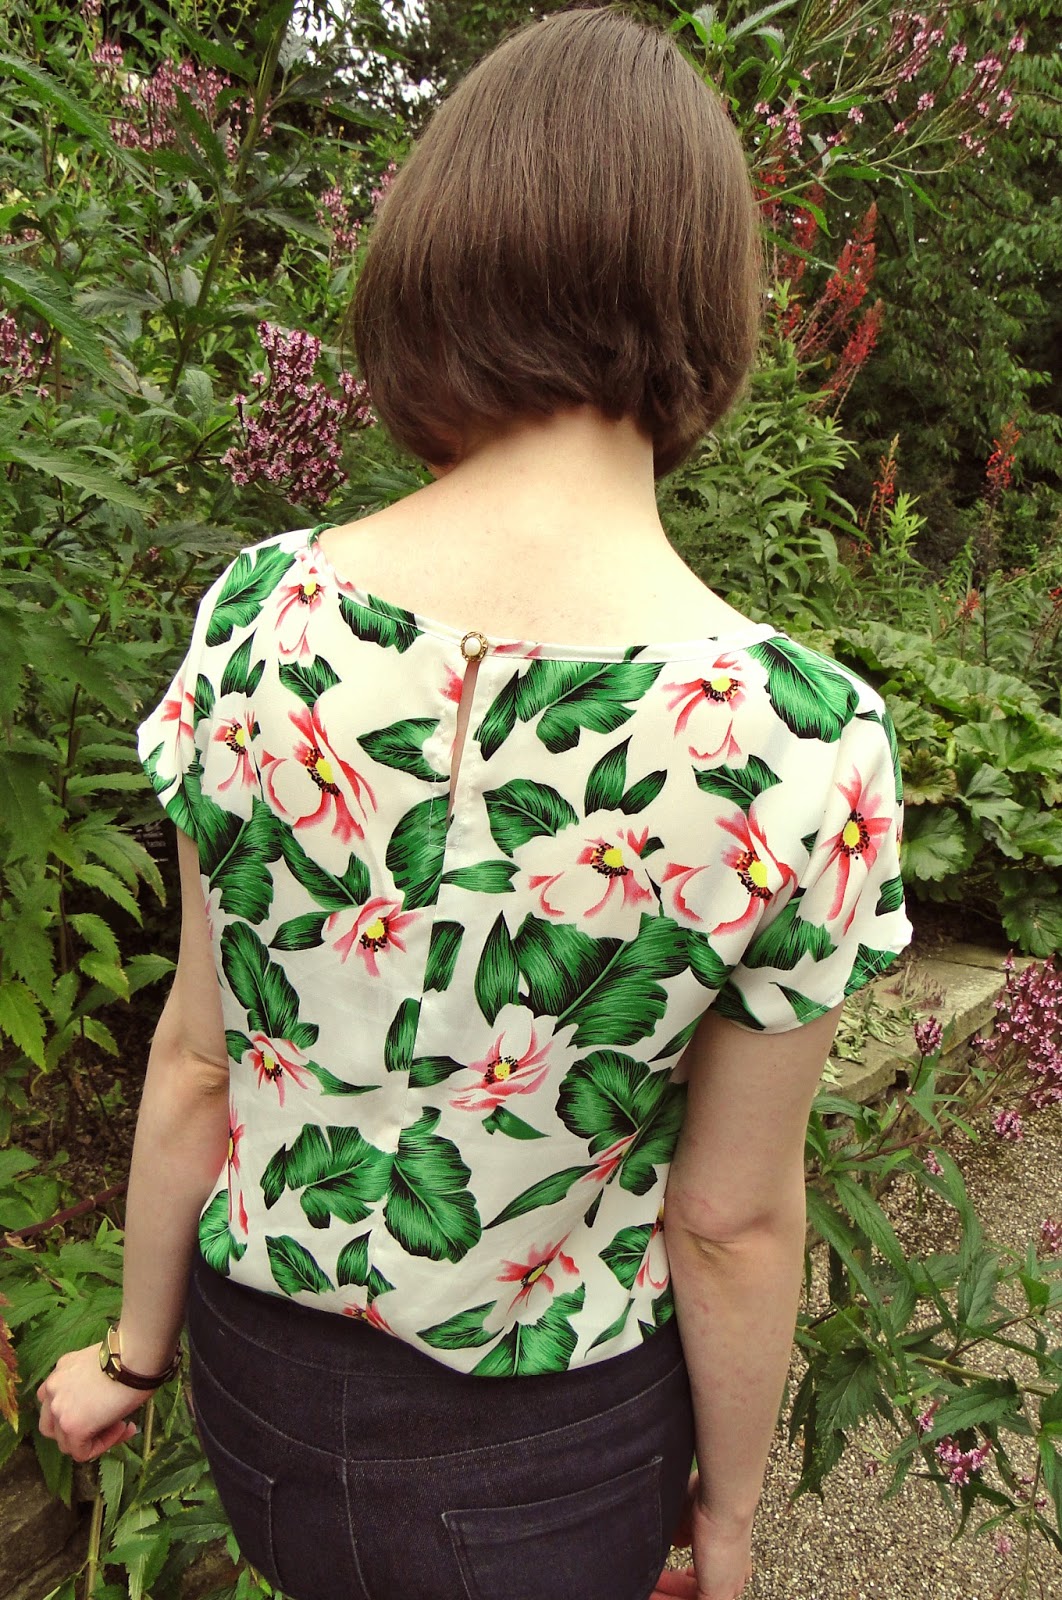
On my Lottie Blouses I've always seemed to have a bit of grief regarding getting the neckband to line up around the neck just quite how I want it to. This pattern being a little more detailed, I made extra effort to transfer all markings on the pattern on to the fabric. I was awash with tailors tacks! I get the feeling if I'd used friendlier fabric these tacks would have been absolutely life saving. In this instance though I would describe them as handy, but not perfect. Either way, they resulted in a swifter process of attaching neck band to blouse.
The worst bit about sewing on the neckband though was the dreaded 'Stitch in the Ditch' from the front of the band to catch the back. I absolutely hated doing this and I'm not totally happy about how it turned out. Next time I am definitely definitely doing it by hand! I think a sneaky slip stitch is much much neater.


After this it was time to make the sleeves. I've got to admit I thought I was on my way once I'd got this far. Firstly the cuffs had to be made, which was quite fun as not something I'd done before. A little gap has to be made in the bottom of the sleeve, the sleeve then gathered, then stitched to the cuff which is longer one one side when it meets the gap. Then button and button hole sewn to match up. Does that make sense? Well I wish someone had told me before I started that that was what was meant to happen. I ended up with one good cuff and one that somehow didn't reach around my arm properly (I'm putting it down to those gathers). So I repeated the process for the dodgy side and ended up with a pair of cuffs I was pretty pleased with.
The shoulders of the sleeves were also gathered- alarm bells going off slightly at this point thinking there was an awful lot of gathering going on... But I went with it anyway and stitched in my sleeves.


After putting on my buttons and trying on the blouse properly I realised I absolutely couldn't stand the sleeves! I think it must be something to do with the qualities of the fabric- as I have gathered sleeve-caps in the past and had no problems- but these just seemed to POOF out (one more than the other might I add) and it looked so terribly 80s that I knew I would never ever wear it. I took the worst sleeve out and realised that the whole thing looked a TON better without sleeves in at all. So I whipped up some bias binding and bound the arm holes instead. It's a shame I didn't get to use my cuffs though! At least I have learnt a new skill for next time and I'm much happier with my blouse.


There were a few sketchy moments, but I guess that's what this is all about :)

x

Currently listening to: Green Honeycreeper, Olivia Jean
Location: Weston Park, Sheffield

Sunday, 19 July 2015

New Look K6217 T-Shirt


This pattern has been sat in my to-make pile for ages after it came free with issue 69 of Sew magazine back in March. After having a couple of weekends away from sewing- mainly due to lack of inspiring fabric, I thought it was about time I knocked together one of these tops with some leftover fabric from my Mimi Blouse.


What initially attracted me to this pattern was its versatility- sure it is described as a 't-shirt' but in the right fabric it definitely has a blouse-like quality. With that in mind I knew I wanted to extend the pattern by 1.5 inches so that there would be enough fabric to tuck into work trousers comfortably. Despite getting into a bit of a mess with the cellotape (ahem), extending the pattern was quite simple.


Assemblage was quite easy and the top was made in an afternoon. The only thing I wasn't happy with was my very poor pattern matching on the centre back seam! In fact I am going to admit it didn't even cross my mind to try- I guess I'm just not really used to tops with a centre back seam? Hmm yeah any excuse! Next time I will keep an eye on this!

The sneaky feature on this top is the gap at the top of the centre back seam fastened with a button. This is really just a feature as the neck is really wide and easy enough to get over your head without undoing. The neck is finished off with a strip of bias binding- I made my own from the fabric... It looks neater from the outside than inside, that's what matters right?


I'd like to make a few more K6217s- Maybe I'll go for block colour next time to avoid pattern matching! Being made up of only three pieces (2 back, 1 front) makes this top a good one for using up left over fabric. No pesky interfacing, no button holes and no zips. I should be able to knock out quite a few!


x

Currently listening to: No, Ryan Adams
Location: Crookesmoor Park, Sheffield