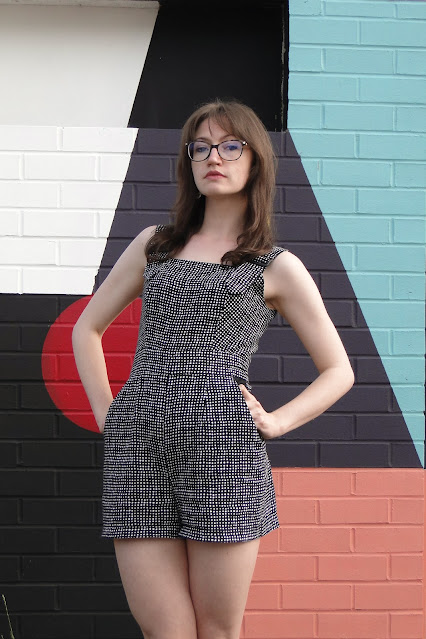
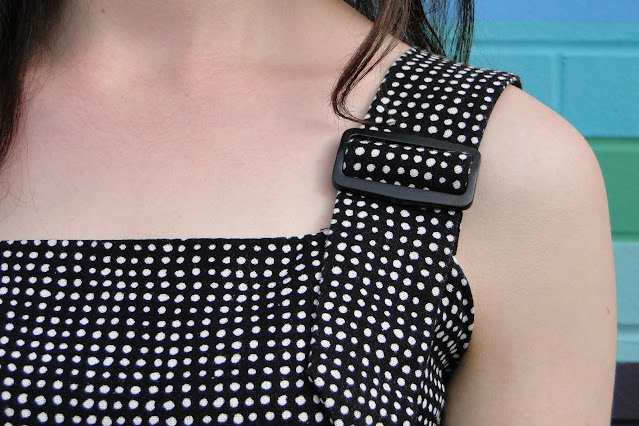
2023 is proving itself to be the year of the playsuit. After falling hopelessly in love and making two McCalls 8009 playsuits in quick succession, I started eagerly browsing for my next potential playsuit pattern. I landed on the McCalls 7626 pattern, with dress, jumpsuit or playsuit variation. I was a little concerned the top could look a bit boxy with its straight neckline and rectangular straps, so knew fitting in the bust area was key to avoid looking oddly angular. I made a toile from an old duvet case and made a few subtle tweaks to the pattern. I increased the seam allowance by 1cm (so therefore taking in 2x 2cm) at the underarm and graded back out before the seam hit the waistband. I was concerned that taking in some of the side seam in this area could have made the arm hole too small, so I extended the armhole by a cm at the back and then moved the strap markings over by 1cm too. This seems to do the trick! I increased the side seam allowance of the shorts by 1cm at the hips down to the hem. I added this alteration on to the front, back and side panel (/pocket) pieces. I added 1.5cm to the top of the inside leg seams (front and back) making the crotch length longer, then graded this down to the hem. This makes the pattern piece more angled instead of being a straight line from crotch to hem. Following this, with a bit of trial and error I deepened the crotch curve in the front and back. This can be tricky as the more the curve is deepened, the more you need to clip to allow the curve to actually curve. Of course you don't want to clip too deep during the trial and error stage incase you've over-deepened the curve - then you can't go back! I need a little more guidance on how to not just wing this process and actually apply some alteration wisdom to how deep the curve should be. I cut 2.3cm from the bottom hem of the shorts, then hemmed as detailed in the pattern instructions - by turning under a 2.5cm hem and then turning in 6mm from the raw edge. In terms of construction, I decided to interface the straps of my playsuit to a) prevent them from stretching out b) help them keep their pointy form and c) add a little more thickness to help them keep their place in the sliders. I was surprised the pattern didn't recommend this. I would 100% do that again. I also interfaced the entire back pockets before stitching them. I knew I wanted to have a go at adding some interesting topstitching. I wanted nice crisp lines around the edge of the pockets and I wanted my top stitching to land neatly. I think interfacing really helped with this, particularly when pressing the edges of the pockets into position.
My top-stitch design was pretty basic, but I'm really pleased with how neat and symmetrical the pockets are as a pair. I want to pluck up the courage to make a more personalised design, turning my initials into a more abstract form or something. A little something to think about before my (inevitable) next playsuit.
While we're on the subject of the back pockets, I don't know if I have a weirdly proportioned booty, but the suggested pocket placement of the pockets on the pattern was waaaaay off. Thankfully I didn't jump right in and put my pockets on while all my pieces were still flat and unassembled. This would have been easier, however I was waiting for my topstitch thread to arrive in the post and I was too impatient to put the project in hold. This was a blessing in disguise, as when I came to attach my pockets onto my fully assembled playsuit, I found the pattern markings were way too high and the pockets would have sat awkwardly on my lower back. Has anyone else found this? I moved them down by about 2.5 inches after pinning and assessing. I will make this change on the pattern pieces. I decided to use a contrast fabric in the side panels, as I thought this would break up the dotty print of the fabric and help show off the design, and also knew that a contrast panel in the side would look flattering for my figure. For the pocket bags I used the satin lining that I lined the bodice with. This fabric was well behaved, and I quite enjoy its silky sheen on the inside. The straight lines of the neckline lend themselves to some top quality understitching to hold that lining in place. I pinned, tacked then stitched the invisible zip into the back. Here my one error became obvious - I should have overlocked the back raw edges. The lining only covers the bodice and waistband edges, meaning that below the band to where I overlocked the crotch seam too was still raw after inserting the zipper. My fabric was fraying hard at this point after so many try-ons, but I couldn't get the overlocker over the zipper to catch the raw edge of the fabric. To save it, I used a modest zig zag stitch from below the waistband to the end of the zip placment which stopped the fabric from shedding any further. I love my little rompersuit! I'm so pleased with the fit and I like the chunky straps way more than I thought I would. I quite enjoyed not committing to a strap length by using the sliders too haha! Next 7626 has gotta be a denim one with some goldy top stitching right?
x
Location: Nether Edge, Sheffield
Currently listening to: I'm Gonna Catch Me a Rat, Fabienne DelSol


