Sunday, 9 July 2023

McCalls 6469, Polo Neck Dress Hack


I'm a bit scared of vintage patterns. There I've said it. I heard rumours their sizing is different to modern day. I'm scared old paper will fall apart instantly with my touch. I'm scared old symbols mean the opposite of new symbols. With this in mind tho I do always have a rifle though the old patterns in vintge shops and charity shops, never knowing what you might find. 


This pattern was inculded in a bundle in my local charity shop alongside other retro work-out patterns. Without being able to delve in and check all the bits were there I bought the bundle, confident that whatever I found inside I would be able to do something with. 


The McCalls 6469 was instantly my vibe. Lil shorts, sporty polo neck, customisable joggers and a hoodie to match. I set to work having a look what was inside the packet. Everything was still intact, but ohh no, that's right, multi size patterns were still a thing of the future when this pattern was made. OK check the size guide........ bust size looks good, hips look err, narrow OH WAIT it's a junior's pattern haha!  


Undeterred by this revelation, I decided to pull out some of the stretchiest rib knit in my stash, take some careful measurements  and proceed with caution. At the very least I'd get to have a bash at making that polo neck placket, even if I ended up with a garment too small.  


As I was likely going to be lengthening the pattern anyway, I decided to throw caution to the wind and extend the top into a dress. I added length and, I won't lie, completely estimated what hips looked like - erring towards overestimating so that I had enough to pin when the dress was on, and find my fit.
 

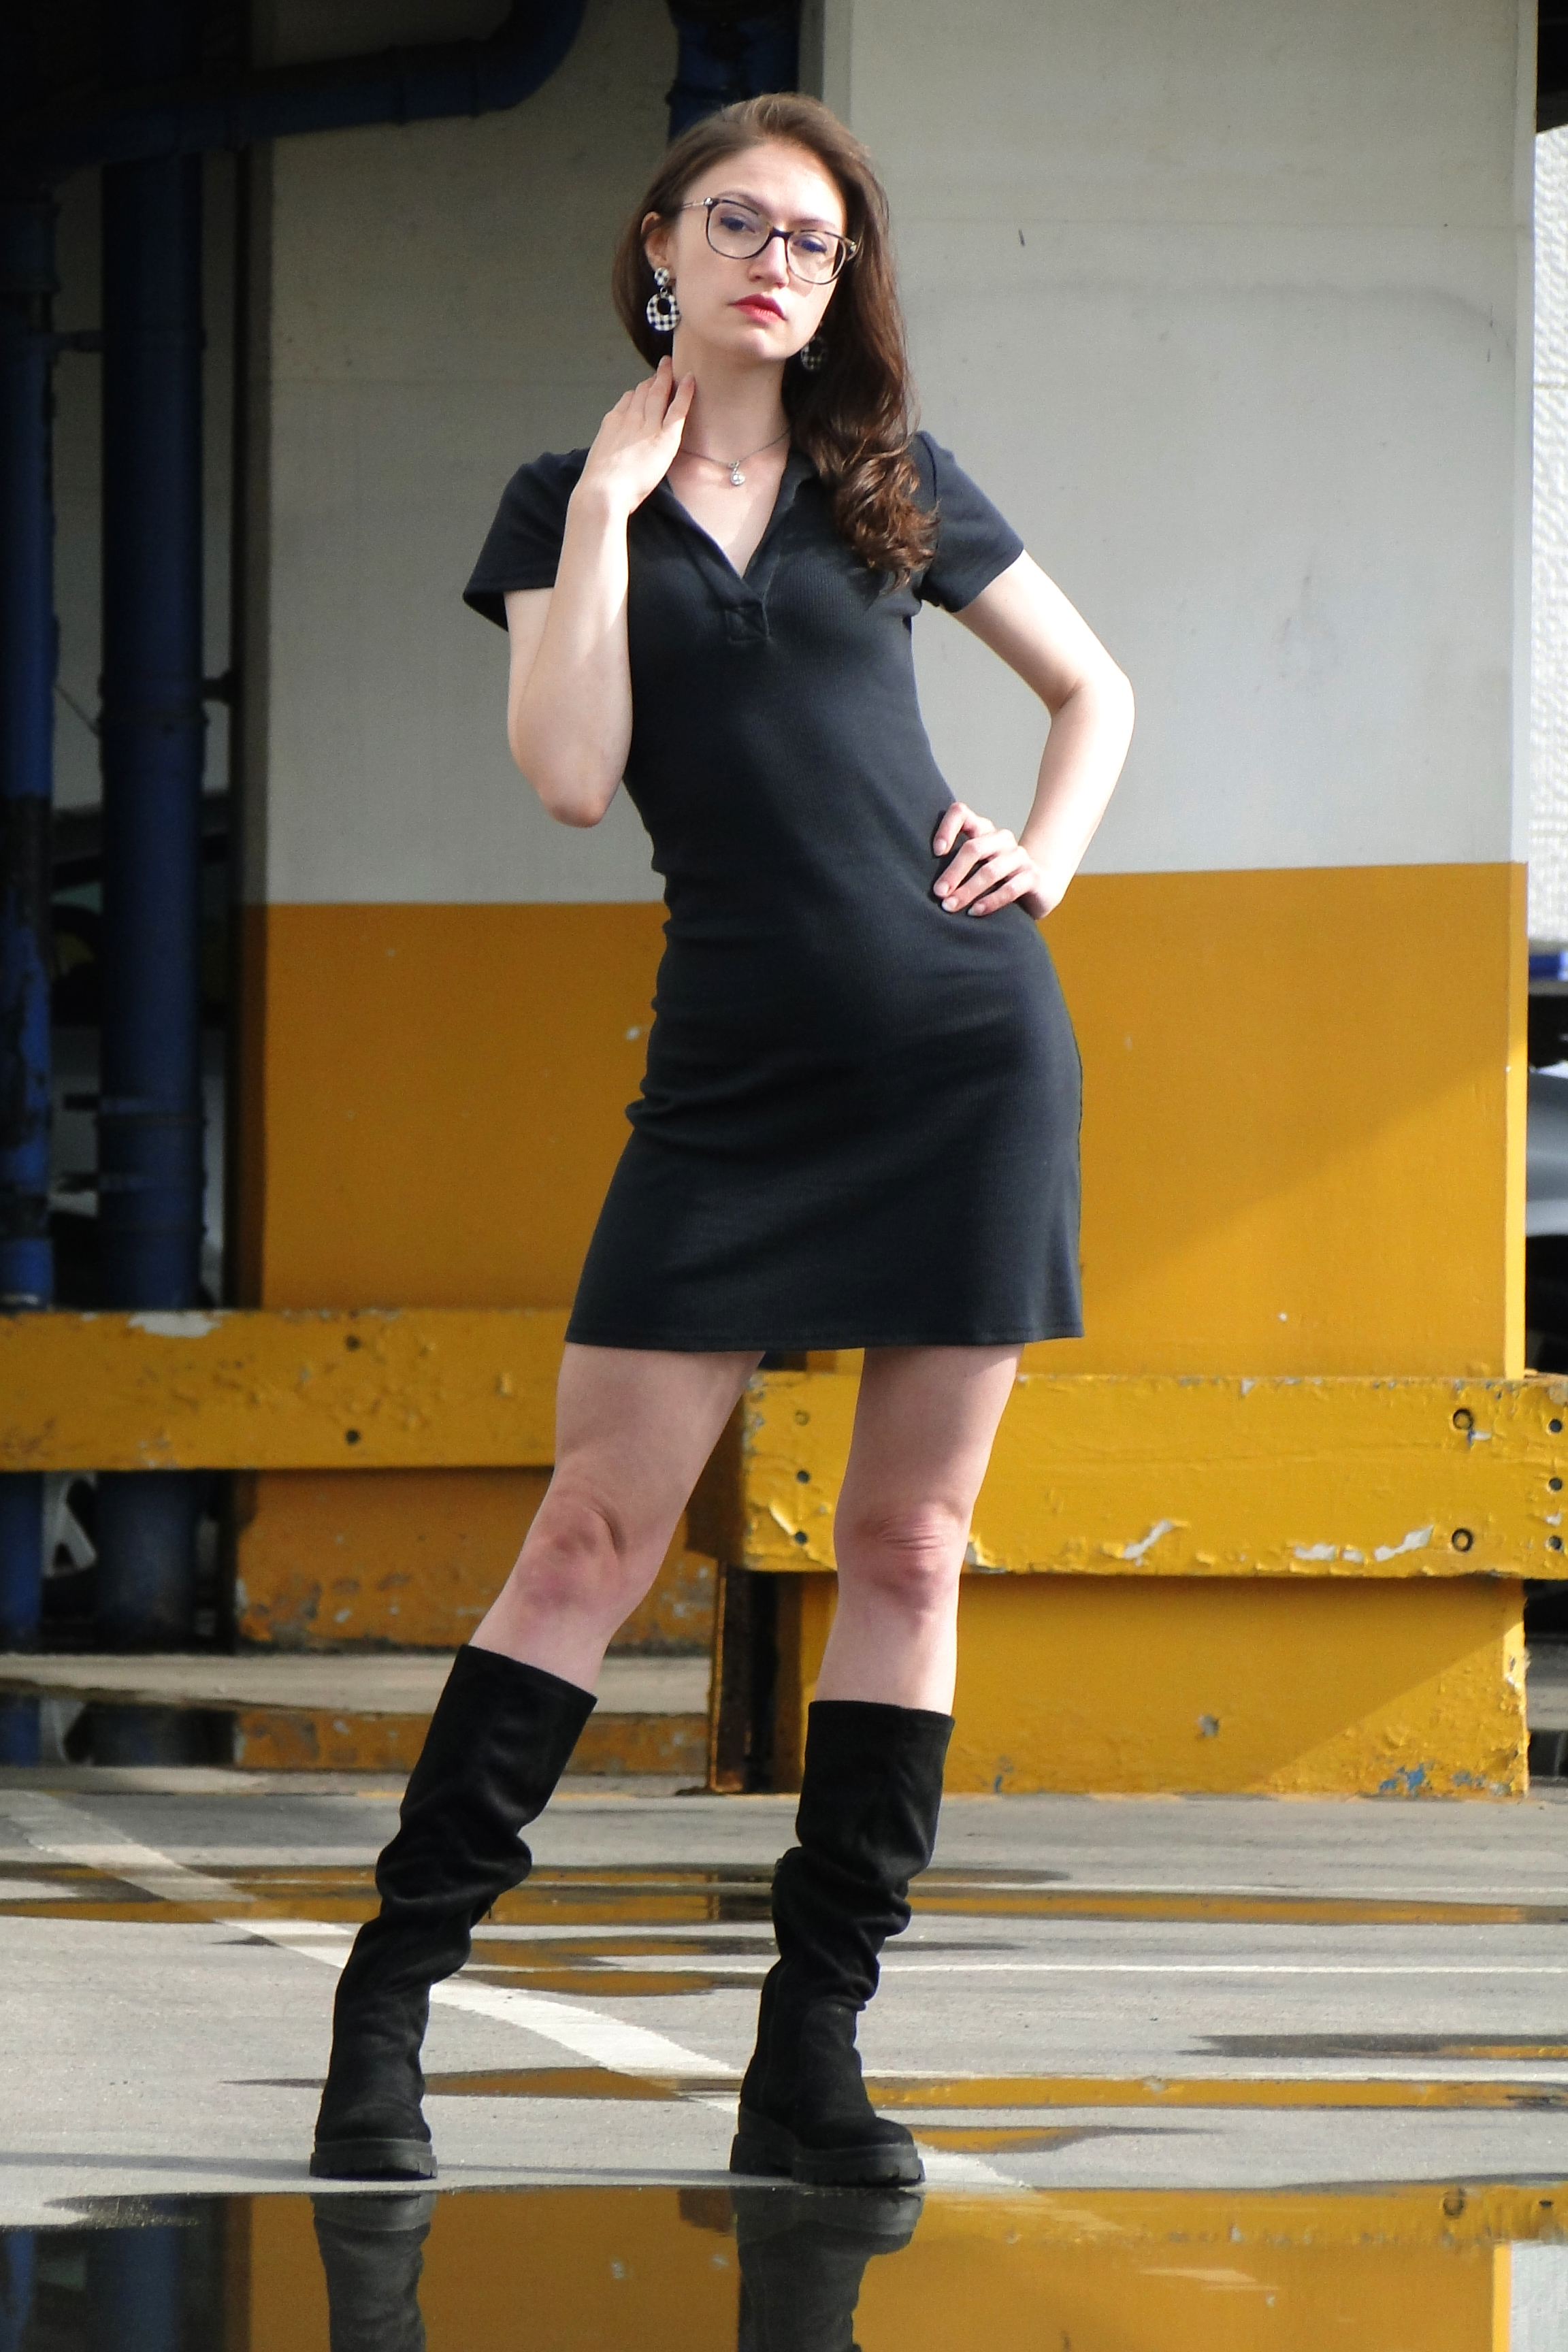
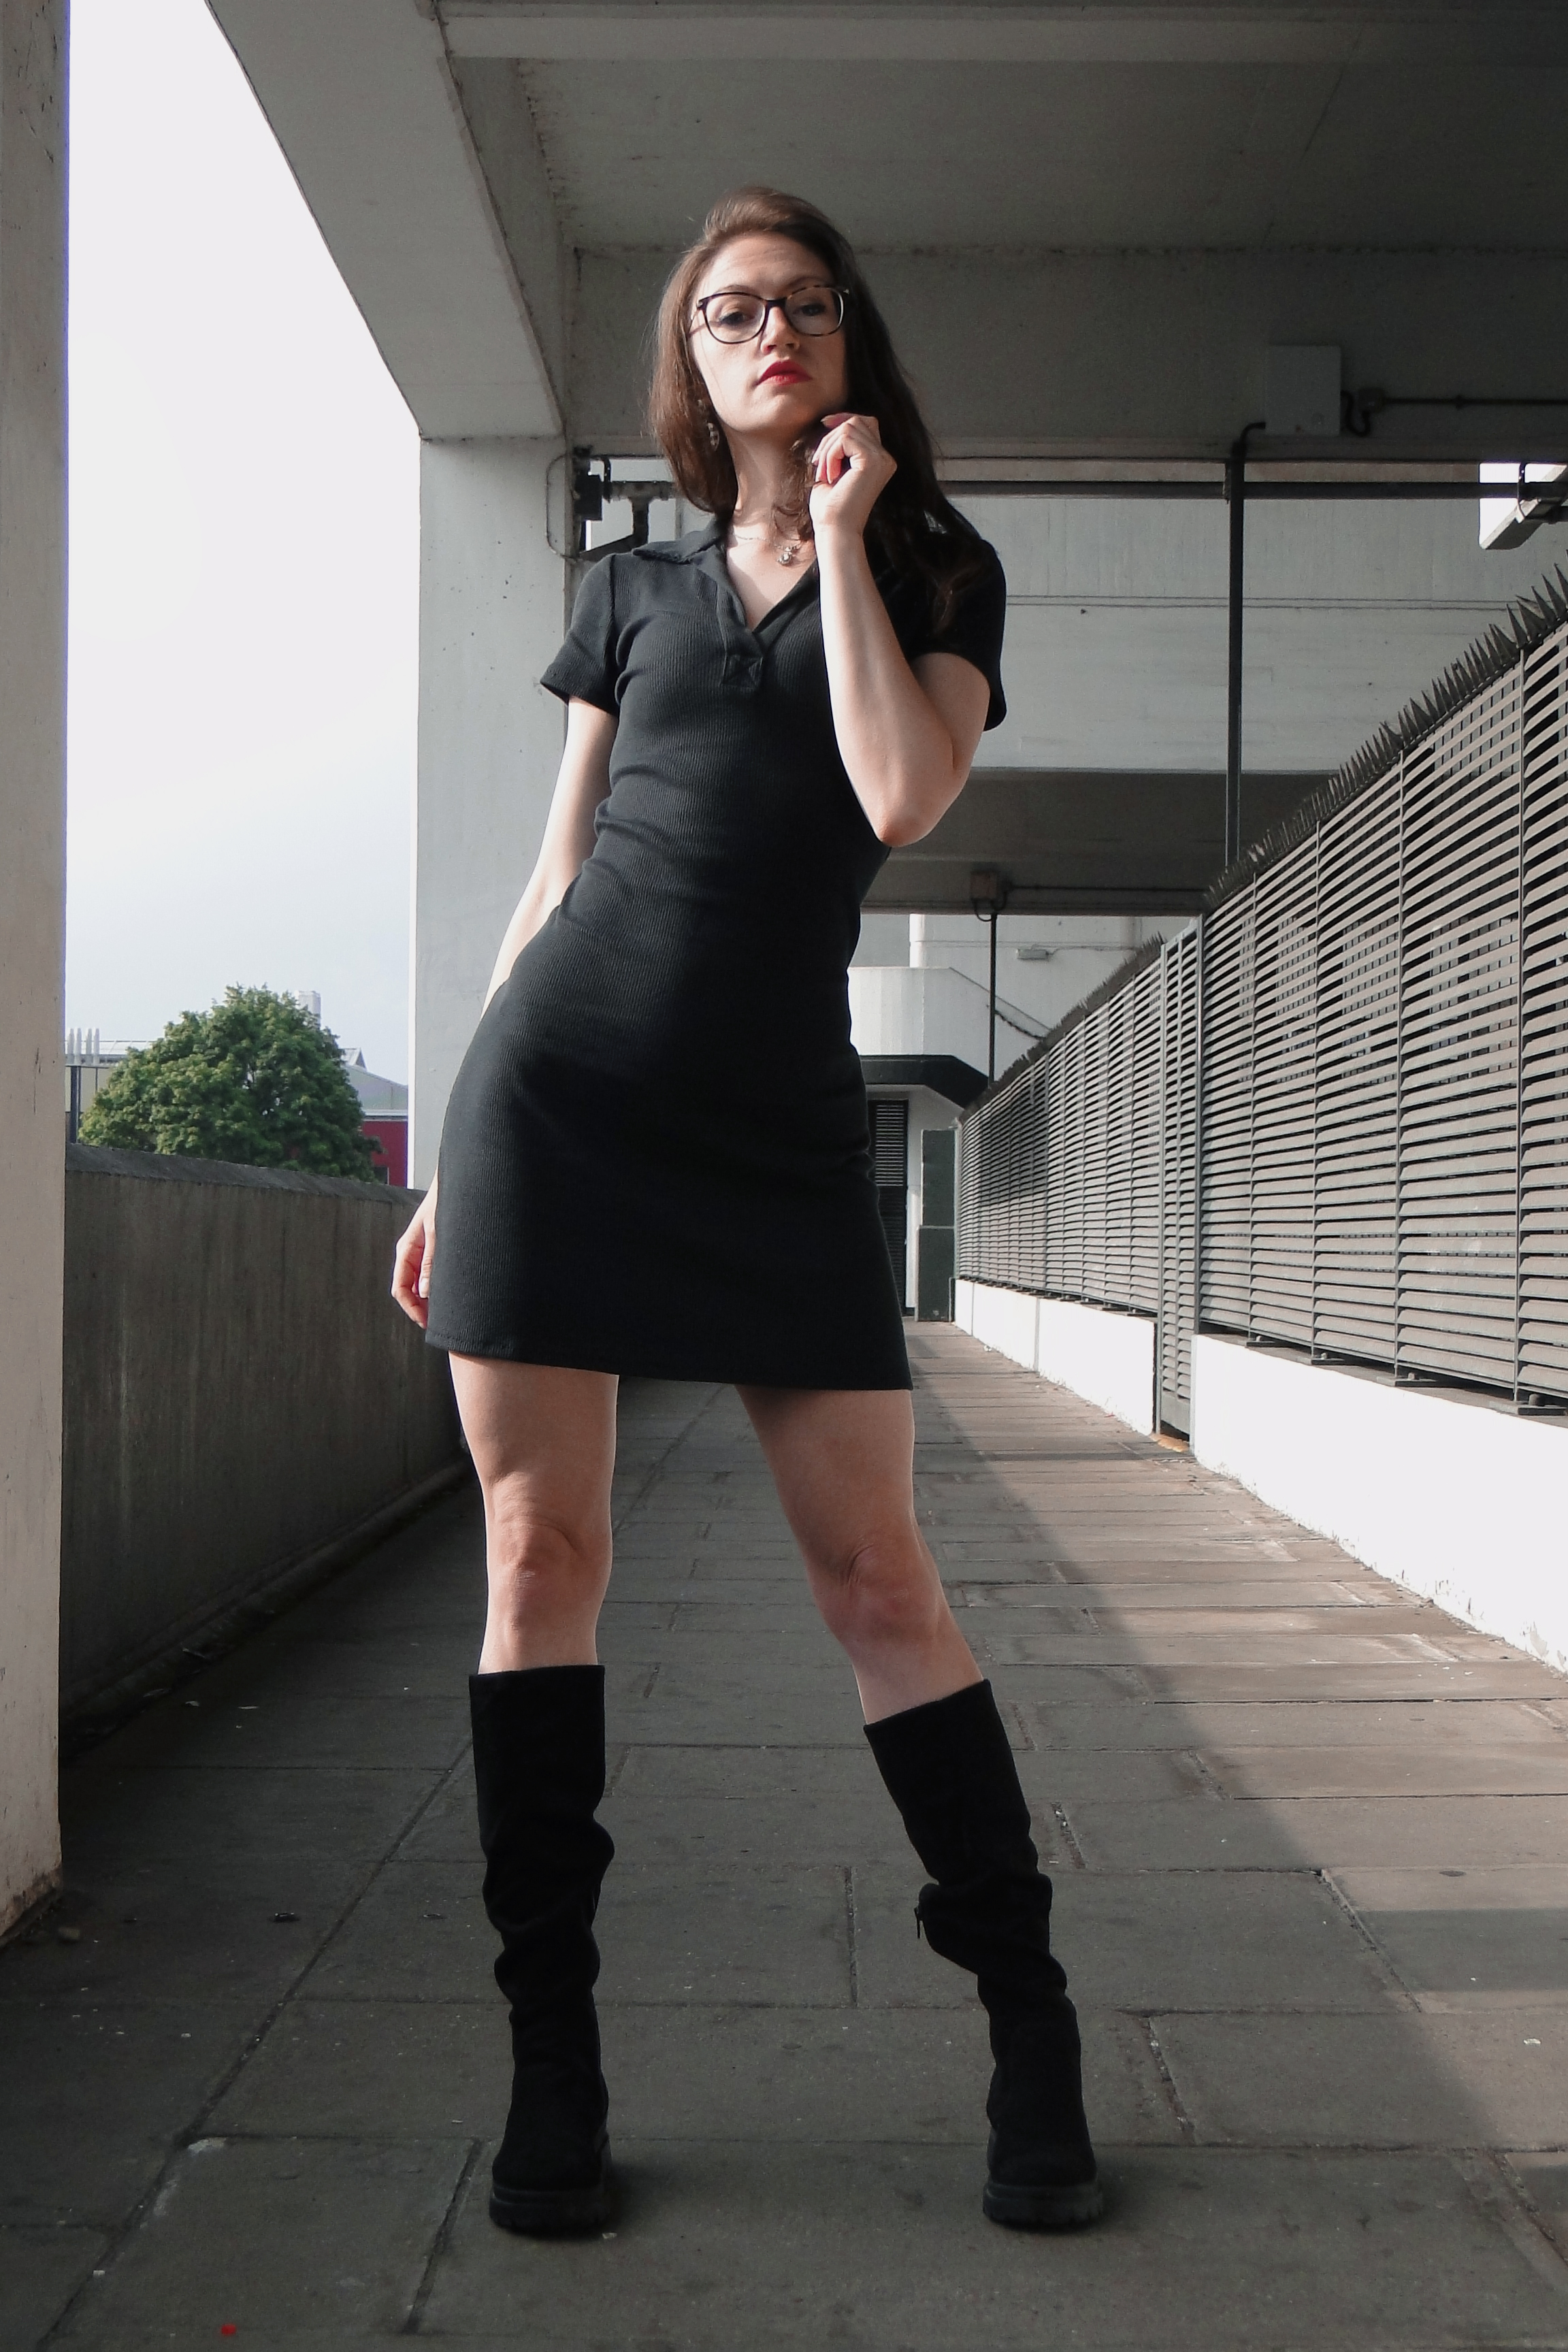
Before we get to sideseams though, let's chat about that placket. What a joy to make. The pattern doesn't mention using any kind of interfacing at all - is this just a vintage pattern thing where they assume we are all interfacing everything all the time anyway? Not sure, but I didn't have any stretch interfacing so I thought what the hell and swiftly glossed over the idea that we might need some stabiliser in the collar. Maybe the placket could have been a little crisper with the addition of interfacing, but there is no way anyone is going to be looking at it and thinking this. I am honestly delighted with the entire neck. When it came to pressing under seam allowances I was super super careful so as not to stretch out the fabric, and I handstitched the inside of the placket and collar so there was no chance of stretching. 


What else is great about this neckline is. No. Buttons. No. Buttonholes. Absolute party time! Can we just take a moment to celebrate how symmetrical that X is at the bottom of the opening? Pretty lush eh? 


I stitched the side seams by pinning them wrongsides together at 1.5cm then trying on and altering the pins as necessary. I'd got a really nifty fir at the front, but had the same old classic small back fit issues that I have with every single garment. So I did what any 2022 seamstress would do, and I totally cheated by adding a centre back seam/dart, starting beween my shoulders (widest part) then extending all the way down to my bum. There's potentail to overfit here, so I kept in my minds' eye what I wanted. Tight around the hips but still a little sway in the skirt. I spent a long while shifting pins around and puncturing my underarms in the process, but I got there eventually! 


I took 8cm off the length of the sleeves, hemmed them while they were flat with a zig zag stitch and used pattern paper under the machine foot to prevent over-stretching. I tapered what was left of the under arm seam inwards to prevent gape. Was this cheating or is this what sleeves do? I don't know but either was I was really pleased with the outcome. 


I stitched the hem in the same fashion as the sleeves, but this time used pattern paper on the top and bottom of the fabric to really get a glide. I was way too committed by this point to lose it all to a wonky streched hem! 


I love it. I love the simplcity of it, but also the technicality of the neckline. I love how it's sporty, but elegant. I love how it's short but still modest. I love how I could go play golf in it, and I could go to the fancy work party in it... I'm off to do both. C ya x 


x
Location: Arundel Gate Car Park
Currently listening to: Oh My God, P!nk

Sunday, 18 June 2023

Mood Sewciety, D'Arcy Bralette


I wanted to fine tune the fit of my second D'Arcy Bralette. This time round I cut a smaller size and slightly increased the side seams. I found cutting the smaller cup size removed the wrinkles around the top and bottom of the cup so definitely did the trick. 


I did find the cut of the underarms was still a little high so I again omitted the second pair of cage straps from the bralette. 


I paired two lovely stretch mesh fabrics from Minerva for this project, dotty for the outside and plain for the lining. I did find these fabrics (particularly the dotty) were a little more stable than the fabric I used for my my black bralette, this added a bit more structure to the bra but also reduced the stretch, making it slightly more of an effort to get it over my head! 


I chose to use ivory fabrics instead of white, which created a softer look against my skin, however I did only have white plush elastic for the straps. I think both the ivory and the white pair well with the gold rings and sliders I used though - adding a glimmer of elegance to my make. 


I had a vision that leaving a sheer panel in the bralette would look kinda cute and sexy, after toing and froing in my brain for ages I decided to go for it and just used a single layer of power mesh for the centre front panels. In hindsight, I think the bralette would have looked better 100% dotty on the outside. I don't think the placement of the cup seam is flattering enough when the cup is so blatantly divided. 


I do love the pairing of the two fabrics, and using them gave my chance to test out the stretch settings on my new sewing machine! I zig zagged pretty much all the seams and opted to french seam the side seams as suggested in the pattern instructions... I think the side seams came out really bulky because if this though and think leaving them flat and perhaps just topstitching close to the stithcing would have created a smoother finish. 


We live and learn though, so instead of rushing to make matching knickers this time, I have a couple more bralette patterns I would like to use the left over fabric on. I am also eyeing up this fabric in other colours (swit swoo to red polkadot power mesh!!).


I think this bralette looks super cute peeking out of the top of things, especially summer vests and open shirts. I'm a big big fan ofthe cage straps and hope I can incorporate them into my own patterns sometime. 

x
Location: Home Sweet Home
Curretly listening to: Stupid Girl, Garbage

Sunday, 28 May 2023

McCalls M8009, Playsuit

2022 was a bit of everything. The best year, the worst year, the most productive, the least productive, somehow growth and stagnation both at the same time. I look back on my 2022 sewing and I could stamp it with a big rubber stamp that says DISTRACTED - stay behind after class Ms. Holland.


And I'd be right. I was distrated, distracted growing into my house, distracted falling in love, distracted getting my heart broken, distracted playing badminton, distracted learning golf, distracted trying to learn how to swim, distracted writing songs, distracted letting men buy me dinner, distracted trying to get enough vitamin D, distracted recording songs, distracted getting a new job, distracted getting another new job. It's amazing I managed to get anything made really isn't it? 

I want to cut the crap in 2023. I know what makes me happy. It's making, it's learning, it's putting skills into practice. It's sewing, damn it! I wanted to launch the year with a new pattern I'd never made before that would likely need a few fitting alterations. I'm a big big fan of a playsuit (despite their obvious awkward draw backs), a chairty shop TopShop playsuit find was on heavy rotation in 2022 for various occasions. So I wanted to make my own! Having gained a bit of confidence in fitting crotch and legs after my Simplicity Amazing Fit trousers I felt ready to take the plunge. 


I used what I think was the last of the fabric from the backdrop in the Coco Don't video to make the toile. I cut to the bust size as this is where I always have fitting issues. I suspected, and was soon proved right, that this would cause the playsuit to be a bit short in the body. Visually, you could tell the crotch sat too high and it looked (and felt) pretty uncomfortable. The solution was easy - I added 1.5cm to the length of the bodice band. This meant it sat on my natural waistline and dropped the crotch lower. I also tapered the top of the inside leg seams out a bit where they met, so that the shorts were a little looser around my hips/bum. 


On the top half, I had to take a little out of the neckline to save it from gaping. It was only a teeny tiny bit - I just pinched about 1cm on the neckline of the paper pattern and flattened this towards the bust. When I cut the fabric I trued the new neckline so it was straight. 


The gathering on the shoulders and bust is a lovely touch to this pattern. I was worried it would look a bit bulky when the lining was gathered too but there were no problems. I moved the bust gathers towards the centre by about 1-2cm, as I felt the positioning was a little bit off on my initial toile that followed the pattern. I don't think this was any kind of poor design on behalf of the pattern design, more a case of me doing what I can to try and make my boobs appear bigger! 


Tacking together the side seams and pinning up the back it became quite clear I needed to taper in the side seams at the underarm so that the bodice wasn't loose and lumpy. I increased the seam allowance by about 1.5cm, grading out towards the bodice band. 

This floral fabric has been in my stash for 2 summers now I think?! I never quite knew what to make with it. It became obvious quite quickly that I wouldnt have enough fabric for the sleeves and I would have to use something different for the lining (delves into stash and comes up with some tan statin). I think this pattern was a really good match for the fabric. I added some lightweight interfacing to the outer bodice piece which I couldnt see any mention of in the pattern but I think it was a good shout. The pattern also calls for a 24" invisible zip... The shop onmy had 22", but when I put it in it reallly did feel like it was designed with 22" in mind so there were no problems there. 


The shorts ran a chance of being too short, but before I comitted to the length I compared them to the Topshop playsuit I'd been wearing and they were about the same length. I overlocked the raw edge and turned up a tiny hem. 


Lastly, as the sleeves were a no-go I opted for bias bound armholes. I dont actually ever recall doing bias binding before where the whole band is turned inside! It went well, the armholes definitely had the desired neat finish, but I 100% did not enjoy handstitching down on the inside. Next time I will make the armholes a little wider as I don't think I compensated quite enough for how much I lost by increasing the underarm side seam width. 


The pattern is really cute! I'm glad I was couragous enough to try the plunge neckline, the alterations I made definitely allowed me to get away with it. Looking forward to getting my pins out this summer! 


x
Location: Sheffield Botanical Gardens
Currently listening to: Universal Cinema, Gaz Coombes

Sunday, 21 May 2023

Simplicity 2860, Amazing Fit Trousers


I've been scared of trousers for quite some time. I've made a few pairs but I've always felt like I was cheating, big pleats and forgiving gathers. 


The Simplicty Amazing fit trousers were what I needed to tackle my fear. The pattern instructions include a lot of fitting tips, and the pattern is designed with fitting alterations in mind, for example the seam allowances are bloody massive and there is a seam in the centre back of the waistband to aid with pinching in or letting out as necessary. 


The toile I cut was a good starting point. It was a little loose on the waist and hips, so I increased the seam allowance but 0.5cm at the waist and a further cm from the hips onwards. I wanted to keep the legs straight, so I was careful not to over-fit at the hips. 

I was prepared to have to make some alterations in the lower back area as I am often needing to tackle a swayback adjustment, but I found the waist/ butt darts gave a good shape to my behind. 


The main fit issue was a found the trousers a little tight in the crtoch area. I did a bit of research and found I needed to deepen the curve in the crotch (which felt sort of counter intuitive as I associate increasing a seam allowance with making something smaller and therefore tighter), and alter the angle of the inside leg seams. This worked for giving me less of a wedgie but did seem to make the front crotch area a little overly spacious. But hey that's what toiles are for! Lots of messing about until the fit is good and the fun bit can begin! 


I may have over-deepened (is that a word?) the crotch seam, but it did work to my advantage - they ended up a little more high-waisted with that extra room which is exactly where I wanted to wear them. I had to be careful though, as any higher and I would definitely have had to alter the darts in the back to fit the curve of my lower back. 

Wearing them a little higher meant that I also had to be wary of the length! 2cm further up the hips meant 2cm higher up the ankle! Luckily there were no disasters, but I did make a slightly narrower hem to be on the safe side. I then blind hemmed by hand so as no stitching could be seen on the outside. 


I loved constructing the fly zip (even if constantly swapping to the zipperfoot was a pain!). I could have done with sewing the left side a little further from the zip teeth so that the tag sat a little more comfortably behind it, but if I wiggle it in after I've zipped up no one would know! Also I learnt when making my toile that the outside of the fly pieces need to be overlocked before inserting. 


One of the only downsides of this pattern, is there's no pockets! But I totally get that this means altering the fit is much more doable at any stage of making. 


What it lacks in pockets it toally makes up for with beltloop bonus points. It's very satisfying adding them into the construction of the waistband right from the off instead of fiddling about with them at the end. There's also the added comfort knowing that if for some reason they need a bit of help staying up you've got an extra safety blanket! 


Other satisfying features of the waistband include the hidden button and buttonhole inside the fly. I was sooo pleased with the buttonhole (new unpicker for smooth slicing and some fray stop before any threads started running). I bound the bottom of the waistband facing with a satin bias binding for a super neat finish. I fastened down with my neatest stitch in the ditch, which for the first time ever you cannot see from the right side and I did not need to unpick a thing. 


Finally, a little note on fabric choice. I would love to make million versatile versions of these trousers. I can see a plain black pair quickly becoming a wardrobe staple. When picking fabric though I need to be really careful not to pick something that creases easily (crease crotch is the worst), but not pick something so heavy or stiff that it chafes (also bad). If I keep the wide straight legs, cord might look a but juvenile (I've already lived through the 90s once thanks), denim would work but only if it had very minimal stretch so as not to alter the fit of the pattern. 


Really pleased with the time I put into altering the fit. I got these guys finished in time to start my new job. Meet your new boss. 


x
Location: Millhouses Park
Currently listening to: Somewhere They Can't Find Me, Simon and Garfunkel