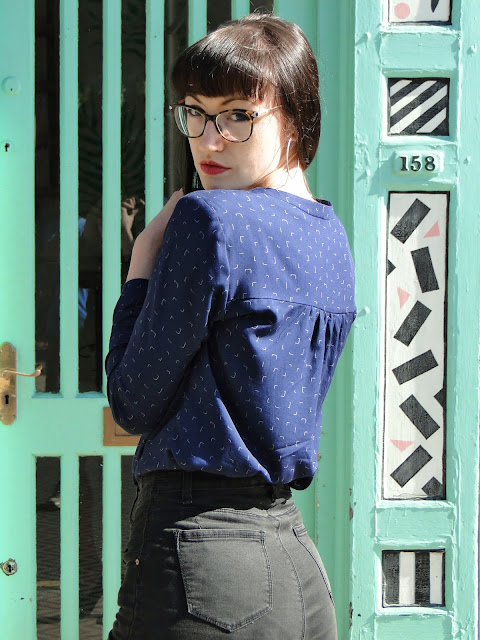
I cut a size 8 and made a toile to check fit. The blouse fitted nicely across the bust and around the waist but felt tight across the back, restricting movement a little. The sleeves were also a little snug around the elbow, so I set to making a couple of basic adjustments to the pattern.
To make a broad back adjustment, I first folded under the seam allowances on the paper pattern where the yoke and back met and taped them together so I could treat this as one piece. I drew a line about 2cm along the shoulder from the sleeve cap and another about 2cm below the armpit, then extended these to meet at a right angle. I cut along these lines and moved this shoulder section outwards. I used a shirt pattern I know fits well across the back to use as a guide for how far out to move the pattern piece. Comparing the pattern pieces I also realised I needed to extend the shoulder seam by another couple of cms or so and then redraw the curve from the shoulder point down to the double notches.
To match I made this same alteration to the front yoke piece- extending the shoulder and then redrawing the curve this time to the front notch of the armhole. I made a minor sleeve adjustment, adding just a little bit more fabric into the back sleeve cap to aid movement.
To make the sleeve width alteration I firstly marked on the seam line of my toile where the sleeve felt too tight- basically just the section around my elbow. On the pattern I straightened the curve on the sleeve seam so it was a straight line from underarm to wrist. This added a few extra cms where I needed them but didn't affect the fit elsewhere on the arm.
Onto my fabric choice... I couldn't have fallen more in love! I used this 100% rayon from the Cloud 9 'Business Class' range, kindly supplied by Bobbins n Buttons. The whole range is absolutely beautiful, but I chose this 'Business Class Coder' design. It's geometricity appealed to me as well as the print looking somewhere between an organised explosion of staples and a CSS coder's dream. This was before I'd even touched the fabric.... Wow, once it arrived I was falling all over again, the rayon was the perfect weight to make this drapey shirt- ideal to make the most of those gathered sections below the yoke. It also found it pressed like an absolute dream! The fabric had just enough stretch for me to stop worrying that I hadn't added enough extra fabric across the back and elbows and it wasn't prone to laddering which was a relief when it came to adding my snap closures. Honestly, I was so impressed I can see myself going back for the other designs in the range.
The pattern itself is easy to follow, though I would have appreciated a few more notches, at the shoulders for example, to ensure I was matching everything up properly. The pattern doesn't quite prepare you for how tricky attaching the front band around the neckline curves can be either! Due to my rayon being so well behaved it thankfully wasn't so bad, but when making my toile I found it quite tricky to match together the opposing curves at the neckline.
My advice for attaching the neckband would be go slow and be as accurate as possible! When stitching I started at the centre back and worked outward toward the front neckline. I would also recommend making sure you trim and clip your seam allowances to get the neatest finish.
The uninterfaced band is attached to the neckline first, then the interfaced band is sewn right side to right side before being flipped to the underside. I trimmed the seam allowances here too and then understitched the inside piece to the seam allowance. This stops the inside from rolling out and becoming visible from the front.
The band is then fixed by 'stitching in the ditch' around the neckline seam... Make sure you overlock the raw edge of the inside band first! In reality you can trim this by about 1cm as you overlock- as it is not folded under you end up with quite a large overlap over the seam on the underside if you don't.
Again I found it helped to start at the centre back then stitch out toward the front. I would also recommend just stitching sections to hold the underside down instead of stitching all the way around to avoid any pulling or rippling of the band.
The thought of putting button holes in the band after all that work went right through me, so I struck lucky when I found these pearl Prym snaps at my local market. They are in the Prym 'Jersey' range, so I was a little worried that for some reason they wouldn't work with woven fabric but it was fine! Always double check your snaps are the right way round before fixing them!! I very almost had a scary moment featuring a back to front popper that would have ruined the whole thing!!
The blouse fits well, the gathers below the yoke make it loose fitted, which I love for tucking into my work skirts... And works with my shorts too! I would recommend wearing a little cami or something underneath for work, as the neckline is quite low for something that loose.
Who else is making an Olive blouse? I want to see some more sassy fabric combos!
x
Location: Syd and Mallroy Devonshire Street, Sheffield
Currently listening to: The Drugs Don't Work, Verve


No comments:
Post a Comment