Pages

Sunday, 24 December 2023

So, Zo... Strappy Vest Top IV


This pattens a classic. Up there, slap bang in the hall of fame. Anyone who hasn't mads a So Zo vest top is missing a vital wardrobe staple.

What can I say that I haven't said before?

It's a fantastic scrapbuster - you only need a front piece and a back piece and a choice of finishing trim. 


It lends itself to pretty much any stretch fabric - T-shirt jersey, Stretch velvet (hint hint, coming soon), Rib knit (hint hint hint), a subtle change in trim can transform this pattern from daywear to night wear, outerwear to underwear. 

It's easy as pie to fit - Want it shorter? Make it shorter! Need it wider? Increase the width placing the pattern slightly further out from the fold, or by reducing the seam allowance.

Can't find a trim to match? Make your own band from your stretch jersey and apply it like bias tape. 

Its a simple pattern with a big impact. I wanted to make something cute to wear with my new BusinkaMania Luxe panties. I had plenty of this heart-print tshirt jersey in my kit, and thought it looked more underwear than outerwear for my style. 


The only problem I came up against this time was when I came to attach fold over elastic to the opening edge. It stretched out the back piece something chronic! I tried different tensions, using tissue paper to help the foot glide, different feet, tacking the elastic first, differnt stitch widths... everything was resulting in a misshapen back piece. I think essentially the presser foot was set too low, so the double thickness of the elastic, plus the stretchy nature of my fabrics was resulting in a stretch-fest. I googled for how to amend the foot height but couldn't see anything telling me what I was looking for - Any tips would be greatly received!

Anyway, to fix the issue, I swapped the fold-over elastic for a picot elastic trim and there was no more drama, it stitched like a dream and finished the neck edge nicely. 


To match my knickers, I used little gold rings to attach the straps. I left a bit of a tail end on the picot trim to thread through which avoided any bulkiness from the jersey fabric. I hand stitched the elastic after threading through the rings and found this looked a lot neater than previous attempts to stitch close to a metal ring with the machine (hands up who's broken a needle attempting that, and the looked at the machine in shock like that Pikachu meme when it transpires that you can't stitch through metal...? 🙋🏻‍♀️🤦🏻‍♀️)  


I'm really pleased with my little matching heart set 😊💕

x
Location: Home Sweet Home
Currently listening to: Same Airport, Different Man, Julia Jacklin

BusinkaMania Patterns, Luxe Bikini Panties


Lots have things have changed since I started this blog. I'm a homeowner, I seem fairly immune to feelings of sadness, I have a little crease line on my face clearly from smiling too much, I workout every morning, I box every week, I have less and less time to blog and take snaps of my makes but one thing that has stayed the same is my absolute love for Instagram as a source of inspiration and connection with other creative, likeminded people. 


Recently (I say recently, but as mentioned above, the turn around time from make-to -blog is getting increasingly extended), I received a message from Alyona from sewing account @BusinkaMania asking if I would like to test out one of the patterns from her site. 

BusinkaMania specialises in lingerie patterns, so naturally I was well up for an excuse to get the stretch fabrics and picot elastic out! The hardest part of course was picking a pattern, there are bra patterns, knicker patterns, garter belts and matching sets all available on the website. There's cut-aways and lace edges, front closures and back closures, thongs, briefs, shorts. So much choice! 


After going in and out of each pattern about 6 times, I finally decided on the Luxe Bikini Panties - a flirty pants pattern, designed with a scalloped lace edge around the bum, and a cheeky hi-rise leg accentuated by the front and back being attached by 2 metal rings. 

What's great about this pattern, is it can be easily adapted for different fabrics. I didn't have any scalloped edge lace in my stash, but I did have a meter or two of this playful, heart-print tshirt jersey. By omitting the centre back seam and changing the angle that the back piece is cut at, you can use any stretch fabric. Without the scalloped edge, it was just a case of finishing the leg holes off with some picot elastic. 

I used thie same trim around the top and the front leg pieces. The way the pattern is designed, means that by leaving a few cm of elastic at the tops of the front and back, you can thread through the metal rings and create a really unique shape. This also means no side seams! Yay! We like this a lot. I feel a side seam on a mesh or lace panty can really disturb it's elegance.

Another lush feature of these knickers, is the lace panel in the gusset. This again uses the scalloped edge of lace to create a cute little overlay in the gusset area. I had a tiny piece of lace in the stash suitable for this and I love the effect. I'm excited to try more contrasting fabrics to really bring this out as a feature next time I make a pair of Luxe. 


The pattern is a great scrap buster - this barely took any fabric at all, and can be paired with pretty much any bra pattern in the BusinkaMania range to create a super cute set. 

There are a couple of tweaks I would make to the pattern shape next time - I find the back panel is a little high-rise on my body, I like the shape but it comes up quite a lot higher than the front panel does on me. I would also maybe make the front panel a tiny tiny bit wider for a little more coverage (more coverage?? Like I say, things have changed a little since I started this blog 😅). The knickers are really comfy though and definitely the type of style I would wear.

The pattern comes as a printable, multisized PDF, and there is a fully comprehensive instruction video for each pattern on the Businka YouTube channel, where you get the pleasure of Alyona's lovely accent guiding you through the construction. 


I'm really pleased Alyona reached out to me and invited me to have a go at one of her lovely patterns. There are also looooads of sewing tips on the instagram page so well-worth a follow even if lingerie isn't your thing 🖤 


x
Location: Home Sweet Home
Currently listening to: Speedway, Morrissey

Wednesday, 8 November 2023

Self Drafted, Gold Leather Skirt

The dream would be a 6 month summer sabbatical, hiding in a beautiful home nestled into the layered landscape overlooking Matlock, Derbyshire. I would wake up early every morning, make a coffee and a bowl of kellogs then head to the studio, naturally lit by Peak District sunlight. I would wear an oversized artist shirt and a cute neckerchief, I would have a paintbrush in one had always and I would wear comfy mules on my feet. I would sit out in my leafy garden and look down onto glorious Matlock Bath, I'd go down to the town to buy my baguettes and try different flavour ice creams every week. I would sew sew sew every day. 
However, I'm not sure I can get a 6 month sewing sabbatical right now, and I'm not sure I can afford a 6 month stay in a holiday home in the hills. I did get in a cheeky visit to Matlock this summer though, and it was glorious as ever. The Identity Store were hosting their leathercraft fair at Matlock town football club again, so I used this as an excuse for a daytrip with Mark. We had a great day, eating ice cream, hunting in the antique shops, admiring the scenery, AND turns out he's very fun to shop fabric with. 
I was drawn to absolutely everything shiny at the fair, I had to try and focus my practical head to think which leathers would go through my machine without causing breakdown and what would hang right as a garment. Thankfully Mark had bought his practical head while I ran round stroking everything that was gold, and he helped me pick this textured gold, lightweight leather. It's super soft and has a nice drape to it whilst still having all the tough sturdy qualities of leather. The texture of the leather allows it to shimmer in different lighting. 


You're going to roll your eyes - Yes Angela bought some lovely leather and made another mini skirt. Let me tell you how this one is different. I used the New Look 6843 as a base pattern again - I love love the double darts in the back, I have quite a small back so always find the double dart flattering. For my toile, I cut the A-line pattern in a size 10 instead of the straight skirt. It fit well, but the shape just looked a bit comedy on me. A bit like I'd float with my parachute skirt if you threw me up in the air. I did some tweaking of the shape, I wanted to keep the soft roundedness of the hem, and keep some of the A-line flair, but I relaxed this quite substantially. I added 0.5cm to the seam allowance at the hips and made the overall skirt a little shorter. 
The silhouette of the pattern was already starting to be recognisable as my body shape. I thoguht this would really be accentuated by omitting the waistband, and instead making a waist facing that sat inside the skirt. I've never done this before, but I applied my logical brain again. I liked where the skirt was currently sitting on my waist, so I added 1.5cm to the top as a seam allowance. I then traced the top 7cm of the skirt pieces to form a facing band. I closed up the darts on the band so the pieces were curves that would fit into the top of the skirt once the darts were sewn up. 
I then created a lining piece to hang from the facing in the inside. To do this I took 7cm off the top of the skirt pattern piece, added 1.5cm for a seam allowance that would attach to the bottom of the facing band. I took an inch off of the lining length so it would hide away inside the skirt. I traced the bottom of the darts onto the lining pattern piece, but instead of sewing the triangles in, I created tucks instead. This creates the right shaping so it fits inside the skirt and to the band as it should, but allows for a bit more movement, which is what you want in a lining really. 


I assembled the lining before cutting the leather (because I was scared to cut obv). I overlocked the back raw edges before sewing any seams, and overlocked the top raw edge after I put the tucks into stop any fraying. after sewing the side seams and centre back seam up to the zip notch, I hemmed the lining (turned under 0.5cm then another 1cm) so I didn't have to faff with this once it was attached to the skirt. 
Feeling warmed up now, I dared cut the leather. I fit the front, bands and one back piece out of one hide, then the second back piece from the other piece I bought. It feels odd, but you can be much more flexible with cutting lay plans as leather doesn't have a grainline the same way fabric does (go on leather officianados, tell me how there's a right and wrong leather cutting direction....). What I'm trying to say, is I still have enough leather left to add some accents or panels onto something else cool... Gold panelled matching jacket anyone? 
Making the skirt was quite straight forward now as I'd put so much work into testing the toile. Darts, side seams then attach facing band (right sides together then flip it to the inside). I stitched everything with a layer of tracing paper in between fabric and machine. I felt my new machine was a little more forgiving than my old one and probably wouldn't drag so much, but I didn't want to risk anything. The tracing paper helps the machine glide over the fabric and makes for neat stitches :) I understitched the facing to the seam allowances at the top to help keep it in place, and then attached the top of the lining piece to the bottom of the facing band. 
I'm not sure if it was because of the gold coating, but I found this leather pressed realllly nicely. I made sure I used a pressing cloth as all times - Imagine all that gold melting onto my iron!!! The darts and seams all looked so so much neater. I was feeling very encouraged at this point! 
Inserting the zipper was easy as pie. I used clips to hold it in place, and used a 1.3cm seam allowance, as the leather was bulkier than my toile fabric and I was paranoid that was going to alter the fit. I stitched the bottom of the centre back seam after inserting the zip, which made it easier to get in and assemble everything flatly. To attach the lining to the zipper, I turned the skirt inside out, lined up the edge of the lining with the inside zip edge, and using a zip foot, sewed close to the zip teeth. I clipped the top corners and turned the right way out. This worked well, although the top of the zip opening is a bit bulky - however I was expecting this due to the nature of leather seams! 
And then here is where I cheated. Am I ashamaed? A little? Am I proud of myself? Well, yes. Would I do it agian? In heartbeat. Due to the drapey nature of the leather, I was more than ready to turn up a 1cm hem and stitch it. I went round the bottom of the skirt with my clips, clipping up 1cm and thinking YES this looks great. I got sat at the machine, ready to hem, when fear suddenly struck. What if it stretches? What if the stitching line is wobbly? What if having visible stitching just looks a bit pants? SO, I glued it. Yes, glue. Throw me off of the Sewing Bee, exile me into a pit of sewing cheats. I don't care, cause I'll be wearing this super sassy gold skirt with a beautiful, stable, flat, invisible hem 😘 
I love it. I really love it. The fit is absolutely perfect. I am going to draw the pattern pieces up on card so that I can use them over and over. It will be so versatile. Helllllloooo plaid Autumn skirts. 
The only one thing I totally forgot in my leather excitement - I'd gone very off-piste from the pattern and didn't refer to the instructions at all - This lead me to totally forget to interface the facing band. I'm hoping, that due to the nature of leather being sturdy and stable, that there will be no negative comeback from this after I've worn the skirt a few times. It's keeping its shape nicely so far - but next time deffo add a bit of interfacing onto that band for assured stability Angela. 
I love that I've made a skirt that I love as much as I loved the day I bought the fabric. Who's ready to dazzle? 

x
Location: Broadfield Road, Sheffield
Currently Listening to: Leadlight, Julia Jacklin

Sunday, 3 September 2023

McCalls 7626, Playsuit

2023 is proving itself to be the year of the playsuit. After falling hopelessly in love and making two McCalls 8009 playsuits in quick succession, I started eagerly browsing for my next potential playsuit pattern. 
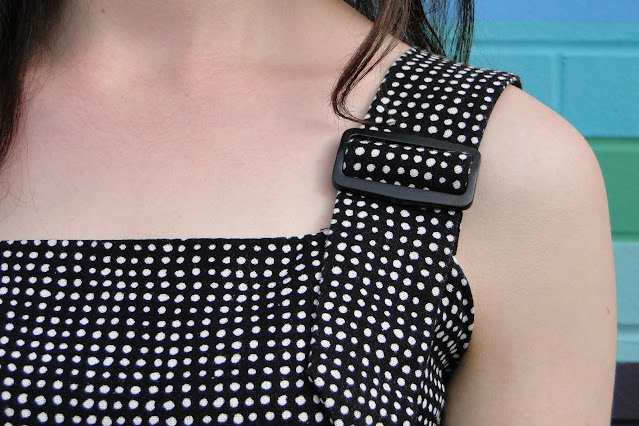
I landed on the McCalls 7626 pattern, with dress, jumpsuit or playsuit variation. I was a little concerned the top could look a bit boxy with its straight neckline and rectangular straps, so knew fitting in the bust area was key to avoid looking oddly angular. 
I made a toile from an old duvet case and made a few subtle tweaks to the pattern. I increased the seam allowance by 1cm (so therefore taking in 2x 2cm) at the underarm and graded back out before the seam hit the waistband. I was concerned that taking in some of the side seam in this area could have made the arm hole too small, so I extended the armhole by a cm at the back and then moved the strap markings over by 1cm too. This seems to do the trick! 
I increased the side seam allowance of the shorts by 1cm at the hips down to the hem. I added this alteration on to the front, back and side panel (/pocket) pieces. 
I added 1.5cm to the top of the inside leg seams (front and back) making the crotch length longer, then graded this down to the hem. This makes the pattern piece more angled instead of being a straight line from crotch to hem. 
Following this, with a bit of trial and error I deepened the crotch curve in the front and back. This can be tricky as the more the curve is deepened, the more you need to clip to allow the curve to actually curve. Of course you don't want to clip too deep during the trial and error stage incase you've over-deepened the curve - then you can't go back! I need a little more guidance on how to not just wing this process and actually apply some alteration wisdom to how deep the curve should be. 
I cut 2.3cm from the bottom hem of the shorts, then hemmed as detailed in the pattern instructions - by turning under a 2.5cm hem and then turning in 6mm from the raw edge. 
In terms of construction, I decided to interface the straps of my playsuit to a) prevent them from stretching out b) help them keep their pointy form and c) add a little more thickness to help them keep their place in the sliders. I was surprised the pattern didn't recommend this. I would 100% do that again. 
I also interfaced the entire back pockets before stitching them. I knew I wanted to have a go at adding some interesting topstitching. I wanted nice crisp lines around the edge of the pockets and I wanted my top stitching to land neatly. I think interfacing really helped with this, particularly when pressing the edges of the pockets into position. 
My top-stitch design was pretty basic, but I'm really pleased with how neat and symmetrical the pockets are as a pair. I want to pluck up the courage to make a more personalised design, turning my initials into a more abstract form or something. A little something to think about before my (inevitable) next playsuit. 
While we're on the subject of the back pockets, I don't know if I have a weirdly proportioned booty, but the suggested pocket placement of the pockets on the pattern was waaaaay off. Thankfully I didn't jump right in and put my pockets on while all my pieces were still flat and unassembled. This would have been easier, however I was waiting for my topstitch thread to arrive in the post and I was too impatient to put the project in hold. This was a blessing in disguise, as when I came to attach my pockets onto my fully assembled playsuit, I found the pattern markings were way too high and the pockets would have sat awkwardly on my lower back. Has anyone else found this? I moved them down by about 2.5 inches after pinning and assessing. I will make this change on the pattern pieces. 
I decided to use a contrast fabric in the side panels, as I thought this would break up the dotty print of the fabric and help show off the design, and also knew that a contrast panel in the side would look flattering for my figure. 
For the pocket bags I used the satin lining that I lined the bodice with. This fabric was well behaved, and I quite enjoy its silky sheen on the inside. 
The straight lines of the neckline lend themselves to some top quality understitching to hold that lining in place. 
I pinned, tacked then stitched the invisible zip into the back. Here my one error became obvious - I should have overlocked the back raw edges. The lining only covers the bodice and waistband edges, meaning that below the band to where I overlocked the crotch seam too was still raw after inserting the zipper. My fabric was fraying hard at this point after so many try-ons, but I couldn't get the overlocker over the zipper to catch the raw edge of the fabric. To save it, I used a modest zig zag stitch from below the waistband to the end of the zip placment which stopped the fabric from shedding any further. 
I love my little rompersuit! I'm so pleased with the fit and I like the chunky straps way more than I thought I would. I quite enjoyed not committing to a strap length by using the sliders too haha! 
Next 7626 has gotta be a denim one with some goldy top stitching right? 

x
Location: Nether Edge, Sheffield
Currently listening to: I'm Gonna Catch Me a Rat, Fabienne DelSol

Sunday, 9 July 2023

McCalls 6469, Polo Neck Dress Hack


I'm a bit scared of vintage patterns. There I've said it. I heard rumours their sizing is different to modern day. I'm scared old paper will fall apart instantly with my touch. I'm scared old symbols mean the opposite of new symbols. With this in mind tho I do always have a rifle though the old patterns in vintge shops and charity shops, never knowing what you might find. 


This pattern was inculded in a bundle in my local charity shop alongside other retro work-out patterns. Without being able to delve in and check all the bits were there I bought the bundle, confident that whatever I found inside I would be able to do something with. 


The McCalls 6469 was instantly my vibe. Lil shorts, sporty polo neck, customisable joggers and a hoodie to match. I set to work having a look what was inside the packet. Everything was still intact, but ohh no, that's right, multi size patterns were still a thing of the future when this pattern was made. OK check the size guide........ bust size looks good, hips look err, narrow OH WAIT it's a junior's pattern haha!  


Undeterred by this revelation, I decided to pull out some of the stretchiest rib knit in my stash, take some careful measurements  and proceed with caution. At the very least I'd get to have a bash at making that polo neck placket, even if I ended up with a garment too small.  


As I was likely going to be lengthening the pattern anyway, I decided to throw caution to the wind and extend the top into a dress. I added length and, I won't lie, completely estimated what hips looked like - erring towards overestimating so that I had enough to pin when the dress was on, and find my fit.
 

Before we get to sideseams though, let's chat about that placket. What a joy to make. The pattern doesn't mention using any kind of interfacing at all - is this just a vintage pattern thing where they assume we are all interfacing everything all the time anyway? Not sure, but I didn't have any stretch interfacing so I thought what the hell and swiftly glossed over the idea that we might need some stabiliser in the collar. Maybe the placket could have been a little crisper with the addition of interfacing, but there is no way anyone is going to be looking at it and thinking this. I am honestly delighted with the entire neck. When it came to pressing under seam allowances I was super super careful so as not to stretch out the fabric, and I handstitched the inside of the placket and collar so there was no chance of stretching. 


What else is great about this neckline is. No. Buttons. No. Buttonholes. Absolute party time! Can we just take a moment to celebrate how symmetrical that X is at the bottom of the opening? Pretty lush eh? 


I stitched the side seams by pinning them wrongsides together at 1.5cm then trying on and altering the pins as necessary. I'd got a really nifty fir at the front, but had the same old classic small back fit issues that I have with every single garment. So I did what any 2022 seamstress would do, and I totally cheated by adding a centre back seam/dart, starting beween my shoulders (widest part) then extending all the way down to my bum. There's potentail to overfit here, so I kept in my minds' eye what I wanted. Tight around the hips but still a little sway in the skirt. I spent a long while shifting pins around and puncturing my underarms in the process, but I got there eventually! 


I took 8cm off the length of the sleeves, hemmed them while they were flat with a zig zag stitch and used pattern paper under the machine foot to prevent over-stretching. I tapered what was left of the under arm seam inwards to prevent gape. Was this cheating or is this what sleeves do? I don't know but either was I was really pleased with the outcome. 


I stitched the hem in the same fashion as the sleeves, but this time used pattern paper on the top and bottom of the fabric to really get a glide. I was way too committed by this point to lose it all to a wonky streched hem! 


I love it. I love the simplcity of it, but also the technicality of the neckline. I love how it's sporty, but elegant. I love how it's short but still modest. I love how I could go play golf in it, and I could go to the fancy work party in it... I'm off to do both. C ya x 


x
Location: Arundel Gate Car Park
Currently listening to: Oh My God, P!nk